It’s been SO long since I posted but my blogging time was replaced by sewing time for the past two months. My youngest son was just married and I had the joyous task of making the bridal gown, my gown, altering 3 bridesmaid dresses, adjusting three suits and restyling my mother-in-law’s gown ( I had made for her many years ago from fabric purchased in Paris). Sounds like I had my hands full.
Details of the bridal gown are coming soon but here’s a preview of the newlyweds.

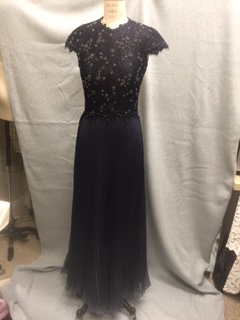
My new daughter-in-law chose navy and silvery gray as colors. I persuaded my husband to go fabric shopping for my dress and we wandered into Mendel Goldberg Fabrics in NYC. If you’ve shopped there, you know the exquisite things they have and the exquisite prices. I thought hubby was going to seize, but one yard was easily enough for what I had in mind and the total price of the dress would be far, far less than anything I could buy. His response was “go for it!”

The bodice draft began with design lines taped onto my body double dress form. Muslin draping was cut and formed to follow the design lines and the pattern created.


I often play with layers of fabric to achieve the desired effect. After trying various combinations of nude tone silk organza, black organza, black cotton tulle and black silk tulle, I decided to use one layer of nude organza, one layer of black cotton tulle and two layers of silk tulle. The fabrics provided the necessary opaqueness and support for this heavy beaded lace.


Beaded lace doesn’t cut well so I opted to construct the underlayer and drape the lace over, adding handstitched applique darts where necessary.


The front princess seams needed support but my favorite spiral steel boning was too rigid. I often use narrow horsehair braid which I stretch and steam to made it narrower and stiffer. The horsehair is inserted into the front seam and provides the right amount of shaping without looking unnatural. Spiral steel was used at the side seams for additional, flexible support.


To finish the cap sleeve edges, I cut the scalloped edging and hand appliqued it on. There was just enough scalloped edge to finish the neckline but none left for the edges of the cut away back. Buying more yardage for this would have been ludicrous! From the scraps I was able to cut beaded circles and appliqued them along the back edges. The excess tulle was trimmed away.


All this detail work required hours and hours of hand sewing. I entertained myself by setting up my sewing in front of the TV on election night and watched the totally unpredicted results flow in. Now I know what my readers in the UK must have experienced with the Brexit vote. Hopefully our new president will be good for this country and the world.
For the skirt I chose a sheer polyester chiffon and had it professionally pleated in a sunburst pattern. Use polyester, NOT silk. The pleats won’t be permanent in silk. I had a discussion with Lisa at International Pleating and they don’t recommend silks unless you plan to wear the garment in a dry environment and are prepared for the upkeep. As this was for an outdoor beach wedding, silk seemed a poor choice. This service is more accessible than you might think. I took my yardage to Tom’s Sons International Pleating in NYC, although you can also ship fabric to them. They have a wonderfully helpful yardage calculator on their website and your pleated fabric is shipped with explicit instructions for seaming the panels together. Shop the Garment District has more info on her blog about this company. I asked for the waistline seam not to be cut (the inner circle when you draft a circle skirt) as having the fabric at the point makes it easy to hang and store your pleated yardage until you are ready to work on it.


I found it easiest to locate the “inside fold” (read their seaming directions) and thread trace the fold. Do this on both sections and then baste together before seaming. Make sure your work is absolutely flat to avoid rippling along the seam. The skirt was lined with a separate skirt of metallic silver gray charmeuse. The bodice and two layers of skirt were joined and the scalloped edging covered the seamline.


Hemming took some time. A wonderful feature of a professional style dress form is that you can raise the form so the skirt hangs free of the base and you aren’t marking a hem while lying on the floor. A yardstick rubber-banded to a heavy jar made a wonderful marking stick. The hem will flare out when stitched so allow an extra 1/2 to 3/4 inch in length to compensate. A few shots of close-up views:


We had the joy of bringing our son to the chuppah and celebrating his marriage. Wedding gown production is next.

The rehearsal dinner was also a beach affair and I made a white lace tunic, idea courtesy of Julie and Sarah of The Tunic Bible. White cotton lace was underlined with skin tone cotton.


I used darts in the back underlining but eliminated them in the lace layer. White linen formed the placket and collar and all seams were finished with narrow binding. I wore this with skinny navy pants for a comfortable night on the beach.
Thank you for this amazing update; I could read your posts the whole day long. Would that I could also sew at your level the whole day long…..
Cheryl Lewis
Thank you. Don’t be afraid to tackle advanced projects. If you break down the construction into manageable parts it doesn’t seem so difficult.
Wow! Beautiful work! So inspiring!
Thank you. Glad you enjoyed.
Wow! Fabulous dress and thank you for taking us readers through the whole process. Love your hem marker 🙂 . I’m getting a kick out of seeing the gorgeous bride and equally gorgeous groom with their well shod feet buried halfway in the sand.
Thanks. Yes the dichotomy of semi formal wear on a beach was an intriguing concept. There is actually a dress code of “beach formal” which they wanted. The wedding guests all commented on how much “a fun wedding” it was.
Stunning. Gorgeous. Perfect. Love the rehearsal dinner tunic, too. Looking forward to the next installment.
Thank you. I had fun in spite of all the work. It was a labor of love.
What a divine outcome! Fascinating to read about the creation process too. Formal wear is definitely where sewing gives back the most 🙂 Fabulous lace – you look great! Looking forward to reading about the many other garments you made – and a big congrats to your son and new daughter in law 🙂
Thank you. I miss your posts but know how busy you must be with a little one.
Such a stunning dress. Your planning and organizational skills are impressive! Thank you so much for sharing your sewing techniques with us.
Thanks. It was definitely necessary to have a timeline to assure everything was completed on time.
Lovely, lovely! Can’t wait to hear more about the additional garments.
Thank you. More soon.
Such a beautifully constructed dress and your tunic was very cute!
Thank you.
I hate to be redundant… but, WOW! Your dress was truly exquisite!
Thank you.
Thank you for sharing the process of making your beautiful dress. Whatever that beaded fabric cost it was worth every penny!
The fabric was inspiring to work with. I always enjoy beautiful fabrics; makes sewing more fun.
Amazing! What a beautiful dress. I loved reading all the fascinating construction details, too. Looking forward to the next installment.
Thank you. Next post coming soon.
Always a joy to read and see all your stunning couture work.
Congratulations on your stunning outfit. Looking forward to seeing the details of the beautiful wedding dress.
Wishing your son and his new wife a lifetime of happiness.
Congratulations to your son and daughter-in-law. I look forward to reading the rest of your posts, too. Your dress was beautiful, thank you for sharing your tips – always so helpful. Gorgeous tunic, too. I had to do a bit of reading to find out about the chuppah – a fascinating diversion! I love your professional style model. This coming year I will be doing more for me and need a better model my size and shape.
Thank you. Your experience of making your daughter’s wedding gown was wonderful to follow. The dressmaker’s form is so useful and I’ve tweaked it for a better fit. However much time you spend getting the form perfected will be well spent.
Once again, I find you to be absolutely amazing! Congratulations on your son’s wedding. I had no idea fabric could be professionally pleated. Your Mother of the Groom ensemble is beautiful, Mary! I’m flattered that you chose to sew from The Tunic Bible for the rehearsal dinner, and like everything you make – it is exquisite 🙂
I look forward to reading about the wedding dress.
Wedding gown post will be coming soon. The tunic was perfect for a beach affair and I received many compliments. I have a few more in the planning stage. Thank you.
What a beautiful dress and tunic! I can never even imagine doing this. Can’t wait to see the other dresses.
Glad you enjoyed. Thanks.
Wow! Your lace tunic was the perfect touch for the rehearsal dinner. But your MOG dress takes the cake. Just stunning. BTW, you were brave to allow your husband in M-G. I don’t think mine could take the shock!!
Cissie
Thank you Cissie. My husband is actually very good about my fabric shopping. He only gets frustrated when fabric “ages” too long. I’ve seen some of your stunning creations and know M-G is a favorite of yours also.
Congratulations on your son’s wedding! It looks like it was a fun day. Your dress is absolutely gorgeous. Thanks for such an informative, step-by-step post. I love to see the creative/construction process in making such wonderful garments.
Glad you liked it. I also enjoy seeing the process other sewers use.
Both are absolutely stunning. The only way I know you did not upstage the bride is that you made her dress as well (which I can’t wait to see)! Your husband’s comment in MG is a delight! (My husband would have been equally supportive.) Congratulations to your son and to your entire family!
Glad you liked. Post of the bridal gown is coming. I take my husband fabric shopping often and he does appreciate the value.
Stunning outfit! Nothing you could buy would fit so beautifully or be made so well.
That’s the primary reason to sew. It’s nearly impossible to duplicate the quality of fabric and workmanship. Thank you.
Seeing all your photos, I am drooling and saying out loud, “And then” scrolling down to see every step. Especially loved the tip to use horsehair braid as boning in combination with steel boning on the sides. I’ve seen pre-pleated fabrics before and I think if they are the kind with the paper underneath…the paper itself would be a gorgeous addition to a blank wall! Many blessings to your son and new bride and I too look forward to seeing her dress and the steps you took to achieve the gorgeous finale!
Thank you and glad you enjoyed this. I think you will also find the bridal gown construction post interesting. I’m sure it can be easier to start from scratch than do the remakes like you do.
Seeing all your photos, I am drooling and saying out loud, “And then” scrolling down to see every step. Especially loved the tip to use horsehair braid as boning in combination with steel boning on the sides. I’ve seen pre-pleated fabrics before and I think if they are the kind with the paper underneath…the paper itself would be a gorgeous addition to a blank wall! Many blessings to your son and new bride and I too look forward to seeing her dress and the steps you took to achieve the gorgeous finale!
Thank you for the compliments. I’ve discovered my version of horsehair boning is much more flexible than Rigelene yet gives the same results. The fabric is sandwiched between layers of paper, pleated and heat set. The pleated paper is interesting also.
I’m breathless.
You are a master. Exquisite taste is an understatement when it comes to your magical, thoroughness.
Just beautiful Mary!
Mazeltov! Is that the right word???
Thank you. Yes, Mazel Tov is the appropriate term.
Wow ! Looks amazing
Thanks. I hope you like the next installment.
Oh my goodness! I have just started using a showing machine and seeing what you can do is amazing!
It must have been so stressful, but so worth it in the end 🙂