Our family is in wedding mode. We gathered in Miami this past weekend to celebrate our nephew’s marriage. I also finally got to meet Sarah of Goodbye Valentino in person! We have been following each other’s blogs for several years and I was invited to do a guest post for the launch of “The Tunic Bible.” I wore an ankle length tunic to the welcome party around the hotel pool; very appropriate attire.

The tunic fabric was purchased in Mood several years ago. It is like raffia but much softer and woven with a knit backing. The fabric is quite flexible and extremely comfortable. I used my master tunic pattern and was able to eliminate the back waist darts and incorporate the shaping into the side seams.
I enjoy having my garments look clean and finished on the inside. All seams were bound with narrow strips of bias cut china silk. I attached them with hand sewing; much more elegant and softer than machine stitching.


The side vents and hem were invisibly slipstitched, catching only the knit backing, to prevent them from flipping to the right side. The collar band was faced with a scrap of gold toned silk charmeuse.


The challenging aspect of this project was to work the trim (also purchased at Mood Fabrics) so it looked custom shaped for the neckline. The neckband trim was arranged so that the motifs were symmetrical at center front and front neck opening pieces were mirror images.

Removing the unwanted beads and stitching was tedious to say the least as I didn’t want to damage the net backing. It would be needed to back the bald areas and prevent beads from sinking into the textured fabric. Save the removed beads for later.

To create a neat finish at the lower edge I stitched silk organza in the desire shape to face the edge. Hand stitches here; machine stitching this would have been impossible to control. Turn and trim the organza.
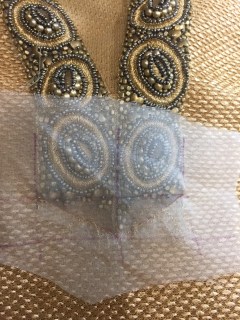


Fill in the areas with saved beads and it looks like a custom shaped trim.
Next up will be the gown I created for this black tie wedding. Sarah just published pics of her stunning outfit; be sure to take a look.
You truly did a magnificent job, inside and out!
Love seeing the beautiful work you do.
Absolutely beautiful! I love all the little details inside of your tunic and the beautiful trim. I always look forward to your posts, they are so educational and inspiring.
Glad you find the info helpful. Thank you.
You look so happy and relaxed in your beautiful tunic Mary. The trim is exquisite. Just another lovely piece of work.
Thank you Kate. The trim was was fun to work out.
A beautiful tunic! I love seeing all the details of your magnificent work.
Stunning, inside and out!
Very beautiful inside and out.
Thank you.
Mary, what a beautiful dress — you look absolutely gorgeous wearing it. I also love reading your posts and appreciate all the detailed information you share with us.
Thanks. Glad you enjoy reading about the details.
This is a lovely dress – and of course the interior finishing is drool-worthy! I think that I’m going to have to consider a tunic-style (which I love) dress for the fall cruise this year. I’m hoping to be able to make one from a travel-worthy fabric with all the finishing inside as you’ve done. Any suggestions about fabric type for a full-length tunic that is packable and yet will look elegant?
Thank you. Knits are always very packable. This fabric rolled up well, I think because of the knit base. Wool knit is wonderful to use. There are many tropical weights, especially if you search for merino, that wouldn’t be too warm. Another idea is linen knit. I have several dresses from it and they don’t wrinkle; nothing like woven linen. I’ll look forward to seeing your version.
Beautiful work. And to my mind…it IS custom-shaped trim!
Thanks. Yes it did become custom shaped.
Gorgeous. Love the pretty finishing on the interior. 🙂
Thank you. No one else sees the inside but it just feels better.
I agree. 🙂
You absolutely glow in this color, this is so very pretty on you. The finishing and custom trim are lovely.
Thank you.
Wow, I’m so impressed!
Your work is exquisite!
Love the way you’ve melded the two pieces of trim together – definitely worth the time and effort! It’s gorgeous 🙂
Inside finishes exquisite, outside finishes exquisite and the beading…so tedious but what a clever idea to attach the silk organza to fill in before re-attaching! Every post you share is a lesson in wonderful creativity! Thanks for sharing, Mary!
Thank you Mrs. Mole. Happy you enjoy reading about my experimentation in the world of sewing.
Wow, another blog post from you where I learn more in one post than years of reading the others on the internet. How the heck do you do it??? You have the knowledge to know what and when to use a specific technique, the dexterity and skill to execute it, and the patience to allow enough time to complete the task. Have you seen those articles by Claire Shaeffer where she examines vintage couture garments from the masters ? In my opinion, the insides of those “masterpieces ” don’t look half as good as the ones Mary generously shares with us on a monthly basis. Thank you Mary for showing us “mortals” how it really should be done!
You are too flattering but thank you. Most of my techniques are of my own invention and my way of doing things as professionally and finely finished as possible. Yes, it does take time and patience but I love the final results. Glad you enjoy.
Hi Mary.
re: Fitting for Couture: April 2014
I tried several times to respond to the email address you sent me, without success. Would you mind re-sending your address to smith.janet.r@edumail.vic.gov.au
to discuss fitting?
Thanks, Janet
How on earth did I miss this post, Mary?? Your skills and eye for couture took our pattern to a new level and one I aspire to. Bravo and many thanks for making this tunic and publishing this post. Simply amazing!
PS….. I was in awe of your tunic 🙂
Really Beautiful
Thank. This is a very wearable design.
Beautiful dress