

It’s been SO long since I posted but my blogging time was replaced by sewing time for the past two months. My youngest son was just married and I had the joyous task of making the bridal gown, my gown, altering 3 bridesmaid dresses, adjusting three suits and restyling my mother-in-law’s gown ( I had made for her many years ago from fabric purchased in Paris). Sounds like I had my hands full.
Details of the bridal gown are coming soon but here’s a preview of the newlyweds.


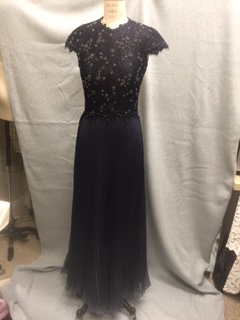
My new daughter-in-law chose navy and silvery gray as colors. I persuaded my husband to go fabric shopping for my dress and we wandered into Mendel Goldberg Fabrics in NYC. If you’ve shopped there, you know the exquisite things they have and the exquisite prices. I thought hubby was going to seize, but one yard was easily enough for what I had in mind and the total price of the dress would be far, far less than anything I could buy. His response was “go for it!”


The bodice draft began with design lines taped onto my body double dress form. Muslin draping was cut and formed to follow the design lines and the pattern created.


I often play with layers of fabric to achieve the desired effect. After trying various combinations of nude tone silk organza, black organza, black cotton tulle and black silk tulle, I decided to use one layer of nude organza, one layer of black cotton tulle and two layers of silk tulle. The fabrics provided the necessary opaqueness and support for this heavy beaded lace.


Beaded lace doesn’t cut well so I opted to construct the underlayer and drape the lace over, adding handstitched applique darts where necessary.


The front princess seams needed support but my favorite spiral steel boning was too rigid. I often use narrow horsehair braid which I stretch and steam to made it narrower and stiffer. The horsehair is inserted into the front seam and provides the right amount of shaping without looking unnatural. Spiral steel was used at the side seams for additional, flexible support.


To finish the cap sleeve edges, I cut the scalloped edging and hand appliqued it on. There was just enough scalloped edge to finish the neckline but none left for the edges of the cut away back. Buying more yardage for this would have been ludicrous! From the scraps I was able to cut beaded circles and appliqued them along the back edges. The excess tulle was trimmed away.


All this detail work required hours and hours of hand sewing. I entertained myself by setting up my sewing in front of the TV on election night and watched the totally unpredicted results flow in. Now I know what my readers in the UK must have experienced with the Brexit vote. Hopefully our new president will be good for this country and the world.
For the skirt I chose a sheer polyester chiffon and had it professionally pleated in a sunburst pattern. Use polyester, NOT silk. The pleats won’t be permanent in silk. I had a discussion with Lisa at International Pleating and they don’t recommend silks unless you plan to wear the garment in a dry environment and are prepared for the upkeep. As this was for an outdoor beach wedding, silk seemed a poor choice. This service is more accessible than you might think. I took my yardage to Tom’s Sons International Pleating in NYC, although you can also ship fabric to them. They have a wonderfully helpful yardage calculator on their website and your pleated fabric is shipped with explicit instructions for seaming the panels together. Shop the Garment District has more info on her blog about this company. I asked for the waistline seam not to be cut (the inner circle when you draft a circle skirt) as having the fabric at the point makes it easy to hang and store your pleated yardage until you are ready to work on it.


I found it easiest to locate the “inside fold” (read their seaming directions) and thread trace the fold. Do this on both sections and then baste together before seaming. Make sure your work is absolutely flat to avoid rippling along the seam. The skirt was lined with a separate skirt of metallic silver gray charmeuse. The bodice and two layers of skirt were joined and the scalloped edging covered the seamline.


Hemming took some time. A wonderful feature of a professional style dress form is that you can raise the form so the skirt hangs free of the base and you aren’t marking a hem while lying on the floor. A yardstick rubber-banded to a heavy jar made a wonderful marking stick. The hem will flare out when stitched so allow an extra 1/2 to 3/4 inch in length to compensate. A few shots of close-up views:


We had the joy of bringing our son to the chuppah and celebrating his marriage. Wedding gown production is next.


The rehearsal dinner was also a beach affair and I made a white lace tunic, idea courtesy of Julie and Sarah of The Tunic Bible. White cotton lace was underlined with skin tone cotton.


I used darts in the back underlining but eliminated them in the lace layer. White linen formed the placket and collar and all seams were finished with narrow binding. I wore this with skinny navy pants for a comfortable night on the beach.