couture sewing, Drafting Patterns, Lace, Uncategorized, Wedding Gowns

Bride’s Dress for a Backyard Wedding

In the last post you got a sneak preview of the bride’s dress and I promised full details would follow. For her wedding, my sister-in-law wanted a knee length ivory dress that looked bridal but not over the top for the informal setting. After brainstorming ideas with her and some fabric scouting, I designed a dress which would compliment her figure and highlight a piece of lovely wool guipure lace.

After measuring her head to toe, I drafted a custom pattern block which was the basis for her dress. This draft is fitted from shoulders to low hip and becomes the master pattern for subsequent patterns. Red lines indicate fitting adjustments and proposed style lines. The initial pattern is cleaned up and a fresh copy used to begin the actual dress pattern.

First Moulage Pattern 1

We decided the approximate placement of the lace upper bodice and also lowered the waistline seam about one inch to give her a longer silhouette. The pattern is cut apart on red lines and darts closed. The dress cut in muslin and basted together.

Pattern 2 Fitting 1

We opted to move the lower portion of the front princess seams closer to the side seams. The corresponding darts in the skirt front were also moved to line up with the princess seams. The skirt was pegged 3/4 inch for a slimmer look. I wanted to eliminate the back bodice dart, so the dart takeup was transferred to the center back and side seams.

Pattern 3 Fitting 2

I set-in sleeve would have been easier but I wanted to avoid seaming the lace in such a prominent spot. I felt a sleeve which was cut in one section with the bodice would not interrupt the beautiful guipure design. The sleeve pattern is cut lengthwise from shoulder point to hem and attached to the bodice. There is some guesswork regarding the exact shoulder slope and underarm shape but that gets resolved in the next fitting. Here is the front; the back is drafted exactly the same.

Pattern 4

We decided to raise the underarm (shown in green) for greater ease of movement. These are the pattern changes. Identical changes made to the back bodice and back lace pieces. The shoulder slope and finished sleeve length were also finalized.

Pattern 6 Final lace pattern

For the body of the dress I selected a tissue weight wool crepe, cotton lawn underlining and silk crepe de chine lining. The wool guipure was backed with cotton bobbinette, aka cotton tulle. Bobbinette is characterized by a hexagon shaped mesh weave. It stabilized the open lace beautifully. Pics of the lace with and without the net backing.

Lace without Tulle lace with Tulle

The sharp inner corner is a point of stress and a square of silk organza beefs it up and prevents ripping.

Reinforced Seam   Lace Seam 1

This lace raveled badly so a traditional appliqued seam wouldn’t have worked. I used a plain seam across the top of the shoulder. The tulle camouflaged the seam allowances well.  I ended the seam at the large flower along the border and used applique technique along the lace borders to create an uninterrupted sleeve hem.

Lace Seam 2 Complete Lace Seam

Dress fittting

Almost done. The side seams need a little more nipping in; seams get cleaned up; excess tulle trimmed; lining inserted.

The bride!!!

bride-entrance.jpg

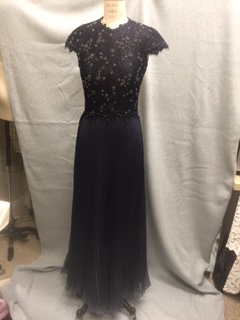
I also managed a dress for the mother of the bride. She chose a metallic chantilly lace from Solstiss. The trumpet skirt was cut so that each motif was centered on the panel. This was a wide border lace, so the border pattern was used for the skirt and the allover design section used for the jacket and top.

Lila Dress Lila Skirt

Syma and Lila 2

Where are the newlyweds off to on their “honeymoon.”

syma-and-bob.jpg

To an exotic destination for sure, but not for a relaxing pleasure trip. Every year they travel with a medical team to Columbia where the living conditions are anything but luxury. The team works to repair cleft lip/palates and perform other reconstructive procedures in areas of South America which don’t have access to and can’t afford this kind of medical care. Affected children are treated as outcasts of society; they and their families are eternally grateful for the gift of a new face.


Wedding Gowns

The Wedding Gown: Inside Details

My youngest son was recently married and I had the joy of creating my new daughter-in-law’s gown. But before elaborating on the details of her gown I thought I would share photos of gowns I created for my other two daughter-in-law’s.

My oldest and his bride opted for a beach wedding on a far flung island in the Bahamas; not easy in terms of travel and logistics, but spectacular. She chose heavy silk crepe fabric and I embroidered abstract roses on the skirt. Random petals were cut out and backed with silk organza. The embroidery doesn’t show well in the photo. Silk organza flowers covered the narrow shoulder strap and cascaded down the bodice.

liz-gown

My middle son’s bride chose an antique looking crochet lace woven from silk, wool and cashmere. The ivory lace was backed with white silk charmeuse and underlined with ivory silk tulle. The lace required precise layouts as it had a large pattern and I wanted to position the scalloped edge to skim the ground in the front. Hemming this lace wasn’t an option so the toile needed to be carefully fitted. I also played with various edge and seam finishes using the lace borders. Here is a pic of her getting unrumpled and set for her entrance.

sarah-gown

My youngest and his bride chose a beach setting for their wedding so her choice of a simple gown sewn in heavy silk crepe worked well. We designed a dress with a fitted and flared skirt, bodice with low necklines front and back, and jeweled belt.

The problem with low neckline in both front back is keeping the shoulder strap up. The bride doesn’t want to spend the night struggling with falling straps. Spiral steel boning solved the problem. After attaching the strap to the back bodice, interfacing with a channel for the boning was stitched to the underlining. The boning extends to the waistline seam in order for the strap to be supported from the waist up.  Seams were turned under and catch stitched, ready for lining.

back-boningback-strap

My first draft of the bodice had all the shaping transferred to one dart but no matter how I shaped and pressed the dart it ended in an unattractive point. The day before our final fitting I removed the front bodice and remade it using princess seaming which had a much better silhouette. I added a layer of cotton flannel to the front to camouflage a stick-on bra. The flannel was catch stitched just inside the stitching lines to avoid unnecessary bulk.

bodice-first-draftbodice-second

Firm cotton sateen reinforced the center front. I normally use silk organza for this but the deep plunge neckline needed something firmer.

front-stabilizer

The lining was inserted by hand. There was no way to do this by machine and sometimes sewing by hand is simply easier and produces better results. Hand sewing enabled me to ease the lining in much smoother than could have been done by machine.

lining-1lining-2

A final touch for good luck is a horseshoe covered in silk ribbon. I start with a small cardboard horseshoe shape. Wrap narrow silk ribbon from both ends meeting at the top. Secure with narrow double sided tape and add a bow.

hs1hs1

hs3hs4

A French bustle held the skirt up for the reception. Color coded silk ribbons made it easy to tie everything up after the ceremony.

bustle-diagram

The bow drooped but all else stayed secure.

bustle-back

veil-in-wind

preview


Wedding Gowns

Sewing a Wedding

It’s been SO long since I posted but my blogging time was replaced by sewing time for the past two months. My youngest son was just married and I had the joyous task of making the bridal gown, my gown, altering 3 bridesmaid dresses, adjusting three suits and restyling my mother-in-law’s gown ( I had made for her many years ago from fabric purchased in Paris). Sounds like I had my hands full.

Details of the bridal gown are coming soon but here’s a preview of the newlyweds.

preview

My new daughter-in-law chose navy and silvery gray as colors. I persuaded my husband to go fabric shopping for my dress and we wandered into Mendel Goldberg Fabrics in NYC. If you’ve shopped there, you know the exquisite things they have and the exquisite prices. I thought hubby was going to seize, but one yard was easily enough for what I had in mind and the total price of the dress would be far, far less than anything I could buy. His response was “go for it!”

lace-yardag

The bodice draft began with design lines taped onto my body double dress form. Muslin draping was cut and formed to follow the design lines and the pattern created.

marking-dress-form-backmarking-dress-form-frontmuslin-toile-backmuslin-toile-front

I often play with layers of fabric to achieve the desired effect. After trying various combinations of nude tone silk organza, black organza, black cotton tulle and black silk tulle, I decided to use one layer of nude organza, one layer of black cotton tulle and two layers of silk tulle. The fabrics provided the necessary opaqueness and support for this heavy beaded lace.

cutting-tullebasted-for-fitting

Beaded lace doesn’t cut well so I opted to construct the underlayer and drape the lace over, adding handstitched applique darts where necessary.

finished-underlayerdraping-lace

The front princess seams needed support but my favorite spiral steel boning was too rigid. I often use narrow horsehair braid which I stretch and steam to made it narrower and stiffer. The horsehair is inserted into the front seam and provides the right amount of shaping without looking unnatural. Spiral steel was used at the side seams for additional, flexible support.

lace-bust-dartfront-princess-seam

To finish the cap sleeve edges, I cut the scalloped edging and hand appliqued it on. There was just enough scalloped edge to finish the neckline but none left for the edges of the cut away back. Buying more yardage for this would have been ludicrous! From the scraps I was able to cut beaded circles and appliqued them along the back edges. The excess tulle was trimmed away.

cutting-edgingback-edge-trim

All this detail work required hours and hours of hand sewing. I entertained myself by setting up my sewing in front of the TV on election night and watched the totally unpredicted results flow in. Now I know what my readers in the UK must have experienced with the Brexit vote. Hopefully our new president will be good for this country and the world.

For the skirt I chose a sheer polyester chiffon and had it professionally pleated in a sunburst pattern. Use polyester, NOT silk. The pleats won’t be permanent in silk. I had a discussion with Lisa at International Pleating and they don’t recommend silks unless you plan to wear the garment in a dry environment and are prepared for the upkeep. As this was for an outdoor beach wedding, silk seemed a poor choice.  This service is more accessible than you might think. I took my yardage to Tom’s Sons International Pleating in NYC, although you can also ship fabric to them. They have a wonderfully helpful yardage calculator on their website and your pleated fabric is shipped with explicit instructions for seaming the panels together. Shop the Garment District has more info on her blog about this company. I asked for the waistline seam not to be cut (the inner circle when you draft a circle skirt) as having the fabric at the point makes it easy to hang and store your pleated yardage until you are ready to work on it.

pleated-yardagethread-trace-pleat

I found it easiest to locate the “inside fold” (read their seaming directions) and thread trace the fold. Do this on both sections and then baste together before seaming. Make sure your work is absolutely flat to avoid rippling along the seam. The skirt was lined with a separate skirt of metallic silver gray charmeuse. The bodice and two layers of skirt were joined and the scalloped edging covered the seamline.

waistline-seamhemming-skirt

Hemming took some time. A wonderful feature of a professional style dress form is that you can raise the form so the skirt hangs free of the base and you aren’t marking a hem while lying on the floor. A yardstick rubber-banded to a heavy jar made a wonderful marking stick. The hem will flare out when stitched so allow an extra 1/2 to 3/4 inch in length to compensate. A few shots of close-up views:

dress-closeupdress-back

dress-sleevedress-on-form

We had the joy of bringing our son to the chuppah and celebrating his marriage. Wedding gown production is next.

mob-dress-2

The rehearsal dinner was also a beach affair and I made a white lace tunic, idea courtesy of Julie and Sarah of The Tunic Bible. White cotton lace was underlined with skin tone cotton.

lace-tunictunic-interior

I used darts in the back underlining but eliminated them in the lace layer. White linen formed the placket and collar and all seams were finished with narrow binding. I wore this with skinny navy pants for a comfortable night on the beach.


Wedding Gowns

The Wedding Gown: Tying up Loose Ends

A wedding gown isn’t complete without bustling. Otherwise the skirt drags on the ground during the reception, getting dirty and damaged, as well as a tripping hazard to the bride, groom and guests.

As this gown had no embellishment on the skirt, I was limited to placing the pickup points at the seam lines. If you have a gown covered with lace, any hooks, loops or buttons can usually be hidden. The bride, her mom, and I all felt it would be a shame to ruin the sleek surface of this gown with any kind of fastening device. We also chose an underbustle, rather than an overbustle. The difference is that an underbustle, or French bustle, has fastenings, usually sets of ribbons, on the underside which are tied together and hold the skirt up. Underbustling resulted in poufs of fabrics we thought looked liked soft clouds.

The difficulty with bustling is that every gown is unique. While there are some basic principles, most of the time it is a trial and error process. Check out Mrs. Mole’s blog for her bustling adventures.

Here is a diagram of what was worked out with this dress:

Scan0001
Sorry about the poor image. The letters are also reversed. I’m working with a new computer and don’t have image editing software installed yet, so cropping images isn’t working. The image cropping on word press isn’t working either and the scanner reversed the letters, but I hope you will be able to follow.

Pastel silk ribbons are attached on the underside of the skirt, catching the seam allowances of all layers. I color code so that it’s hard to mess up. Points A and B are one color (say pastel pink), points C and D are blue, points E and F are yellow and so on. I find that silk ribbon is strong and also has a texture that poly ribbon doesn’t. Poly ribbon tends to slip and the knots come undone. Silk ribbon tends to stay tied.  We also do a trial with the maid of honor (or whoever will be doing this) so she has practiced before doing it solo.

The skirt at center back was 20 inches too long, so the distance from A to B is 20 inches. That brings the center back up to floor length. Next C and D are tied together, E and F together. We all felt the bustle looked better if it was dragged towards the center back so an additional ribbon was attached at point G (above A) and worked like a large swing tack to prevent the bustle from falling too far forwards.

The small amount of excess length at the side seams was controlled by attaching G to H and I to J.

Sounds easy but it does take some time and trials to get the lengths right.

Cleaning and storing:

The silk dress was cleaned by a local cleaner. Lace top, dress and veil were taken to The Textile Conservation Workshop for conservation packing.

Conservation Workshop
This is the same workshop which dated and cleaned the lace pieces before I began working. They are experts in the field of textiles and with this fragile lace, the bride wanted to do everything possible to preserve it. Notice the large flat soaking trays where pieces can be gently soaked. There is a large drying screen which allows fabrics to be laid flat to dry and water drains preventing further stains; no hanging which might further damage a delicate piece.

What a fascinating project this was!

View More: http://nicolerochellephotography.pass.us/whitehead

Wedding Gowns

A Finished Gown!

Next step is the hem. At this point, the net underskirt is hand basted in place and will be removed to made hemming easier. Some sources advise a narrow hem for 4 ply silk crepe but in a skirt this luxurious I chose to use a horsehair interfaced 3 inch wide hem in the center front and two side front sections of the gown. The side back and center back sections were interfaced with bias strips of silk organza. The hem width tapered from 3 inches at the side seams to 1.5 inches at the center back. The narrower hem width allowed the fabric to be eased in along the curved edge of the train.

DSC_0232

Now, with the gown completed, I hand sewed the net petticoat to the bottom of the corslet. Imagine wrestling all this to the sewing machine! There are times it’s just easier to do things by hand.

Now for the lace overblouse. I created a pattern by draping and manipulated the waistline darts into the bust dart and back side seam to avoid disrupting the lace pattern along the hem.

Here is a section of lace. The cat (NOT MINE, thank goodness), chewed one edge, but I was able to work around it.

DSC_0576

DSC_0131
How do you cut into 200 year old irreplaceable lace? VERY carefully, allowing generous seam allowances and using a muslin pattern which has been fitted over the gown.

DSC_0133

Seam lines are traced with heavy cotton thread as a lighter weight thread pulls out of the lace too easily.

DSC_0135

The buttons have been covered with 4 ply silk from dress scraps so they will match the gown perfectly.

The lace is backed with silk tulle and the two layers treated as one, just as when underlining.

After sewing the seams I trim all layers except one layer of tulle to 1/4 inch. Fold the raw edge of the tulle over and hand sew, binding the seam as you would do a Hong Kong finish.

DSC_0143

Elastic looping finishes the back.

DSC_0139

To finish the neck edge, I discovered two edges of the lace piece had hand appliqued trim. I carefully clipped the stitches and was left with a length of perfectly matching lace trim. This was simply hand appliqued back in place along the neckline.DSC_0575

View More: http://nicolerochellephotography.pass.us/whitehead

Last item was the veil. Real silk tulle veils are luxurious and pricy but since the bride wanted a shorter length, it seemed a shame to stick a length of polyester net on her head. The edge of the veil would be finished with a narrow silk ribbon. Mokuba has exquisite ribbons and I found a shade of ivory which matched the gown. I had planned on attaching it using fine cotton thread and a fine double needle in the machine. Think again! The ribbon was so soft and the tulle so fine I had a balled up mess. Thank goodness it was on the test sample. Another reason to test, test, test your techniques. You never know when disaster will strike.

The only solution: hand sewing.
tDSC_0205DSC_0202
It actually went faster than anticipated and did allow me a great deal of control over the tension of the ribbon on the tulle. Working over a black surface made life easier also.

After the ribbon was sewn along each edge using 80 weight cotton thread, trim carefully along the ribbon edge.

The upper edge of the tulle was simply gathered onto a comb and stitched. An heirloom pin served as the headpiece.

DSC_0229

Finished !

View More: http://nicolerochellephotography.pass.us/whitehead

View from the back, highlighting the luxurious drape of the heavy silk.

gown back in church

Wedding Gowns

Wedding Gown Construction

Here’s a sneak preview of the work in progress. The hem is pinned and basted. The major seams have been machine sewn. All inner support layers are basted in place as they will be removed so each component can be worked on separately.

Front View

DSC_0210

Armed with a fitted muslin, its finally time to cut the silk fabrics. I hand basted the outer 4 ply silk crepe to the charmeuse underlining. There was too much show through even with the two layers, so a second underlining layer of cotton was added. 4 ply crepe does hang out, so the gown was hand basted together and allowed to hang on the dress form for a couple of days. Any pulling of the layers was smoothed out by removing the basting and allowing the layers to fall naturally before machine stitching. View of the inside.

DSC_0226

Notice how the princess seams are pressed. I find that pressing most of the layers towards the center front rather than pressing the entire seam open gives a cleaner line over the bust. The second layer of cotton underlining has been trimmed to the stitching line. There is also a layer of fusible weft interfacing which stops at the waistline. This gives the upper bodice enough body to support the weight of this full, heavy skirt. The straps are just ribbons pinned in place to help support the dress on the form until the inner corslet is attached. To all my readers who alter gowns: don’t you LOVE those big seam allowances!

The corslet fit well except there was a tiny bit too much fabric at the front seams. Even though this bride is small busted and didn’t need a tremendous amount of support, we agreed that adding spiral steel boning in the middle of the side front improved the shape.

DSC_0213

Pattern instructions usually have you stitch the gown and corslet right sides together and turn. I find this method really doesn’t work too well. Unless you are working with very thin fabrics, the gown layer is slightly larger than the corslet. Also the seam, even if understitched, tends to roll and reveal the underside.

I cut the corslet about 1/8 inch below the finished edge. I fuse a 2 inch wide strip of stiff cotton interfacing cut on the straight grain along the upper edge. This is cut to correspond to each section.  I also add a row of fusible 1/4 inch stay tape to further stabilize the top edge. This tape is pulled tight across the top of the bust so the corslet hugs the upper chest wall. How many formal gowns have we all seen where this gaps open?

DSC_0214

Next I attach a bra which is stitched in place at the side seams. If the gown is backless or lowcut, the back of the bra can be cut away. We chose to leave the bra back in place as it didn’t show through and felt secure. The center front of the bra floats inside a loose ribbon loop. If this ribbon is too tight, the center front is pulled inwards, creating an unattractive hollow on the finished side. I tend not to use sewn in cups. They move with the dress, creating a “floating boob” effect.

DSC_0218

The back closure has spiral steel boning along both sides and a fabric underlap to prevent the hooks from digging into the skin.

DSC_0220

The gown is in three major sections: The silk gown, the corslet, and the petticoat. I avoid stitching these together until each section is totally completed. It’s so much easier to work on one section at a time. It saves wear and tear on the silk and 4 ply crepe tends to snag easily (usually at the center front where its most visible).

Gown is fitted and complete; corslet fits perfectly and is completed. I attach them in the following way: Trim the gown allowing between an inch and two inches to turn over at the top edge. Grade and trim all seams to reduce bulk as much as possible. I bind the top edge with silk tulle. Silk tulle is amazing stuff. It’s soft, weightless, stretches like bias tape, and stays where you put it. Nylon tulle is not the same thing. It will fight you all the way!

DSC_0223

Fell stitch in place. Sewing this top edge by hand allows you to perfectly control the layers.

Next: hemming, attaching petticoat, lace overblouse and veil. I need a break!

Wedding Gowns

The Wedding Gown: Creating the Understructure

Although wedding gowns can look complicated, the basic lines are often fairly simple. For this dress McCall’s M4776 (not sure if it’s still in print but there are loads of similar patterns) provided a starting point.

DSC_0136
I find it easier to create the understructure of the gown first. That way you can have it on the dress form and get a clear idea of how the dress will actually look. The fullness also dramatically affects the hem length. I used only the four main pieces and created the boned corslet and petticoat from them.
Master Pattern
Here is an illustration of the basic pattern with my additions. The corslet pattern is shown in red. It extends 4 inches down from the waist and will be sewn with slightly (about 1/16 inch) larger seams as it needs to be skin tight. For fitting I copied the corslet shape in cotton drill fabric and padded a dress form ( the junky adjustable kind) to mimic the bride’s shape. Since this dress is only fitted through the upper bodice, no need for a fully fitted custom shape.

I used white cotton coutil. If you’ve never used this before it works wonderfully for a tight fitting support garment. It presses easily and flexes just enough to mold to the body. It’s sturdy and heavy enough to support the boning which will be added to each seam. The cotton fiber is also cooler to wear than a synthetic. The boning channels are sewn along each seam and at center front. Flexible steel bones will be inserted into the back and side seams; spiral steel into the princess seams over the bust and center front. The gown flares out below the waist so I decided to end the boning at the waist. Since this bride is not full busted, I’ll decide whether or not the bodice needs additional boning after a fitting. The waist has been thread traced to use as a reference during fitting and also as a guide for the ribbon waistband which will hold this whole thing up.
DSC_0118
Rather than make or buy a separate petticoat I chose to integrate one into the dress so it could hang from below the waist. The pattern for this was drafted 4 inches lower than the waist (it will ultimately be stitched to the bottom of the corslet) and two inches narrower at the bottom than the outer skirt. It is about 5 inches shorter than the finished hem. The petticoat is shown in green. By removing two inches from each skirt seam I decreased the circumference 28 inches to allow for the petticoat ruffles.

The petticoat skirt was cut from satin faced silk organza. It’s stiff enough to hold the shape without being heavy. Two lower layers of stiff nylon netting were gathered and sewn to the petticoat base. I cut the netting 30 inches wide and folded it lengthwise (no scratchy exposed edges) and gathered it  4:1. An easy way to keep the gathering even is to mark every 18 inches on the netting. Zigzag over a length of heavy thread and pull up gathers so every mark is 4.5 inches apart. The two ruffles were attached along the dotted purple lines.

To soften the outer petticoat layer I used soft nylon tulle and gathered it 10:1. It was attached along the uppermost purple line. Two inch wide nylon horsehair braid keeps the hem of the organza layer full.  3/4 inch horsehair braid is topstitched along the top edges of the lower ruffles. If you want to keep your sanity while sewing this, leave the center back seam open so the piece can lay flat. Close it and lap the ends of the tulle and braid as a last step.

DSC_0117
A closer view of the underskirt layers.
DSC_0119
DSC_0120
Here is the muslin toile draped over the underlayer. Notice how I’ve made a slight adjustment to the side seams under the arm. The neckline has also been shaped. Having a muslin also allows me to determine a final hem length, play with bustling options and minimizes handling the silk outer fabrics.

DSC_0121
I keep the corslet and petticoat separate as long as possible. The corslet will be sewn into the finished gown first. The petticoat layer will be hand sewn into the dress once all else is complete; SO much easier than wrestling with mountains of poufy fabric at the machine.

Next step is construction of the outer silk gown!

Wedding Gowns

Follow the Birth of a Custom Wedding Gown

I have an exciting project in the works and finally have enough pics to share it. I’m creating a gown for a July wedding and will be posting the progress, both as a record for myself as well as a memento for the bride.

The focal point of this gown is absolutely spectacular handmade Point de Venise lace which has spent the last couple of months in Connecticut being cleaned. Hard to believe this lace was created with a single needle and sewn entirely by hand. We were told by the restorers that the lace was likely made during the 1820’s!DSC_0572
Closeup of the detail
DSC_0575
There are two matching pieces. One is rectangular with a scalloped border and the other this shape.
DSC_0576
The dress will be a simple strapless gown with train which will be bustled up for the reception. The lace will be a separate top hemmed at the midriff with short sleeves. Buttons covered with dress fabric will close the top at center back. The fitting muslin with lace draped to approximate the top.
DSC_0578
A gown with no embellishment calls for luxury fabrics. I met the bride and her mom at B&J Fabrics in NYC and set up a work station at one of the long tables overlooking 7th Ave. The window provided loads of natural light for color matching. Antique lace is never white and and we needed a LARGE selection of fabrics to choose from. The staff at B&J were incredibly helpful, pulling roll after roll of various shades of ivories. We finally decided on a wonderfully drapey 4 ply ivory silk crepe which will be underlined with white double faced silk charmeuse. The white underlining brightened up the ivory just enough to compliment the lace.
Fabrics 1
The lace will be backed with ivory silk tulle which will provide just enough stability for it to hold its shape nicely. The same silk tulle will be used for a short veil.
Fabrics 2
Veil 2
The first step is now to create the gown’s under structure of a boned corset and attached petticoat. I’ll tackle that in the next installment.