Registration is open for my upcoming in-person classes. I’ll be hosting a sewing retreat in Bristol, RI October 2-8, 2023. Immerse yourself for 7 days of couture level sewing in the charming town of Bristol. Class fee includes 7 days of instruction plus accommodations at an Air B&B, snacks plus a group dinner at one of the lovely historical restaurants.
The November class in Palm Beach Gardens, FL is geared towards creating a custom French Jacket. You’ll construct a muslin test jacket prior to class (instructions provided). After perfecting the fit, you will be guided through the steps to create your own version of this iconic jacket. Read the class description for additional information.
The January 8-14, 2024 class is an opportunity to work on, or complete, your French jacket, construct a custom dressform or another project of your choosing. I will contact you prior to class to discuss your plans. Some students begin a new project while others bring partially completed ones for expert assistance in completing the garment.
This class is a great time to create a dressform which replicates your body. You will also draft a master sloper which serves as the basis for altering patterns or creating your own. Completed forms fly easily in a golf bag as checked luggage.
I am also offering a 1 or 2 day class this spring, May 20-21 at Mendel Goldberg Fabrics in NYC. The class will be geared towards creating custom trims to coordinate with Alice’s exquisite boucle fabrics. She will clear the shop for us to work Saturday and Sunday. This is a hands-on workshop where I’ll guide you through how I choose yarns and design a trim to match the fabrics. Techniques used are crochet, braiding, braiding on a Japanese Kumihimo stand and more. I will also explain my method for handworked buttonholes in boucle fabric and the specialized notions which give a professional result. Different topics are covered each day; Saturday and Sunday are NOT repeats, so attend both days for the best experience. You will enjoy this class more if you are comfortable with basic crochet stitches.
Class registration can be accessed through the “Classes” drop down menu or “Shop” and then look at the Catalog. Hope to see you. Any questions, email me at MF953@aol.com or leave a comment. Thanks for reading.
Registration is open for classes in Palm Beach Gardens. Join the 7 day French jacket class from Monday, November 7 through Sunday November 13, 2022. These jackets involve considerable hand sewing and do take time, so expanding the class to 7 days made sense.
What is unique about this class? We will start with fine tuning the fit of your jacket toile. Detailed instructions will be sent several weeks prior to class.
Vogue 7975 is often used as the basis for a French jacket. It is easy to change the jacket’s length, neckline, sleeve and front closure. The pattern has princess seams ending in the shoulder which simplifies many fitting issues. Curvy figures need more shaping which can result in any horizontal stripe in the fabric to be mismatched along the upper part of the front princess seam. This photo shows the difference.
The right side (right side of photo) of this sample has been cut and sewn according to the pattern. For the left side, I’ve made some simple changes to the pattern and shaped the front side section with a steam iron. Note how the horizontal lines in the weave carry across the upper chest uninterrupted.
We will examine techniques to eliminate darts. For this sample, I wanted a very curvy figure, easily accomplished by a bra filled out with extra padding. It’s easy to achieve the look on a small busted model but harder when dealing with more curves.
The pronounced curves of this figure required additional shaping which could have been accomplished by adding a dart either from armhole to bust or side seam to bust.
Either dart placement isn’t ideal and will create unnecessary bulk. Fortunately most boucle fabric is pliable and can be molded with steam. Any distortion in the weave is hidden under the arm and a better solution than darts.
A few patterns have the classic three piece sleeve. Vogue 7975 has a standard two piece sleeve. It’s not difficult to convert the pattern. This method can be used on any sleeve.
Learn how to customize the look of a basic pattern. The neckline is easily converted to a stand collar, round or V-neck.
These jackets all used Vogue 7975 as the starting point
Coco Chanel said, ”never a button without a buttonhole.” Machine buttonholes are an option but handworked buttonholes are a true couture finish. Loosely woven boucle fabric isn’t the easiest to work with and mastering buttonholes does take practice. There are a few tips and tricks that make the finished result more professional.
Trims are the final embellishment. Shopping for pre-made trim can be difficult. You rarely find something that’s the perfect color, width and texture. Often trims are rigid and difficult to navigate curves and corners. Creating your own trim using fibers from the fabric and coordinating yarn isn’t difficult.
November dates not convenient? Another Couture Sewing Class is scheduled from Monday, January 16 through Saturday, January 21, 2023. This class isn’t strictly for French jacket construction but you can certainly work on one. It’s a perfect opportunity finish (or make significant progress) on a previously started jacket. Work on anything you like. Maybe you’re hesitant to work on tricky fabric or an unfamiliar style? Take advantage of expert help with planning and executing your project.
Register by clicking on ”Classes” from the main menu. Any questions email me: mf953@aol.com
I’ve been writing this blog since 2014 and am thrilled to learn the tutorials presented are helpful to other sewists. Joyce posted photos of her completed jacket on Instagram and tagged me as a resource for her construction methods. I invited her to write a post, highlighting the information she found especially valuable.
Thank you Joyce, for taking the time to write this and allowing me to share your work.
Hello! My name is Joyce. After my recent completion of a French jacket, Mary asked me to write about my experience in a post for her blog. Before we get started, here’s a bit about me: I live in southern Manitoba, Canada with my husband, who is also my best friend! We have raised two children, who have blessed us with five grandchildren. I am a retired Interior Design Consultant & Kitchen Designer. My talented mother taught me to sew, crochet, knit, and hand embroider. From the time I was five years old, she allowed me to use her sewing machine. I made a lot of clothes for my dolls until the age of ten when I began sewing my own clothes. My favourite things to sew are coats, jackets and dresses. My favourite fabrics are made of natural fibers.
About seven years ago, I began dreaming of making a French jacket. While reading blogs of sewists who documented their experiences on the subject, I became aware of the hours involved, as well as the couture techniques they had learned along the way. It was when I discovered Mary’s blog, cloningcouture.com, that I soon realized what a treasure store of information it is. Her precision and her impeccable attention to detail reveal incredible skill. I was amazed that she was willing to share her extensive knowledge and experience with her readers at no cost to them. I read each post in detail, bookmarking those I wanted to refer to later. By early 2019, I had collected all my supplies for this project, and was ready to begin. My fabric is appropriately called “Giverny Tweed”. The lining is silk charmeuse.
Of course, the first step was to make a well-fitting toile. I cut the body of the jacket according to Vogue 8804, but in reading online reviews, I heard repeatedly that the sleeve in this pattern was wide. Since I have thin arms, I knew I would have to draft a narrower sleeve. This is where Mary’s post https://cloningcouture.com/2014/08/04/chanel-and-the-sleeve/came to the rescue. I know she has since updated it, but her original method worked for me! I also changed my sleeves to full-length instead of the three-quarter length from the pattern.
As many of you already know, after fitting the toile, it is cut apart and used as the pattern to cut the pieces in the tweed and lining fabrics, adding wide seam and hem allowances. In hindsight, I should have fused Pro-Sheer Elegance Couture interfacing to the tweed at this point, since I was working with a fabric that frays very easily. Mary gives this advice in the following post: https://cloningcouture.com/2018/02/15/finishing-details-the-french-jacket/Instead, I used a stepped zigzag to secure the fibers along the edges.
Detail of the front, ready for machine quilting
Over the next couple of weeks, I interfaced the fronts with silk organza, quilted the silk charmeuse lining to the front and back pieces, before joining them along the princess and side seams. I really enjoyed slipstitching the lining seams together by hand.
Now that the body of the jacket was taking shape, it was time to turn my attention to the trim. I was unable to find a ready-made trim that complemented my fabric, but then I remembered Mary’s post on making your own. My first attempt was a crocheted chain using fibers from the tweed, but it was too narrow and did not contrast enough with the fabric. I was intrigued by Mary’s detailed instructions on Kumihimo braiding, so I decided to try my hand at it. See her post here: https://cloningcouture.com/2017/08/30/create-custom-trim-for-your-french-jacket/After locating a Kumihimo plate at my local fabric store and watching some YouTube videos on 10-strand braiding, I was ready to begin. After a couple of false starts, while deciding which fibers to use, I settled on four blue strands and two ivory from my fabric, in combination with four strands of ivory Phildar yarn left over from a sweater I knitted for my husband many years ago.
This was the set-up I used. It is certainly not the traditional way, but it worked for me. Every few inches I had to stop and release more material from my “bobbins”. It took me about three days to work out my setup and make three and a half yards of trim.
You can see it being “auditioned” here with the buttons I planned to use. Btw, although these were inexpensive buttons, they remind me of Coco Chanel’s favorite camellia rose.
After making the trim, I did some work on the sleeves, then packed the project away before going on vacation in March 2019. As it turned out, this is where the project stalled out until a couple of weeks ago.
I had been putting off making the handworked buttonholes, but one day I gathered up courage and got to work. First, I made a sample buttonhole to work out the method. Then, in a pleasant afternoon’s sewing, I made five buttonholes on the jacket front. You can see Mary’s post on buttonholes here: https://cloningcouture.com/2020/01/07/buttonholes-and-more-trim/
After crossing this hurdle, I knew I was on the home stretch. The next two days were spent finishing the sleeves.
Completed sleeves with trim and handworked buttonholes
After this, I applied the trim to front and neck edges with a running stitch and the occasional backstitch. It was actually easier to do than I thought it would be. Then I fellstitched the lining to the jacket edges. This was my favourite step!
Stitching the sleeves in by handSleeve lining basted into placeCompleted jacket
In summary, I learned so much about couture sewing methods while working on this project. I easily spent a hundred hours on it, but the result is something I will wear with much satisfaction for years to come. It has also given me a great appreciation for the work of couturiers. They are indeed a skilled lot!
Mary, many thanks for all your informative, detailed and inspiring posts on couture sewing! Thanks also for letting me share my experience with your readers. You can find me on Instagram at amakersshowandtell, where I post photos of my projects. They include sewing, watercolor painting, home decorating, gardening, knitting, and occasionally, upholstery. Best regards, Joyce
The mockup was done on a half-scale mannequin but a full size pattern worked better for the collar draft. Here’s my final collar pattern which I tested with hymo canvas and a piece of scrap boucle.
When looking closely at couture designs, I’ve noticed that a horizontal weave in the fabric travels straight across the the upper body and continues through the sleeve, creating an unbroken line in the fabric. This half scale jacket illustrates the difference.
Runway design. Notice how the horizontal stripe is matched.
The right side of the jacket has been cut with the princess seam ending at mid shoulder. For the left side, the princess seam was shifted from the bust apex to a point closer to the neck (about 1 inch). This pattern adjustment makes the princess line on the side panel more vertical and requires less manipulation of the fabric. Refer to the previous post linked above for a more complete explanation of the pattern changes.
Here’s the full scale side panel being steamed and shaped.
Fabric before shaping
Working the fabric into shape. The excess fabric in the armhole will be shrunk into place.
After shaping the boucle will be unstable. Silk organza cut on the original grain holds the shape. A row of running stitches helps hold the armseye to shape.
The collar is partially pad stitched. I’ll finalize the placement and determine the finished collar size before finishing. This is the under collar which is collar felt and bias cut lightweight linen canvas.
Here’s a preview of the custom trim. I rarely use pre-made trims as most are too stiff and rigid. This one has been created with tubes of matching silk georgette fabric and yarn. This one turns corners easily and compliments the boucle.
I’ve written about this in the past but have revised the method slightly. I’ve seen converting the two piece sleeve to a three piece by simply splitting the upper sleeve at the shoulder point. This method results in a wide under sleeve. The classic Chanel design has a much narrower under sleeve section. I’ve found the easiest way is to convert the two piece pattern to a one piece sleeve; then split the sleeve.
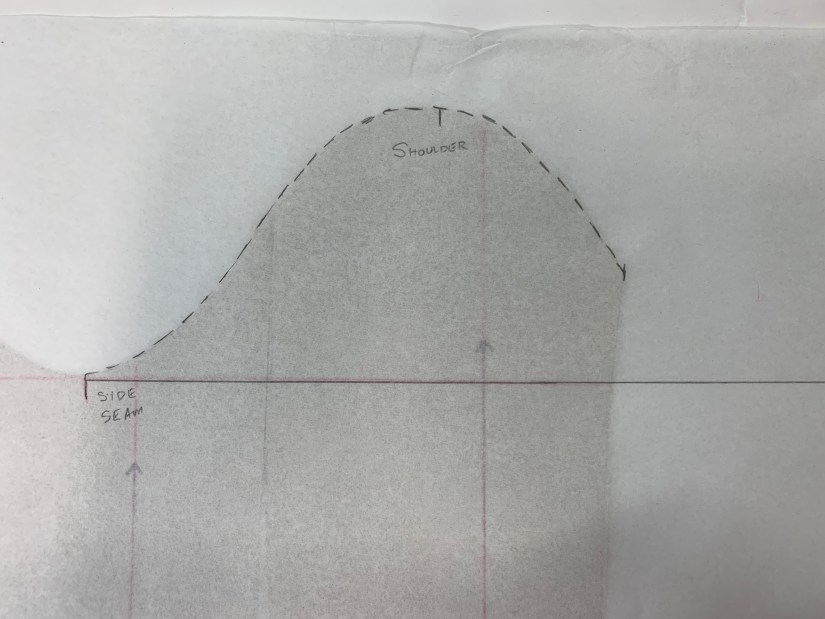
First cut off the seam allowances from your pattern. Pattern drafting is always done with no seam allowances. You will add seam allowances after all drafting is completed. Extend the grain lines the full length of the pattern. If the elbow point isn’t indicated, measure your arm and determine your elbow point. Line up the upper and under sleeve patterns along the underarm line. Make sure the grain lines are parallel to each other. Trace the top of the sleeve from the underarm point on the under sleeve around to the front of the upper sleeve.
Shift the pattern to complete the top of the sleeve on the right side. Draw a horizontal line connecting the underarm points. Draw a horizontal line to indicate the elbow position; also draw the finished hem of the upper sleeve.
Determine the midpoint of the underarm line (line which will divide the sleeve in half lengthwise). Extend this point to the bottom of the sleeve.
Determine the finished width of the sleeve hem. Divide by 2. Mark 1/2 finished hem width on either side of center. Connect the underarm points to the points on the hem for side sleeve shaping.
Shift the midpoint of the sleeve about 1/2 inch towards the right (front of sleeve). Extend this point up to meet the top of the sleeve. This moves the shoulder point, also known as the pitch point, a little further to the front and places the finished sleeve more in line with the natural position of the arm.
Fold the left (back of sleeve) underarm point to meet the just marked offset center point. Trace the armseye seam from the side seam to fold.
When you unfold the paper, it should look like this:
Repeat for the right (front side). Fold the right underarm point to meet in the center and trace. You should have the underarm curve duplicated in the center of the sleeve.
Draw a horizontal line indicating the elbow line. If the elbow isn’t indicated on the original pattern, measure your arm either from the underarm or shoulder. Cut the pattern from the back side seam to sleeve center. Cut the pattern from the hem along the center to just before the elbow line, leaving a small hinge point of paper. Rotate the paper to open up a dart along the elbow line. The dart should be about 3/4 inch wide. Tape extra paper underneath the opened dart. Tape the overlapping pattern at the hem. The width of the sleeve hem will be shorter due to the overlap. Measure the amount of overlap and add that amount to the right (front) sleeve at the hem. Extend up to meet the elbow line.
Draw an elbow dart 3 inches long and 3/4 inch wide (the amount the paper was opened). There will be extra fabric, indicated in green. This is to provide ease over the elbow. The angle between the sleeve midline above the elbow and sleeve midline below the elbow will be about 175 degrees. A little more or less is fine.
The undersleeve on classic Chanel jackets is about 2.5 inches wide at the underarm tapering to 2 inches at the wrist. This is for smaller sizes; you may want to adjust for larger sizes/ fuller bicep. From the center line, measure towards the sleeve back 1 and 3/8 at underarm, 1 and 1/4 at elbow and 1 and 1/8 at wrist. For the front, measure from center towards sleeve front 1 and 1/8 at underarm, 1 and 1/8 at elbow and 7/8 at wrist. Connect the points to form the undersleeve. Shown in red.
Now remove the corresponding amounts from the side seams. Shown in blue. Trace the undersleeve onto pattern paper. I place the upper portion of the undersleeve on the bias. The lower portion won’t be on the true bias but it will be off grain. This will allow the undersleeve to stretch when worn for comfort. Chanel sleeves are intended to be slim fitting and the bias provides a little wearing ease. Trace the upper and lower sleeve sections. Your patterns should look like this:
Using the hem length from the original pattern adjust the bottom of the sleeve. The sleeve back which joins the undersleeve should be 1/2 to 3/4 inch longer than the corresponding seam along the undersleeve. The excess length in the back sleeve will be eased in the elbow area. The seam joining the sleeve back to sleeve front will be the same length on both back and front. The front sleeve seam which joins to the undersleeve should be 3/8 to 1/2 inch shorter than the undersleeve seam. The upper sleeve seam will be steamed and stretched before sewing to give the sleeve proper shape. The sleeve hem should be slightly longer in the back and angle upwards to the front. Add vent extensions for buttons if you want. The top of the sleeve cap can be curved to decrease the amount of fabric needing to be eased into the armseye.
Although many machines can sew acceptable buttonholes, there is nothing like a handworked buttonhole to distinguish a garment as couture. Now for the good and the bad. The good thing about making buttonholes by hand is there is one basic stitch and you simply repeat it over and over. The bad is that it takes hours, and hours, and hours of practice to get the stitches narrow and evenly spaced with just the right tension.
There are a few hints that can make this process easier. Using professional materials does make a difference. After making hundreds of buttonholes I’ve found there really is no substitute for Gutermann gimp. It’s not easy to find outside of professional tailoring suppliers but it makes a tremendous difference in the quality of the finished buttonhole.
Gimp is a stiff cord that lifts the stitches off the surface of the cloth and gives a smooth surface for the buttonhole stitches to sit on. Silk buttonhole twist also comes in various weights. The thicker size F is easier to work with and requires fewer stitches but produces a bulkier buttonhole. My preference is Gutermann R753 which is just a bit thinner and makes a finer buttonhole.
Cutting the buttonhole is also easier with a couple of tools. I found an antique buttonhole cutter which cuts the circular hole and slit in one step. This probably isn’t sharp enough to use.
What works for me is a sharp hollow punch for the keyhole and a chisel for the slit.
To actually make this buttonhole first carefully mark where you want the buttonhole and baste all the layers of fabric together. This prevents things from shifting around while you are working. I forgot to take a photo of just the basting so this photo shows the buttonhole cut. Blue thread is the basting.
Before cutting anything (this is especially useful if you’re working on a loosely woven boucle type fabric) machine stitch around the buttonhole. I run two rows of stitching using about a 0.8 to 1.0 mm stitch. The machine stitching will really hold everything in place.
How’s the time to cut. Unlike machine buttonholes which are cut after stitching, the handworked buttonhole is cut first. I use the hole punch pliers to cut a clean hole. Then carefully place the appropriate size chisel along the center of the buttonhole and tap the chisel a few times with a hammer. I use thick cardboard or a piece of heavy scrap leather underneath both the hole punch and chisel to prevent damage to the tools.
I prefer the look of a teardrop shaped buttonhole so I carefully trim away the little triangles at the base of the circular hole.
I begin stitching the buttonhole with the rounded end away from me and begin work on the left side. Thread the gimp on a large eye needle, put it between the fabric layers and bring it up just inside the cut edge. Wax and press the buttonhole twist. Rule of thumb is that 1 yard of twist for 1 inch buttonhole. Stitches are worked by inserting the needle about 1-2 mm from the cut edge. Wrap the thread in the direction you are sewing; in this case I’m wrapping the thread around the needle clockwise. Pull the thread through and upwards forming the purl knot on the top edge. Using a traditional tailor’s thimble is helpful to control your needle and place the stitches accurately. Putting you left thumbnail where you want the needle to exit the fabric also helps. You want the stitches almost touching but not crowded. Practice definitely helps. Your 10th buttonhole will look much better than the first and number 100 even better.
Work up the left side, fan the stitches around the circular end and down the right side. Turn the cloth so you are always making the same stitch from the same position. The cloth moves, your hands and stitches don’t. Bend the gimp around the buttonhole as you work.
When you get back to where you started pass the gimp between fabric layers and cut it off. Take three stitches across both sides of the buttonhole with the silk twist and bury the thread. Baste the edges of the buttonhole together and use a bodkin to shape the end into a nice circular shape. Press and leave the basting in place until the garment is finished.
In my quest to replicate Chanel jackets, I did a little sleuth shopping. These are from the new spring cruise collection. Looking at the price tags, I’m happy to be creating my own.
The trim was what I was most interested in. I’ve managed to create a fairly good duplication and am working on refining and variations.
Here’s my version.
Buttonholes, advanced garment shaping using ironwork, Chanel style trims and more in a French jacket class, Palm Beach Gardens, FL February 10-15. Only 2 spots left; more classes coming. Dates to be announced.
In this post I’ll explore the seemingly little details will make your completed jacket look professional. I love the look of a patterned fabric perfectly matched across the seam lines. Here are the changes I make to the pattern. I also shape certain garment pieces using heat and steam.
A basic princess line pattern. I’ve drawn it on grid paper. It has been cut so that horizontal threads in the fabric match along the lower portion but look what happens in the upper chest area.
Here’s what happens if I’m able to manipulate the fabric in the side front.
In order to minimize the amount of shaping required, I’ve shifted the front princess seam from the bust point upwards and brought it closer to the neck. The violet pattern shows the original; in the red I’ve shifted the princess seams (both front and back so they match at the shoulder) closer to the neck. Overlaying the patterns shows the changes. The same amount of fabric removed from both center fronts and backs has been added to the side back and fronts.
Here is an illustration done on a full figured model. The first photo shows the fabric without shaping. Second photo shows how the fabric pattern matches and gives a much less disruptive line.
The ironwork does push a lot of fabric into the armseye area and makes the grain quite unstable. I deal with this by cutting a piece of silk organza using the original pattern and baste it in place. The armseye can be further stabilized by taping the seamline. The lining is cut according to the pattern and basted in place before quilting (this is a sample and the lining wouldn’t stop below the armhole).
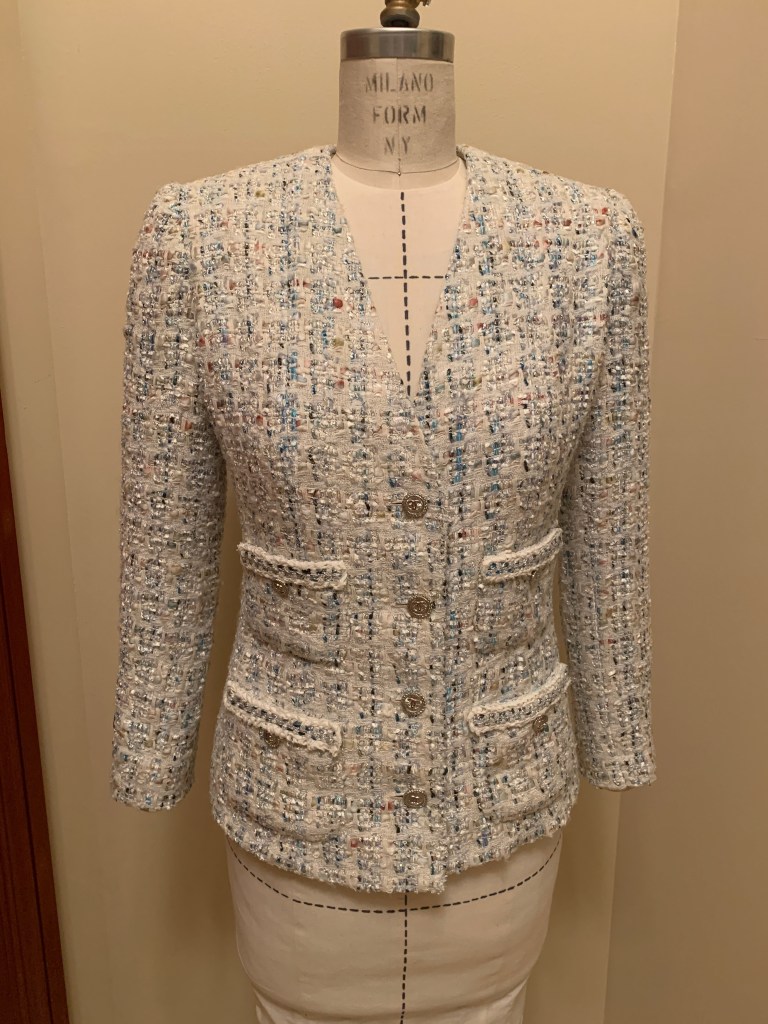
Here’s the front of my white jacket. I’ve moved the princess seam and manipulated the fabric. The horizontal lines in the weave are continuous. I’ve chosen to add a standup collar. It is also cut as a straight piece and shaped with the iron. Cardboard cut to the shape and size of the finished collar helps press a smooth curve and keeps both sides identical.
An easy way to match the fabric design when cutting sleeves is to pin the muslin sleeve onto the jacket body. Pin scraps of fabric to the muslin sleeve, matching the fashion fabric along seam lines. Remove the muslin sleeve, lay it flat keeping the scraps of fashion fabric in place. Carefully trim along the seam lines. Now you have an exact guide to cut the sleeves and be sure they will match. The sleeves should be mirror images of each other but check to be sure.
Next I’ll tackle handworked buttonholes. If you would like hands-on instuction, I’m teaching a French jacket class in Palm Beach Gardens, FL from February 10-15, 2020. We’ll cover fitting, ironwork using professional equipment, jacket construction, custom trims, handworked buttonholes and more. If you’re interested, leave your contact info and I’ll send further details.
Making leather garments can be intimidating. Leather skins are relatively expensive and there is no room for adjustments as stitching marks are permanent. I’ve discovered a few tips that make sewing leather look more professional.
Always, always make a test garment in medium weight muslin. Get the fit perfect before cutting anything in leather. The test garment can be taken apart and used as a pattern. I mark using chalk or a soft lead pencil. Ink pens tend to smear and the marks can be permanent. Even if used on the wrong side, pen marks can bleed through to the face.
I was surprised to learn that leather can be steam pressed. Many sources advise against pressing, but unless you use loads of heavy steam, it works just fine. Having a teflon shoe for your iron helps protect the leather. Teflon shoes are available from most tailoring supply sources and are specific to the iron. Here’s mine for the Naomoto gravity feed iron. Make sure you also get a steam diffuser, which is a piece of heavy felt lining the shoe. The diffuser spreads the steam more evenly and prevents marks from the steam jets. Both are available from Wawak and other sources.
Gentle steam pressing is effective at removing creases. Here’s a sample that I intentionally left folded for awhile and the result of steam pressing. Some sources advised using leather tape (also known as cold tape) to stabilize the seams. The tape can be difficult to source and is a PIA to stitch through as it gums up the needle. Narrow strips of lightweight fusible interfacing worked fine.
Darts can be difficult to press flat so I sew darts this way:
Cut away the dart. Spray a scrap of leather with temporary quilt basting spray. Carefully line up the sides of the dart and finger press gently to tack the dart closed. I position one side first; then align the second side. Doing this over a tailors ham helps get the proper contour.
I’m using a leather roller foot on my Bernina; the roller feet are are also available for industrial machines and probably other brands.
Here’s the settings for Bernina. I’ve positioned the needle left of center so it stitches very close to the roller. I’ve also threaded the machine with two strands of polyester thread and wound the bobbin with two strands. Topstitching thread was a little too thick and a single strand of thread didn’t seem enough. I was surprised that the machine sewed fine with two strands in the bobbin. No adjusting was needed. Be sure and use polyester thread. The chemicals used in tanning leather will degrade cotton thread over time.
I prefer the clean look of invisible zippers but they can be tricky to get right and you can’t remove misplaced stitch marks. Use a zipper at least 2 inches longer than the finished length. In this method you’ll need the extra length to pull the zipper slide out of the way for stitching. I stabilize the seam with lightweight fusible interfacing. Press it on the wrong side using an iron fitted with a Teflon shoe. Stitch the seam closed up to the zipper. Lightly steam press (I also use a press cloth or brown paper when working on the right side) and pound the seam open. I use a soft face mallet and place the seam over a rounded wooden stick to prevent the seam allowance from making an impression on the right side.
Measure the width of the zipper tape. This one is 7/8 inch. Mark exactly 1/2 of this width (7/16) on the inside seam allowance of each side of the zipper opening. Pin the zipper along the marked line placing pins within seam allowance only. Machine baste along outer edge of zipper tape.
Repeat for the other side of the zipper. The zipper is now basted in place but since the basting stitches are on the outer edges there is enough room to reach in with narrow nose pliers or a clamp and pull the slide below where the zipper will stop. Mark where the zipper will stop. Using a regular zipper foot (an invisible zipper foot won’t work as it doesn’t allow you to end exactly where the seam begins), roll the coil out of the way and stitch close to the zipper coil. Stop exactly at the mark. I pull threads through and tie rather than back-stitching which would weaken the seam in leather. Now pull the slide to the zipper top using pliers if necessary.
The stitching should look like this. Notice that the seam line stitches and zipper coil stitches don’t line up exactly. The zipper coil stitches are slightly further into the seam allowance. If the stitching lines weren’t offset just this small amount, you would get the dreaded pucker at the bottom of the zipper. Here’s the completed zipper installation totally smooth and no tell-tale sign of where the zipper stops.
Sewing hooks and eyes on the waistband for a closure won’t work too well. I use a hook and bar with prongs and a backing plate. The waistband has been sewn on from the right side. I’ve interfaced it with Petersham ribbon and added a rectangle of Ban-Rol (a rigid interfacing which resists tearing) to support the fasteners and prevent them ripping through the leather. I’ve used an awl to create small holes for the prongs. The hardest part is determining the exact location before punching holes.
Once the bars and hooks are in place, fold the waistband over and stitch close to the previous stitching. Trim on the underside.
To create this Gucci inspired silk crepe de chine shirt, I needed to find pleated ribbon trim. Where do you find such trim in the right color, width, etc.? It’s much easier to make a custom pleating board and make your own.
I started with a length of drapery heading. It’s a stiff buckram used to support pleats in drapes and worked great for this. Cut of a length about three times the length of your finished pleater board. You don’t need to make it more than about 4-5 inches long. I started with about 13 inches of buckram.
Mark parallel lines (I used a water soluble marker rather than a lead pencil. I might want to use this for white trim later and was afraid of pencil marks rubbing off). Mine are 3/8 inch apart. Score the lines with scissors to make folding easier. Line one folds up, line 2 folds down, line three is a placement line. Score and fold the length of buckram.
Press the pleats flat. Fuse a stiff interfacing to the wrong side of the pleater. The right side will have little louvers that ribbon or fabric can be tucked into. When you’ve inserted trim into all the louvers give it a press, let cool and remove. If a longer length of trim is needed, tuck the last pleat into the left side louver and continue.
Notice the pleats reverse direction. I did this at the center back collar so that the pleats would fold towards the front on both right and left sides of the finished collar.
Form enough pleats to reach from center front to center back of the collar. Then flip the ribbon over to the “wrong side”, line up your last pleat, and continue with the opposite side facing up. A box pleat will from at center back. I also made sure the pleats on the cuffs were facing towards the back of the garment.
I like to use a finer thread for the buttonholes; 60 weight cotton works well. Hopefully all goes well and the buttonhole foot holds the fabric securely. Sometimes disaster is lurking and the fabric slips.
Getting those tiny stitches out without damaging the now complete shirt is nerve-racking. I discovered a new use for my furriers knife.
This little baby is SHARP and does a wonderful job of precision cutting. I used a fine gauge machine needle to isolate a few stitches, then carefully cut the threads using the machine needle as a buffer to protect the fabric. This works better if you work in sections. This knife is also my new tool for cutting buttonholes. The blade is super thin and makes cutting a narrow slit easy.
After the stitches have been removed and fabric pressed there’s almost no sign of the mishap. Work a new buttonhole and the disaster is averted. I also found that increasing pressure on the buttonhole foot helped avoid this happening in the first place.
A couple of my blogging friends have explored the world of pleating. Jacqueline of Words to Stitch By mentioned this book: Complete Pleats by Paul Jackson. There is a chapter detailing his method for making pleating molds and steam setting pleats in fabric. Doing yardage is probably best left to the pros, but I’m excited to try a few of the ideas on smaller sections of fabric.
Poppykettle just wrote about her visit to the pleating shop in Melbourne. Melanie posted some wonderful photos of the process. I’ve used International Pleating in NYC for large projects like the skirt for my mother-of-the groom dress a couple of years ago. The pleats have stayed perfect even after being covered with dust and sand and a douse in the sink to clean. Use synthetic fabrics only if you want to try a pleated project. Natural fibers will pleat but the pleats won’t last through the cleaning process.
For the backyard wedding, I wanted something easy, yet elegant. When you’re the resident dress designer/maker, showing up in something not of your own creation doesn’t work! I had my hands full with the bride, mother of bride, bridesmaids, etc. but managed to crank out a tunic style dress with Coco (and Karl) in mind.
My starting point was fabric from the Haute Couture section of Mendel Goldberg Fabrics. I chose a wonderful French boucle highlighted with tiny sequins woven into the fabric. With careful planning, the dress required only one yard of fabric; here is what was left over.
I used my basic pattern block and made the following adjustments. If you start with another tunic style pattern, and want to get this look, make sure your pattern has a high, jewel neckline. If your pattern has a lower neckline, the collar might be too large and will stand away from the neck.
Close the armhole and shoulder darts, combining them into the underarm dart. Angle the new underarm dart towards the lower edge.
I chose to eliminate the front fisheye darts and transfer some of the dart shaping to the side seam. The bib placket drops from just outside the neck edge to the bust line. I played with shaping the bib wider at the top and tapering slightly but that design created a problem with trim placement. Having the bib placket the same width from top to bottom allowed the trim rows to be evenly spaced. The back was used as is with fisheye darts. The shoulder dart will be eased. The skirt was pegged about 3/4 inch from low hip line to hem.
Next I drafted a collar and stand. Some drafting books suggest curving the collar stand about 1/2 inch but I find the stand will hug the back neck better if more shaping is used. I’ll increase the curvature of the stand by shaping with a steam iron.
All collar pieced are cut from cardboard which will help when pressing. I’ve also cut a collar lining pattern 1/8 inch smaller to keep the undercollar out of sight. The Curve Runner makes measuring curved edges easy; very helpful when drafting collars to fit the neck.
The cardboard helps when pressing seam allowances under and ensures the collar is perfectly symmetrical. Fell stitch the under collar to upper collar.
Pressing over cardboard also helps shape the collar stand. I used satin faced organza to line the collar, stand and as a base fabric for the bib. This organza is more opaque and stiffer than regular silk organza and is harder to shape into a smooth curve.
Designing trims for the placket was the most fun part. I used the same satin faced organza as a base fabric and applied multiple layers of ribbons and braids. Most were sewn on by hand to maintain a soft, couture feel.
I had some leftover tweed from Linton. I save my scraps of tweeds and boucles as there is often wonderful trim hiding in the fabric. Linton fabrics are woven with continuous strands so un-weaving produces a long continuous length of trim. I also used the fringed selvedges from the French boucle. Also found great buttons!!!
I had just enough scraps to cut bias strips for a hem fringe. Two layers of cotton batting padded the center. A blunt tapestry needle helps to un-weave the edges.
Finished! Here’s a glimpse of the inside. Silk crepe de chine fell stitched to armseyes and placket. Side zip makes it easy to get into.
Next post will detail the design and construction of the bride’s outfit.


 Although many machines can sew acceptable buttonholes, there is nothing like a handworked buttonhole to distinguish a garment as couture. Now for the good and the bad. The good thing about making buttonholes by hand is there is one basic stitch and you simply repeat it over and over. The bad is that it takes hours, and hours, and hours of practice to get the stitches narrow and evenly spaced with just the right tension.


