I’m working on my schedule for upcoming classes and asking for input as to what you would like to see offered. In the past I’ve done in-person sessions in south Florida and Rhode Island. A benefit of the pandemic was to make Zoom classes more mainstream. I’ve done numerous trim classes via Zoom as well as individual sessions tailored to creating a custom dressform and have been experimenting with French jacket classes.
Possible options include: in-person sessions in south Florida (Palm Beach Gardens area). Other locations are also under consideration. What topics are of interest? I’ve done sessions on French jacket construction, drafting a personal moulage/sloper and creating a custom dressform. Several have taken my boucle bomber jacket class and I’m scheduled to teach that in Portland, OR in October. Any interest in a bomber jacket class/ custom trim class at Mendel Goldberg Fabrics?
Zoom classes are great. They reach a worldwide audience plus no travel expenses, but virtual lessons remove the opportunity for hands-on fitting.
Leave a comment indicating what you might be interested in, location and time of year. You can also email me at: MF953@aol.com.
The creation of this ensemble required much more problem solving than might appear. The fabric is a lovely designer boucle from Mendel Goldberg Fabrics and the contrast color stripes, both vertical and horizontal, presented a challenge in matching.
I constructed the sheath dress first. The darker navy stripe looked too dominate when placed on the center front. A better placement was to have the more muted blue stripe at center front. Placing the same at center back resulted in two dark navy lines next to each other along the side seam which didn’t look so wonderful. The solution was to move the center back just slightly and also shift the side seam towards the back.
The jacket was to be just below the waist with 3/4 length sleeves. My goal was to have the dominant stripes line up when the jacket and dress were worn together. A classic French jacket design has princess seams ending at the shoulder. While cutting the fabric as per the pattern fit my client’s custom padded mannequin, the extreme mismatch of the fabric design wasn’t so great.
My customary way of dealing with this is to shift the princess line closer to the neck and use steam to manipulate the fabric into shape. Anyone who has taken a French jacket class with me has experimented with this technique. Unfortunately, the fabric just wouldn’t cooperate. This boucle was mostly cotton, which doesn’t yield as easily as wool, to heat and steam. I might have been able to get away with putting in a dart, but the converging lines on the upper chest didn’t look great.
What worked best was to rotate the princess seam into a horizontal bust dart. I created a new princess seam which was shifted closer to the side seam and away from the bust point. Waist shaping was incorporated into the seam. Cut along the new seam line. The part of the dart closest to the side seam can be joined while the remainder of the dart forms what’s known as a Dior dart. Apply the same alteration to the back pattern by relocating the princess seam to start in the armseye. Waist shaping gets moved to the new seam lines.
Finished result of all this careful pattern work and attention to stripe placement. Vertical lines on both the dress and jacket match!! I was careful to place the horizontal pink stripes away from the fullest part of the bust. The Dior dart was also placed midway between two pink horizontal stripes so not not to appear awkward when sewn. Keeping the spacing between pink stripes consistent between the dress and jacket also needed to be taken into consideration. It probably looks effortless but if you’ve ever matched plaids, know otherwise.
The lining is a Pucci print chiffon underlined with pink silk crepe de chine. Yes, the lining was underlined. The chiffon print was such a perfect compliment to the boucle it had to be used but too transparent to hide the inner construction. Interestingly white underlining didn’t make the chiffon as opaque as a light pink.
Finishing details were handworked buttonholes with the reverse side of buttonholes finished with very narrow faux bound buttonholes. I used a variety of coordinating yarns plus a few fibers pulled from the boucle yardage as trim.
So much thought went into the creation of this and my client is thrilled with the result. Thanks for reading.
Here’s an idea for using short lengths of boucle fabric. Often I’ll have a short length of boucle fabric left over (about 5/8 to 3/4 yard) from a project. It’s too nice to discard yet not enough for another garment. Why not combine the boucle and a complimentary fabric to create this casual jacket.
Here I’ve used a length of black/metallic gold boucle for the jacket body and paired it with a scrap of black cashmere. Hundreds of tiny heat set crystals were scattered on the sleeves (prior to construction) and fused in place. Chunky ribbing finishes the bottom band, collar and cuffs. For a little added bling, I chose to embellish the cuffs with more crystals, this time stitching them in place.
Construction of this style jacket with additional variations is offered as an alternative to the classic French jacket class. We’ll use Vogue 1877 or similar style pattern as a starting point.
Embellishment ideas include the option to add heat set/ sew-on crystals. Kits containing stones and transfer paper are supplied in class.
As an alternative to crystals, here’s an idea from a recent runway show using scraps of various boucles cut into appliqué shapes. A video explaining the creation of these embellishments shows boucle flowers being flattened by a heat press.
Leather, suede or man-made versions of either are another option for contrast sleeves. Chunky ribbing will be supplied and is available in: black, dark grey, light grey, dark brown, olive green, navy, beige, ivory and white. Custom made zippers can be ordered from Botani Trims or Pacific Trim in NYC. Both offer options to choose zipper tooth size, zipper tooth color as well as zipper tape color and style of pull.
Manipulating and shaping fabric using heat and moisture is frequently used in tailoring. Rather than using seams to create shape the fabric is molded to shape with an iron, referred to as “ironwork” in the tailoring world. I’ve experimented with this technique for quite a few years. Here’s a link to my first post describing the process.
I incorporate this in my French jacket classes to eliminate the pattern mismatch along the princess seam lines. Vogue 7975 is frequently used as a starting point when constructing a French jacket. It has minimal ease and princess seams which extend from shoulder to hem, allowing plenty of opportunity for fit adjustments.
Many of the boucle fabrics used in making these jackets have a definite horizontal pattern. When the fabric is cut according to standard procedure, a mismatch of the horizontal lines is obvious along the princess line, especially the upper portion of the front from bust apex to shoulder.
I wanted to see how far I could push the ability to shape fabric and eliminate this mismatch. Many fitting demos are done on a standard dressform which is shaped more like a runway model than that of the average body. The difficulty increases as you fit more curvy figures and the fabric is required to mold to that curvy shape. Why not increase the bust curve of a mannequin and see what happens? Here’s a standard dressform wearing a fuller size bra which has been filled out with bust pads. Let’s see if I can get the fabric to mold to this very curvy shape.
I started with Vogue 7975 in a size 10 which was the best fit for this figure’s shoulders but much too tight in the bust. Using a larger size which fit the bust would have been massively too large in the shoulders, and a much more difficult alteration. Also, standard patterns are drafted for a B cup size so while the bust circumference increases, so do the shoulders and upper body. Compare the two patterns: Vogue 7975 on the left and the corrected pattern on the right.
The shoulder width on both patterns is the same but notice the much larger bust apex to shoulder dart is wider for more shaping. Increasing the dart width while maintaining shoulder length pushes the dart (shown in red) closer to the armseye. I don’t like the look of the princess seam placed that close to the armhole, so rotated the dart (shown in black) closer to the neck edge. Now let’s see what happens with the horizontal pattern found in many fabrics.
Photo on the left shows my pattern with horizontal lines drawn as the fabric would be cut in a standard layout. Middle photo demonstrates how those lines intersect along the seam line when the dart ending mid-shoulder is sewn. The lines don’t match and start to slope upwards. Try the seam placed closer to the neck. It’s a little better but still not a great look.
What would happen if I manipulated the princess seam on the side panel into a curve and forced the straight grainline to follow the curve? Start by moving the upper portion of the side front panel to curve towards the armhole. The fabric will start to bubble up where it wants to form a bust dart. Working carefully so you don’t press creases into the fabric, steam and compress the fibers into a curve. Keep the shaping along the lower armhole and where a horizontal bust dart would be placed. Most boucles are loosely woven and will tolerate an impressive amount of manipulation. In the right photo see how much I’ve been able to curve the fabric. Work slowly. The most common mistake students make is to try and compress too much at one time. You can always curve more but it’s very, very difficult to remove an unwanted crease.
Comparison between the left side which has been shaped and the right side which has been cut and sewn according to the original pattern. Horizontal balance lines thread traced in black are helpful when fitting.
Side views of both methods. The fabric is distorted in the underarm area but much of that will be hidden once the sleeve is in. I think it’s more important to have a clean, uninterrupted look across the upper chest.
I’ve also experimented with decreasing the dart width and incorporating the needed shaping in an armhole dart but prefer the look obtained by shaping the garment sections.
Another modification that larger busted shapes find flattering is a V neck. The vertical lines created by the V tend to visually slim the figure. It’s easy to change the neckline. I have students start with the jewel neck and place a ribbon/drafting tape along the front to determine where the V should end. It can be placed higher or (if you plan to wear a blouse or camisole under the jacket) lower for a more vertical line. The jacket often looks better with a small shoulder pad. Here’s one taken from a RTW Chanel jacket.
This extreme shaping does require judgement when choosing fabric. Boucles such as these are:
1. Loosely woven which gives space to compress the yarns closer together
2. Have subtle horizontal lines or relatively solid color
3. Not too much metallic or other yarns which don’t react will to heat and steam
If you will be incorporating a great deal of shaping, use caution with fabrics that have a large obvious check, sequins or large amount of metallic yarns. The fabric on the right is mostly cotton with a tight weave. A student brought this to class. It wasn’t behaving so we split the jacket front into 3 panels, so each panel required less shaping.
Join me in Palm Beach Gardens to learn more about this technique. I’m also offering a variation of the French jacket: The Couture Boucle Bomber. It’s a more casual look, looser fitting and requires about 3/4 yard of boucle; great stash buster! We’ll add contrast fabric or leather sleeves, ribbing and loads of fun embellishment. Details coming soon.
This dress was christened the “Tel Aviv Dress” owing to the fabric’s design reminiscent of the distinctive architecture of the “White City” or Tel Aviv.
The fabric is from Mendel Goldberg Fabrics, NYC and is a silk cloque. The name cloque is derived from the French term for blistered, meaning the fabric has an irregularly raised, “blistered” surface. It is a border print so the biggest challenge was deciding how to place the pattern pieces for the best effect.
The best way to visualize this was to spread the fabric on a large surface and experiment (using yardstitcks) with various positioning of the skirt and bodice sections.
The best option seemed to be that of the large photo as it placed most of the middle design around the skirt hem and still left room to cut the bodice. The hem would be faced so no need to allow several inches for a turned-up hem.
Rather than mess with altering a commercial pattern, I work from a custom block/sloper drafted from the client’s measurements. Once I have the master pattern, it’s a matter of manipulating the darts to obtain a princess seamed bodice.
The skirt was to be full but the rigidity of this fabric didn’t lend itself to attractive gathering or pleats. I opted to use large darts. A center back zipper can be incorporated into a dart, (shown in red on the right photo), eliminating a center back seam.
A wide strip of fabric allowed me to shift the bodice pieces around and play with the design placement.
Always fun to see the finished dress on a live model.
Registration is open for my upcoming in-person classes. I’ll be hosting a sewing retreat in Bristol, RI October 2-8, 2023. Immerse yourself for 7 days of couture level sewing in the charming town of Bristol. Class fee includes 7 days of instruction plus accommodations at an Air B&B, snacks plus a group dinner at one of the lovely historical restaurants.
The November class in Palm Beach Gardens, FL is geared towards creating a custom French Jacket. You’ll construct a muslin test jacket prior to class (instructions provided). After perfecting the fit, you will be guided through the steps to create your own version of this iconic jacket. Read the class description for additional information.
The January 8-14, 2024 class is an opportunity to work on, or complete, your French jacket, construct a custom dressform or another project of your choosing. I will contact you prior to class to discuss your plans. Some students begin a new project while others bring partially completed ones for expert assistance in completing the garment.
This class is a great time to create a dressform which replicates your body. You will also draft a master sloper which serves as the basis for altering patterns or creating your own. Completed forms fly easily in a golf bag as checked luggage.
I am also offering a 1 or 2 day class this spring, May 20-21 at Mendel Goldberg Fabrics in NYC. The class will be geared towards creating custom trims to coordinate with Alice’s exquisite boucle fabrics. She will clear the shop for us to work Saturday and Sunday. This is a hands-on workshop where I’ll guide you through how I choose yarns and design a trim to match the fabrics. Techniques used are crochet, braiding, braiding on a Japanese Kumihimo stand and more. I will also explain my method for handworked buttonholes in boucle fabric and the specialized notions which give a professional result. Different topics are covered each day; Saturday and Sunday are NOT repeats, so attend both days for the best experience. You will enjoy this class more if you are comfortable with basic crochet stitches.
Class registration can be accessed through the “Classes” drop down menu or “Shop” and then look at the Catalog. Hope to see you. Any questions, email me at MF953@aol.com or leave a comment. Thanks for reading.
Finding trim for your French jacket is easier when you are working with a multi color fabric, especially one with black, white or another neutral color. I think finding something pre-made for this color would be near impossible. You could introduce a contrasting color but often that’s not what you want.
Here’s a step by step tutorial on the process I used for this trim. If you’ve taken one of. my Zoom trim classes, much of this will be familiar. I used a silver metallic yarn for the base of the trim. Using a D hook, chain the desired length. Turn and make a double crochet in the fourth stitch from the hook. Chain 1 stitch. Repeat this pattern (double crochet, chain 1) in every other stitch.
Photo on the right is a closeup of the finished crochet work. Top is “wrong” side with purl stitches, bottom image is “right” side with smoother chain stitches.
If you make several lengths of trim, be sure to be consistent in which side you choose as the “right” side. Some trims look better when one side vs. the other is used as the “right” side. For this jacket, I used the side with the purl stitches for the right side.
I used the shiny yarn with variegated shades of teal. Some yarns can be pulled through the fabric. This one didn’t pull easily, so I cut closely along each shiny yarn and pulled it out. Tie the strands together and work a chain stitch along the long edges of the metallic base. To determine number of stitches needed, I make a sample using 25 stitches. Measure the sample and multiply number of stitches by the desired finished length. This jacket required 600 stitches for a length of trim which would go around the hem, along front edges and around neck. The trim for the sleeves and pockets was worked as another piece.
The trim is uneven and needs to be steam blocked into shape. I used the third from the largest tube from the Trim Tube set. Weave the tube in and out between stitches and steam. Hover the iron over the trim; you don’t want to compress it. The tube is 12 inches long so steam 10-11 inches at a time, let cool, and weave the tube through the next section. The ends where the teal yarn has been tied together will be tucked underneath when stitching to the jacket.
Stitch the trim in place. It works best to sew the outer edge around corners, then work the trim in place along the inner edge. The join between lengths of teal yarn can be tucked to the underside. The trim is very flexible and easily navigates curves and corners. I join the trim at the left hem.
When you’ve determined where to join the ends, press hard to flatten only the trim which will be turned under. Use a tailors clapper to flatten the trim as much as possible and let cool. Turn the ends under and stitch. The join will be almost invisible.
To create a finished end (nice on pockets and the sleeve vent), measure the finished length needed. Starting along one long side (it’s harder to stop and start at a corner) make the chain stitch with teal yarn. To turn the corner, make two chain stitches in each corner. One stitch for the long side and one stitch for the short end. Make 1-2 stitches across the short end of the trim. Then two stitches in the next corner. When you reach the starting point, pull yarn to the underside and fasten with a few small hand stitches. To secure the metallic yarn, machine stitch across a few times, compress the end with steam and cut off close to the stitching. The flattened end will turn under.
I will be offering additional trim classes via Zoom. Probably one in December and more starting in January. There are also a few openings left in the January class if you would like to work in person. We’ll be doing a variety of projects in the class: pattern drafting, French jackets: both starting one and completing ones already begun, dressforms and more.
My trim classes have sold out quickly in the past, so leave a comment if you would like advance notification of the schedule. Have fun creating your custom trims.
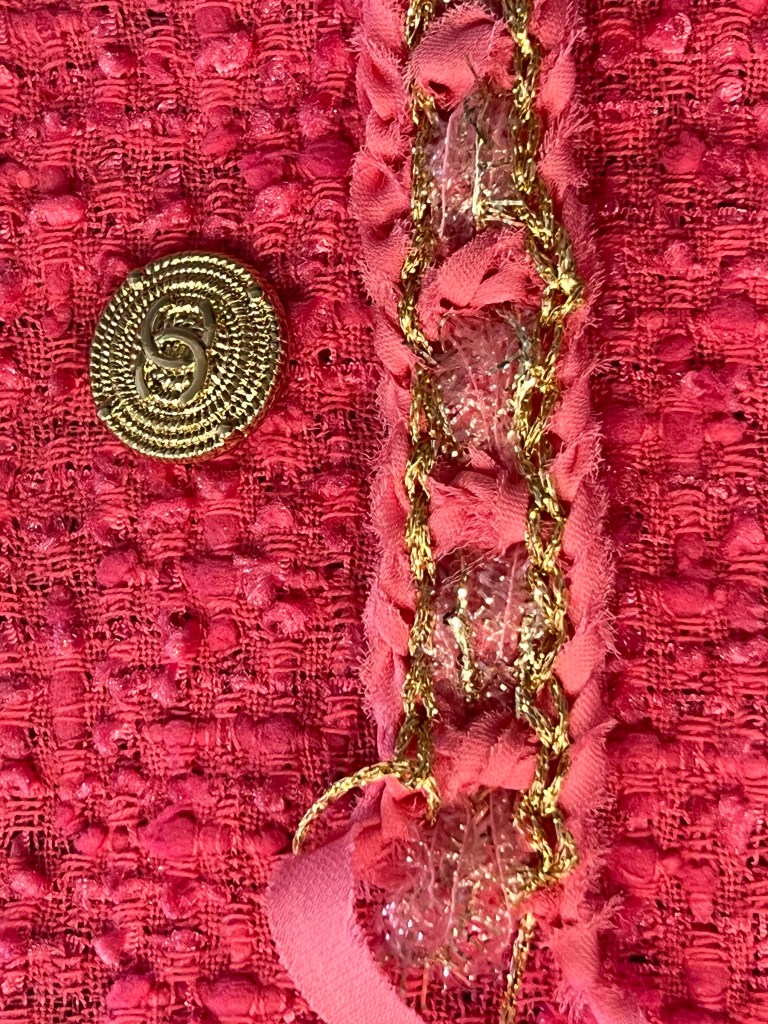
Finding trim is easier if you’re looking for black, white or common color. This fuschia jacket made from a wonderful soft Mendel Goldberg boucle wasn’t going to be easy, particularly if I wanted to avoid introducing another color. I did add silver or gold, depending on buttons.
When creating a trim, I make several variations to experiment with different yarns. If you’ve attended one of my trim classes, the techniques will be familiar.
All examples of trim use the same basic method. I make samples about 4 inches long. Once you decide which version to use, calculate the finished amount of trim you need. Measure the sample created with 20 stitches. If 20 stitches gives you 4 inches of trim and you need 40 inches, then start with a chain of 200 stitches.
First create a crochet base. Chain 20 plus 3. Turn and make a double crochet in every stitch. Weave a brass tube through the finished base to block it and even out the stitches.
Let cool and remove the tube. Weave a smaller tube through the stitches as shown. Pull the desired yarn or fabric through. Push the woven strand to one side and weave the tube through, alternating in and out with the first strand.
Chain stitch around the edge. Here I’m using a strand of flag yarn pulled from the boucle fabric. Using strands of yarns from the fabric guarantees a perfect match.
Finish with a chain stitch in the center. I did a version in gold and one in silver to audition with different buttons.
Trim 1: Using a size F hook, crochet the base with Sesia Elegant yarn with color: Rose. Chain 23, turn and make double crochet in every stitch.
Cut bias strips of fuschia silk double georgette 1.5 inches wide, fold in half lengthwise and stitch scant 1/4” from folded edge. Turn and stuff the silk tube with bulky yarn.
Weave the silk tubes though alternate double crochet stitches. Make a chain stitch through the middle with gold yarn. Finish the edges with a chain stitch using flag yarn pulled from leftover boucle.
Trim 2: Same as trim 1 except use size D hook for the base. Weave 3/8” wide bias strips of silk georgette through. Chain stitch through the middle with size C hook. Edge with the flag yarn from fabric.
Trim 3: Crochet base making double crochet every stitch. Weave one row of gold tape yarn, one row 3/8” wide silk georgette, one row gold tape yarn. Edge with flag yarn from the fabric.
Trim 4: Crochet base using gold metallic yarn and size E hook. Chain stitch along each edge with flag yarn from boucle fabric.
Trim 5: Use 3/8” wide bias strips of silk georgette as yarn. Crochet the base. Weave 4 strands pink tinsel yarn plus two strands metallic yarn through. Chain stitch inside the edge with gold metallic yarn.
Hard to make a decision. Possibilities are endless and by making your own trim you can guarantee a perfect match. Two opportunities to further explore French jacket construction and trims: New England Retreat, September 19-24 and Couture Sewing Class, Palm Beach Gardens, FL, January 16-21. 2023. These classes are not limited to making a French jacket but if you choose to work on a jacket, you will receive the identical information presented in the November French jacket class. The classes are small and allow for individualized instruction. You will receive my 100 plus page manual describing construction techniques unique to the French jacket plus an extended session on trims.
What do you do when this extraordinary fabric finds its way to the sewing room?
Here’s the designer dress to clone.
The pattern is a slim fit basic bodice with princess seams ending in the armseye, both front and back. The skirt draft is a flared skirt, split along princess lines and pleats added. Precise pattern matching is critical. The easiest way is to cut every garment section from translucent pattern paper; full front bodice/skirt, right and left bodice/skirt pieces. Lay everything out and be sure the motifs line up before cutting anything.
Notice that the grain lines are centered on each skirt section. The fold and lap lines of pleats are also marked, making it easy to position pattern pieces accurately.
This fabric frayed like CRAZY so each edge was serged using super fine thread; my favorite is Gutermann Scala 360, TEX weight 8. The serged edge adds no bulk and can’t be felt. This fabric was also super resistant to pressing. It folded easily along the crossgrain but required loads of steam plus my large tailors clapper (made from lengths of unfinished hardwood) to convince the seams to lie flat.
I chose a crisp silk taffeta line the skirt but felt it was too stiff for the bodice lining. Silk charmeuse was perfect. Lining extends to the edges of armholes/ neckline and fell stitched in place. For the skirt hem, I cut a 4” wide facing from silk taffeta and applied it to the hem. Edge stitching along the inside of the pleats keeps them in place. French thread tacks keep the skirt lining in place.