The creation of this ensemble required much more problem solving than might appear. The fabric is a lovely designer boucle from Mendel Goldberg Fabrics and the contrast color stripes, both vertical and horizontal, presented a challenge in matching.
I constructed the sheath dress first. The darker navy stripe looked too dominate when placed on the center front. A better placement was to have the more muted blue stripe at center front. Placing the same at center back resulted in two dark navy lines next to each other along the side seam which didn’t look so wonderful. The solution was to move the center back just slightly and also shift the side seam towards the back.
The jacket was to be just below the waist with 3/4 length sleeves. My goal was to have the dominant stripes line up when the jacket and dress were worn together. A classic French jacket design has princess seams ending at the shoulder. While cutting the fabric as per the pattern fit my client’s custom padded mannequin, the extreme mismatch of the fabric design wasn’t so great.
My customary way of dealing with this is to shift the princess line closer to the neck and use steam to manipulate the fabric into shape. Anyone who has taken a French jacket class with me has experimented with this technique. Unfortunately, the fabric just wouldn’t cooperate. This boucle was mostly cotton, which doesn’t yield as easily as wool, to heat and steam. I might have been able to get away with putting in a dart, but the converging lines on the upper chest didn’t look great.
What worked best was to rotate the princess seam into a horizontal bust dart. I created a new princess seam which was shifted closer to the side seam and away from the bust point. Waist shaping was incorporated into the seam. Cut along the new seam line. The part of the dart closest to the side seam can be joined while the remainder of the dart forms what’s known as a Dior dart. Apply the same alteration to the back pattern by relocating the princess seam to start in the armseye. Waist shaping gets moved to the new seam lines.
Finished result of all this careful pattern work and attention to stripe placement. Vertical lines on both the dress and jacket match!! I was careful to place the horizontal pink stripes away from the fullest part of the bust. The Dior dart was also placed midway between two pink horizontal stripes so not not to appear awkward when sewn. Keeping the spacing between pink stripes consistent between the dress and jacket also needed to be taken into consideration. It probably looks effortless but if you’ve ever matched plaids, know otherwise.
The lining is a Pucci print chiffon underlined with pink silk crepe de chine. Yes, the lining was underlined. The chiffon print was such a perfect compliment to the boucle it had to be used but too transparent to hide the inner construction. Interestingly white underlining didn’t make the chiffon as opaque as a light pink.
Finishing details were handworked buttonholes with the reverse side of buttonholes finished with very narrow faux bound buttonholes. I used a variety of coordinating yarns plus a few fibers pulled from the boucle yardage as trim.
So much thought went into the creation of this and my client is thrilled with the result. Thanks for reading.
A distinctive feature of many French (Chanel) style jackets is the iconic three piece sleeve. Vogue 7975 is a favorite starting pattern for many; however the sleeve is a standard two piece. I’ll go through my method for converting the pattern from a two to three piece sleeve.
First, trace the pattern onto translucent pattern paper. Eliminate the seam allowances. It’s much easier to alter patterns when you aren’t dealing with seam allowances. Make changes to the pattern, then add seam allowances back if you are more comfortable working with patterns which have seam allowances included. Include the marks indicating underarm and shoulder points as well as grain lines. Mark the front and back of the sleeve cap to eliminate confusion.
Working on a grain board/cutting mat makes it easy to keep the pattern properly aligned. Arrange the pattern pieces as shown with grain lines parallel to each other and seam lines just touching along the back armseye seam. Tape or weight the paper so it doesn’t shift.
Using a second sheet of pattern paper large enough for the entire sleeve, trace the shape of the sleeve cap from the underarm point to shoulder point, continuing through the front armseye seam. Mark the underarm and shoulder points. Also draw a line at a 90 degree angle to the grain lines intersecting the underarm point. This line represents the biceps width.
Move the undersleeve pattern to the front, arrange grain lines parallel to each other and trace the remainder of the arsmeye seam to the underarm point.
Also shift the grainline on the upper sleeve section so it is in line with the shoulder point. Connect underarm points with a horizontal line which should be perpendicular to the grainline.
Your draft should look like this:
Draw dashed lines from the underarm points to the hem. They will be parallel to the grainline and be the same distance apart as the biceps width. Measure the distance along the biceps line from back to the new grainline (intersects the shoulder). Measure distance from grainline to front underarm point. Compare the measurements. I’m working with a size 10 pattern. The back measures 7”; front measures 6.5”. Therefore the grainline is offset 1/2” from the midpoint of the front and back underarms. If your pattern size varies slightly, then use the measurements from your size. The additional curves which are mirror images of the armseye seam will be covered in upcoming steps.
Now calculate the sleeve taper from underarm to wrist. Measure the wrist on front and back sleeve sections and add them together for total sleeve wrist measurement. Size 10 is 9 inches. I want to offset the wrist by the same amount of the biceps. Divide 9 by 2 equals 4.5”. Add 1/4” to 4.5” for 4.75” back wrist. Subtract 1/4” from 4.5” for 4.25” front wrist. 4.75” plus 4.25” equals 9” so the total matches amount measured in the previous step.
Also draw in the elbow line. There are various methods for determining the elbow placement. You can measure from underarm to elbow. If you’re not sure, divide the underarm seam in half. Place the elbow about one inch higher than the midpoint.
Where the elbow and underarm seam intersect on the sleeve back, mark a point 1/4” wider than the elbow. Measure the distance from this point to the center grainline. Divide this distance in half (should be about 3 inches). Measure 3/4” down from the elbow line. Draw a line from this point to the halfway point just plotted, forming a dart at the elbow.
At the back wrist, mark a point 3/4” towards the center and 3/4” below the wrist hem. Connect the lower elbow dart leg to this point. The wrist will be shortened 3/4” so 3/4” needs to be added to the front underarm. Draw a line from the elbow to a point 3/4” to the right of the original seam.
Connect the front and back wrist hem with a smooth curve. Also shift the center grainline from elbow line to wrist 3/4” as shown.
Fold the pattern vertically, matching back underarm to grainline. Turn the pattern over with underside up. You will see the armseye curve. Using a red pencil, trace the curve as shown. Repeat for the front.
Now you will draft the narrow under-sleeve. Starting at the underarm, measure 1 and 1/4” to left of grainline; 1 and 1/8” to the right. Move to the elbow line. Measure 1 and 1/4” to the left, 1” to the right. Move to the wrist. Mark 1 and 1/8” left of the angled line, 7/8” to the right. Connect the points to form the under-sleeve. Shown in green.
The under-sleeve now needs to be removed from the outer edges of the back and front sleeve. Measure towards the center of the sleeve on both back and front, the same amounts that were used to draft the under-sleeve. Back underarm, measure in 1 and 1/4”, front underarm 1 and 1/8” towards center. Elbow line 1 and 1/4” along the back, 1” along the front. Wrist 1 and 1/8 at back, 7/8” at front.
This is the right sleeve. The under-sleeve as drafted is for the left sleeve. To create a right side pattern, flip the sleeve draft over and trace the under-sleeve onto pattern paper.
Flip the draft back to the right side and cut the back and front sleeve sections as shown. The elbow dart won’t be sewn as a dart. When constructing the sleeve, you will ease about two inches either side of the dart, drawing up the excess length to match the under-sleeve seam.
Shorten the front sleeve seam about 1/4” and redraw the wrist hem curve. The front seam will be stretched during construction to produce a better curve in the finished sleeve. Yes, the front sleeve seam that attaches to the under-sleeve will be slightly shorter than the corresponding seam on the under-sleeve pattern.
If you want to add sleeve vent for buttons/ trim, tape extensions onto the pattern. I used 1 and 1/2” wide and 4” long. If you want longer vents for more buttons, then just make the vent longer.
The grainline of the undersleeve can be changed to bias providing a little more flexibility in the sleeve.
In my recent moulage/dressform class, students used everything from a custom made full body form from Wolf to a display form found at Hobby Lobby. Evidence that you can get almost anything that resembles a body to work.
We ripped the existing base off the display form and replaced it with a wooden dowel. The dowel fit into a sturdy cast iron base and was a huge improvement over the rickety wooden one. Class begins with taking about 25 body measurements. We then draft a moulage, or mold, of the body. The drafted moulage pattern is cut from sturdy muslin and tested on the body. Fit adjustments are made and transferred back to the paper pattern. When all looks good, we cut the final dressform cover from heavier muslin and do one last fit check.
The muslin cover is draped onto the form. Placement and amount of padding is assessed and we start padding the form to fill out the cover. Depending on where padding is needed, I’ll suggest using various bust cups, cotton quilt batting or polyester batting. The poly batting is steamed to compress and firm up the shape. The display form fit her neck and shoulders surprisingly well. Bust, waist and hips can all be customized with layers of compressed batting.
At the opposite end of the dressform spectrum is a custom made full body form from Wolf. This student had wrestled with fitting problems for years and tried everything from body scan versions to this custom model but nothing seemed to address a key fit issue.
She had already drafted a custom cover to fine tune the fit. It needed firmer padding and a key adjustment for a high hip. After drafting the moulage it was test fit and elastic tied around the waist to pinpoint the fit issue. The right hip significantly higher causing skirts and pants to ride up on the right side. Notice the position of the waist when her back draft is laid out on a grid. Lowering the hem on that side really doesn’t fix the problem.
We carefully marked the dressform cover and added padding to duplicate the hip contours. The finished form is a much better fitting aid with balance lines correctly placed.
We tested the fit using several of her dresses. The new mannequin pinpointed the need for a slight full bust alteration to remove the drag lines around the bust dart. The moulage patter is used to create a custom sloper or basic pattern which can be used as the basis for drafting additional styles and correcting commercial patterns.
The next custom moulage/custom dressform class will be held January 10, 11 and 12 in Palm Beach Gardens, FL. For more information: Dressform Class
I’ve created a new category on my main menu which will be links to free patterns, sewing/workroom tips, and other topics which readers may wish to refer back to. Not everything is linked yet but will be updated as soon as I organize. Having everything listed under one category will eliminate the need to search through past posts.
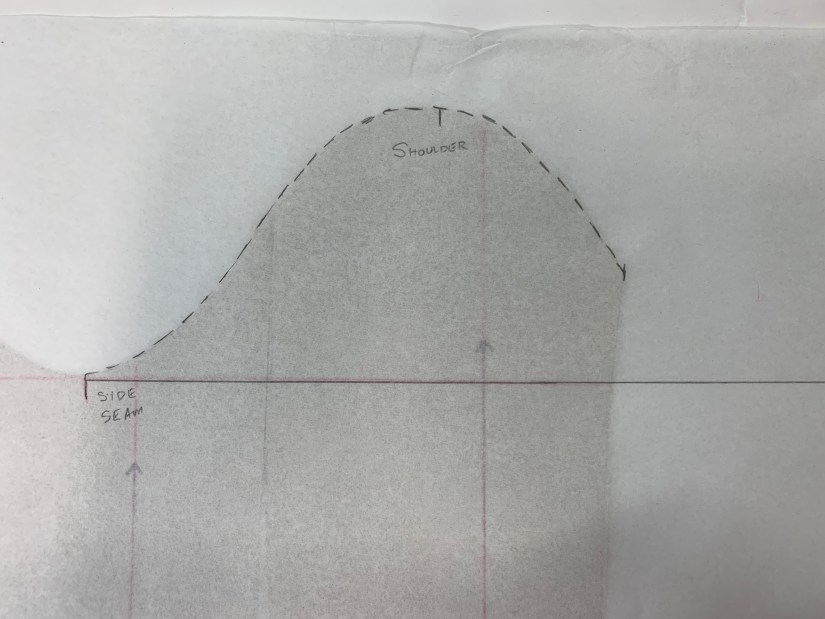
Here’s my pattern for a shoulder pad I designed several years ago. I love the shape of this shoulder pad as it has a built-in sleeve head and you can vary the thickness according to your needs. I’ve started making these using wool felt (which is available at JoAnns Fabrics) for a very couture shoulder pad. The wool felt is not inexpensive but one yard goes a long way and it’s a perfect use for the discount coupon. Cotton quilt batting also works well.
I’ve been writing this blog since 2014 and am thrilled to learn the tutorials presented are helpful to other sewists. Joyce posted photos of her completed jacket on Instagram and tagged me as a resource for her construction methods. I invited her to write a post, highlighting the information she found especially valuable.
Thank you Joyce, for taking the time to write this and allowing me to share your work.
Hello! My name is Joyce. After my recent completion of a French jacket, Mary asked me to write about my experience in a post for her blog. Before we get started, here’s a bit about me: I live in southern Manitoba, Canada with my husband, who is also my best friend! We have raised two children, who have blessed us with five grandchildren. I am a retired Interior Design Consultant & Kitchen Designer. My talented mother taught me to sew, crochet, knit, and hand embroider. From the time I was five years old, she allowed me to use her sewing machine. I made a lot of clothes for my dolls until the age of ten when I began sewing my own clothes. My favourite things to sew are coats, jackets and dresses. My favourite fabrics are made of natural fibers.
About seven years ago, I began dreaming of making a French jacket. While reading blogs of sewists who documented their experiences on the subject, I became aware of the hours involved, as well as the couture techniques they had learned along the way. It was when I discovered Mary’s blog, cloningcouture.com, that I soon realized what a treasure store of information it is. Her precision and her impeccable attention to detail reveal incredible skill. I was amazed that she was willing to share her extensive knowledge and experience with her readers at no cost to them. I read each post in detail, bookmarking those I wanted to refer to later. By early 2019, I had collected all my supplies for this project, and was ready to begin. My fabric is appropriately called “Giverny Tweed”. The lining is silk charmeuse.
Of course, the first step was to make a well-fitting toile. I cut the body of the jacket according to Vogue 8804, but in reading online reviews, I heard repeatedly that the sleeve in this pattern was wide. Since I have thin arms, I knew I would have to draft a narrower sleeve. This is where Mary’s post https://cloningcouture.com/2014/08/04/chanel-and-the-sleeve/came to the rescue. I know she has since updated it, but her original method worked for me! I also changed my sleeves to full-length instead of the three-quarter length from the pattern.
As many of you already know, after fitting the toile, it is cut apart and used as the pattern to cut the pieces in the tweed and lining fabrics, adding wide seam and hem allowances. In hindsight, I should have fused Pro-Sheer Elegance Couture interfacing to the tweed at this point, since I was working with a fabric that frays very easily. Mary gives this advice in the following post: https://cloningcouture.com/2018/02/15/finishing-details-the-french-jacket/Instead, I used a stepped zigzag to secure the fibers along the edges.
Detail of the front, ready for machine quilting
Over the next couple of weeks, I interfaced the fronts with silk organza, quilted the silk charmeuse lining to the front and back pieces, before joining them along the princess and side seams. I really enjoyed slipstitching the lining seams together by hand.
Now that the body of the jacket was taking shape, it was time to turn my attention to the trim. I was unable to find a ready-made trim that complemented my fabric, but then I remembered Mary’s post on making your own. My first attempt was a crocheted chain using fibers from the tweed, but it was too narrow and did not contrast enough with the fabric. I was intrigued by Mary’s detailed instructions on Kumihimo braiding, so I decided to try my hand at it. See her post here: https://cloningcouture.com/2017/08/30/create-custom-trim-for-your-french-jacket/After locating a Kumihimo plate at my local fabric store and watching some YouTube videos on 10-strand braiding, I was ready to begin. After a couple of false starts, while deciding which fibers to use, I settled on four blue strands and two ivory from my fabric, in combination with four strands of ivory Phildar yarn left over from a sweater I knitted for my husband many years ago.
This was the set-up I used. It is certainly not the traditional way, but it worked for me. Every few inches I had to stop and release more material from my “bobbins”. It took me about three days to work out my setup and make three and a half yards of trim.
You can see it being “auditioned” here with the buttons I planned to use. Btw, although these were inexpensive buttons, they remind me of Coco Chanel’s favorite camellia rose.
After making the trim, I did some work on the sleeves, then packed the project away before going on vacation in March 2019. As it turned out, this is where the project stalled out until a couple of weeks ago.
I had been putting off making the handworked buttonholes, but one day I gathered up courage and got to work. First, I made a sample buttonhole to work out the method. Then, in a pleasant afternoon’s sewing, I made five buttonholes on the jacket front. You can see Mary’s post on buttonholes here: https://cloningcouture.com/2020/01/07/buttonholes-and-more-trim/
After crossing this hurdle, I knew I was on the home stretch. The next two days were spent finishing the sleeves.
Completed sleeves with trim and handworked buttonholes
After this, I applied the trim to front and neck edges with a running stitch and the occasional backstitch. It was actually easier to do than I thought it would be. Then I fellstitched the lining to the jacket edges. This was my favourite step!
Stitching the sleeves in by handSleeve lining basted into placeCompleted jacket
In summary, I learned so much about couture sewing methods while working on this project. I easily spent a hundred hours on it, but the result is something I will wear with much satisfaction for years to come. It has also given me a great appreciation for the work of couturiers. They are indeed a skilled lot!
Mary, many thanks for all your informative, detailed and inspiring posts on couture sewing! Thanks also for letting me share my experience with your readers. You can find me on Instagram at amakersshowandtell, where I post photos of my projects. They include sewing, watercolor painting, home decorating, gardening, knitting, and occasionally, upholstery. Best regards, Joyce
Several years ago I posted a pattern and instructions for creating a custom arm for your dressform. Since then, I’ve made a few improvements to the pattern and written more detailed instructions.
Here’s the new and improved pattern. It has cut lines for adjusting the width of the biceps as well as length.
Download and print the pdf file. Pages should be assembled as shown.
Be sure to set your printer to print at “actual size” or “no scaling.” The test square on page 1 should measure 2 inches square. The file is 7 pages. Tape together as shown and cut out the pieces. You will have an upper arm, lower arm, wrist cover, armseye cover, and shoulder attachment which will enable you to pin the arm to your dressform. The pattern has NO SEAM ALLOWANCES. This is to make any alterations you need to do easier. It is drafted for a bicep measurement of 11 inches. If you want a smaller or larger biceps, cut on the dotted lines and overlap or spread the pieces to desired measurement. Measure along the balance line located at the underarm on the lower arm and corresponding balance line on the upper arm. The length of the two balance lines added together are the finished biceps measurement. You can also lengthen or shorten the length between shoulder and elbow and elbow to wrist as desired. If you alter the biceps width, remember to add to the circumference of the large oval the same amount you added to the biceps. The wrist circumference can be increased or decreased in the same way. Adjust the wrist oval in the same way so that the circumference of the oval matches your desired width.
Here’s a sample layout if you want to increase the biceps width. Cut the upper and lower arm patterns apart on the dotted lines. Spread by the desired amount (if you want an additional 1 inch, spread the sections 1/4 inch). Notice I’ve increased the wrist only 1/8 inch at each cut line for a total of 1/2 inch more at the wrist circumference. You’ll also need to alter the wrist and armseye covers to compensate. This can be a bit of trial and error as the circumference of an eclipse (oval) isn’t straightforward math the same as a circle. Smooth out the seam lines over any spaces.
Cut out pattern pieces and lay out on sturdy muslin. I use this heavy weight muslin: Cloning Couture ~ Products ~ Muslin, Heavy Weight ~ Shopify (myshopify.com) but cotton drill cloth is a good sub. Add 3/8 inch seams with these exceptions: 3/4 inch seam allowance around the armseye oval and 1/2 inch around the wrist oval. Cut two shoulder attachment shapes. I prefer to mark the cutting lines lightly in pencil. Tracing with dressmakers carbon paper can leave unwanted marks on the finished arm form.
Mark all balance lines and match points with an erasable marker.
Stitch two rows of machine stitching 3/8 and 1/4 away from the cut edge along the elbow. Pull bobbin threads to take up ease in the elbow area. Tie threads.
Steam the elbow area to smooth the seam. Make sure you don’t have any creases. Join the upper and lower arms along points A, B and C. Press the seam open.
Close the dart at the top of the shoulder. Press towards the back.
You can add the balance lines now. Either stitch along the vertical and horizontal balance lines with contrasting thread or draw lines with a permanent marker. The lines can also be added when the arm is completed but it’s easier to do now when it’s flat. Smooth out any little jog at the elbow.
Stitch the remaining seam along points D,E and F. Press the seam open. I use a sleeve board and seam stick made from a length of stair rail handrail with one flat side.
Stitch along the top of the arm with a longer (about 3.75mm) stitch at 3/8 and 1/4 from cut edge. Pull bobbin threads to create a curve at the top of the arm.
Steam the seam allowance to shrink excess fabric. Be careful not to press in creases. Tie thread ends. Place the two shoulder attachment pieces right sides together and stitch around the outer convex curve. Trim seam to 1/8 inch, turn, press and stitch close to the edge. Clipping the seam isn’t necessary if you trim the seam allowance to 1/8 inch.
Matching shoulder points, pin the shoulder attachment piece to the top of the arm. Make sure you orient so that front and back are correct. Start at the shoulder point and work out from there. The shoulder attachment will end just past the seams.
With the arm on top, stitch the arm to the shoulder attachment.
Turn the seam allowance towards the arm.
Cut the batting to stuff the arm. I use high loft quilt batting to stuff the arm. Using small bits of batting to fill out the arm shape will result in a lumpy, bumpy arm. A better way is to use a larger piece of batting rolled. I start with a piece of high loft (about 3/4 inch) polyester batting cut 30 inches by 24 inches. Roll up the 30 inch width and determine if that gives you a roll the measurement of your biceps. 30 inches of my batting loosely rolled results in a tube 11 inches in circumference. If you adjusted your biceps, then the 30 inch dimension might need to be adjusted. 24 inches is the length of the arm from tip of shoulder to wrist. If you lengthened or shortened the pattern, adjust as necessary. Tear, rather than cut one 24 inch side. This will give a smooth edge when rolled. Start rolling from the short (13 inch) side. The resulting roll of batting will be fatter at one end and taper to a smaller diameter which will be the wrist. Temporary quilt adhesive spray helps adhere the edge. Test the dimensions of your roll and when all looks good, spray the feathered edge with adhesive spray, roll and press the feathered edge down. You should end up with a roll that is fatter at one end and tapers at the other, like an arm.
To pull the roll of batting through the arm, pin a length of ribbon to the narrow end. Attach a weight and drop the weight through the top of the arm. Pull the ribbon through while pushing the batting in from the top.
Turn up 3/8 inch seam allowance at the wrist end of the arm. Cut cardboard the size of the wrist cover pattern. Hand sew a running stitch 1/4 inch from the edge of the fabric. Pull the threads to gather the fabric around the cardboard shape And tie securely. Press to flatten. Mark all match points. The wrist should be an oval with the longer side of the oval matching the marked balance line on the upper arm.
Check that all points match and whip stitch, using strong thread, the fabric covered oval to the wrist.
Cover the armseye oval in the same way. Handsew a running stitch around the edge, pull thread and tie, covering the armseye oval. Mark the match points. Make sure you have the underarm and shoulder points oriented correctly. The back armseye length is slightly longer than the front, so the shoulder point is slightly forward of center. Press to flatten.
Check that there isn’t excess batting in the armseye area and the arm will sit flat against the dressform. You want enough batting to fill out the top of the sleeve but not so much that the arm is pushed away from the dressform.
This is the hardest part: attaching the armseye cover. Pin match points at the shoulder. Work around to where the shoulder attachment ends on both sides, pinning in place as much as possible. I use a sturdy needle and upholstery or heavy duty polyester thread. Begin sewing so that you will attach the section along the top of the arm first, then moving towards underarm section. If you can use a thimble, it will help immensely. I’ve found stitching like this: bite into the arm section and take a small stitch parallel to the seam line. Pass needle through the fabric on the armseye cover along the edge of cardboard, then back to the arm. Pull tight every stitch or two. Keep an eye on your match points to be sure all will line up.
Take a couple of extra stitches where the shoulder attachment ends as that will be a stress point when you use the arm form. The area along the underarm can be sewn with a whip stitch as the arm is flexible and easier to sew along that area.
Attach the arm to your form with pins. I use Clover double forked pins and angle them so they are pointing inwards. Use one pin at the shoulder, one in front and one in back. Push them in parallel to the surface so that just the tiny curve is visible. There are no pin heads to snag on clothing. Determine the best pitch (angle) for your arm. Some arms are pitched with the arm more forward, others figures have the arm angled more towards the back. You can draw the shoulder line on the shoulder attachment when you’ve determined the ideal placement.
Arm pitched forwardArm more towards vertical
I use Clover forked pins to attach the arm to dressform. Angle the pin so it’s pointing downwards. It holds the arm securely and the rounded tip doesn’t snag on clothing.
The idea for a flexible arm came while watching Signe Chanel. The film gave an inside view of Chanel workrooms and all their mannequins were outfitted with these wonderfully flexible arms. I’ve tried the arms supplied with commercial forms which are rigid and heavy. I’m much happier with this version. No wonder this is what Chanel uses.
This pattern makes an arm for the right side. If you want an arm for the left side, just flip the pieces over and duplicate. You can also print the pattern at 50% and use it for a half-size dressform. If making a half-scale arm, use regular quilting weight muslin as the heavier weight will be difficult to handle. I keep seam allowances at 3/8, maybe trimming slightly, but 1/4 inch tends to fray easily and makes things difficult. Enjoy!
The mockup was done on a half-scale mannequin but a full size pattern worked better for the collar draft. Here’s my final collar pattern which I tested with hymo canvas and a piece of scrap boucle.
When looking closely at couture designs, I’ve noticed that a horizontal weave in the fabric travels straight across the the upper body and continues through the sleeve, creating an unbroken line in the fabric. This half scale jacket illustrates the difference.
Runway design. Notice how the horizontal stripe is matched.
The right side of the jacket has been cut with the princess seam ending at mid shoulder. For the left side, the princess seam was shifted from the bust apex to a point closer to the neck (about 1 inch). This pattern adjustment makes the princess line on the side panel more vertical and requires less manipulation of the fabric. Refer to the previous post linked above for a more complete explanation of the pattern changes.
Here’s the full scale side panel being steamed and shaped.
Fabric before shaping
Working the fabric into shape. The excess fabric in the armhole will be shrunk into place.
After shaping the boucle will be unstable. Silk organza cut on the original grain holds the shape. A row of running stitches helps hold the armseye to shape.
The collar is partially pad stitched. I’ll finalize the placement and determine the finished collar size before finishing. This is the under collar which is collar felt and bias cut lightweight linen canvas.
Here’s a preview of the custom trim. I rarely use pre-made trims as most are too stiff and rigid. This one has been created with tubes of matching silk georgette fabric and yarn. This one turns corners easily and compliments the boucle.
I’ve written about the process of drafting a skin tight pattern to duplicate your body and using it as the basis for creating a custom dress form. Now that you’ve invested hours in perfecting a draft of your own body, what can you use it for?
Here’s an image that was posted on one of the dressmaking FaceBook groups I follow. It’s a button front Chanel style; looks fairly simple but it has several design elements that elevate it to couture level.
The shoulders are slightly extended with a squared shape. I’ve marked what looks like the sleeve seam in yellow. It’s narrower than a standard shoulder and the extended shoulder width comes from clever shaping of the sleeve. The collar sits away from the neck and looks like it has been worked into shape using ironwork rather than being cut to shape. The shaping appears to be concealed by princess seams which end close to the neck rather than mid-shoulder, as many princess seams do. Moving the princess seam closer to the neck allows the horizontal lines in the boucle fabric to carry across the front chest into the sleeve as one unbroken line.
I’ll walk through the steps I use to recreate this dress. Start with your moulage draft. This draft is done to half scale and fits my half-scale mannequin. Working in half scale is easier to show the entire draft and design yet is large enough to demonstrate details.
This will be a slim fitting dress so I’ll add minimum wearing ease to the draft. The changes are shown in red.
Next I’ll relocate the princess seam to end near the neck on both front and back. I’ll also narrow the shoulder to compensate for the width added by the altered sleeve. Deciding how wide to make the finished shoulder is a personal design choice. I want this to be slightly extended yet not look like football padded shoulders. I decided to make the shoulder 3/4 inch narrower. I’ll add about 1 inch to the shoulder in the sleeve. The added width will be supported by a small shoulder pad.
Moving the princess seam closer to the neck is important as it allows the horizontal lines in the boucle fabric to span the upper chest in an unbroken line. Here’s how the pattern will match if the princess seam ends at mid-shoulder and what happens if the princess seam gets shifted. Additional shaping and perfect pattern matching can be achieved in the side panel by coaxing it into shape using heat and steam.
Sample dress on the mini-mannequin. I’ve drawn horizontal lines to demonstrate how the fabric will match. I use Osnaburg fabric as it replicates the boucle fairly well. The weave is looser than ordinary muslin and can be shaped much like a boucle.
Views of the shoulder, sleeve and collar. Also one shot of how the horizontal lines would mis-match if the princess seam had not been repositioned.
The collar is cut straight on the crossgrain and shaped with heat and steam into the necessary curve. I’ve created a collar stand, attached the outer collar and positioned it so it doesn’t hug the neck tightly.
Height has been added to the sleeve cap and darts added to produce the extended, squared shape. Here’s how to draft the sleeve:
The diagram on the left shows the armseye of the dress. On the right is a short, one-piece sleeve drafted to fit that armseye. Notice the length of the back and front seams are the same for both armseye and sleeve head: no sleeve cap ease is wanted for this alteration.
I’ll raise the sleeve cap 3/4 inch and dart out the resulting ease. I’ve positioned the sleeve cap darts one inch either side of the shoulder point. Draw a horizontal line connecting the front and back underarm point. Draw a vertical line from the shoulder point to intersect the underarm line at right angles. Connect the dart points to the point where the two guidelines intersect.
Cut open the pattern as shown. Raise the center of the sleeve cap 3/4 inch tapering to nothing at the underarms. The top of the sleeve cap will spread open. Position the triangle of original pattern section midway to divide the sleeve cap opening in half. The original sleeve cap shape is shown in red, new line in black. Draw two darts the width of the opening and 3/4 inch (the amount the sleeve cap was raised) long. Measure the length of the seam (front and back) and compare to the armseye. If the seam line of the sleeve cap is longer, increase the width of the darts slightly to compensate. The necessary ease has been added by the darts and extra ease will alter the “squared” shape of the finished sleeve cap.
Crease the paper and fold the darts closed. I fold both darts towards center. The original sleeve cap line will need to be smoothed out as shown. Also note that the darts will create a fold just beyond the original seam line. In this draft, that distance is 1/4 inch. This is what will create the straight line for the “square” shoulder shape.
Leaving the darts folded, cut along the new seam line. Your completed sleeve pattern should look like this.
I’ll tackle the collar and collar stand in full scale in the next post. Stay well and happy sewing.
I’ve written about this in the past but have revised the method slightly. I’ve seen converting the two piece sleeve to a three piece by simply splitting the upper sleeve at the shoulder point. This method results in a wide under sleeve. The classic Chanel design has a much narrower under sleeve section. I’ve found the easiest way is to convert the two piece pattern to a one piece sleeve; then split the sleeve.
First cut off the seam allowances from your pattern. Pattern drafting is always done with no seam allowances. You will add seam allowances after all drafting is completed. Extend the grain lines the full length of the pattern. If the elbow point isn’t indicated, measure your arm and determine your elbow point. Line up the upper and under sleeve patterns along the underarm line. Make sure the grain lines are parallel to each other. Trace the top of the sleeve from the underarm point on the under sleeve around to the front of the upper sleeve.
Shift the pattern to complete the top of the sleeve on the right side. Draw a horizontal line connecting the underarm points. Draw a horizontal line to indicate the elbow position; also draw the finished hem of the upper sleeve.
Determine the midpoint of the underarm line (line which will divide the sleeve in half lengthwise). Extend this point to the bottom of the sleeve.
Determine the finished width of the sleeve hem. Divide by 2. Mark 1/2 finished hem width on either side of center. Connect the underarm points to the points on the hem for side sleeve shaping.
Shift the midpoint of the sleeve about 1/2 inch towards the right (front of sleeve). Extend this point up to meet the top of the sleeve. This moves the shoulder point, also known as the pitch point, a little further to the front and places the finished sleeve more in line with the natural position of the arm.
Fold the left (back of sleeve) underarm point to meet the just marked offset center point. Trace the armseye seam from the side seam to fold.
When you unfold the paper, it should look like this:
Repeat for the right (front side). Fold the right underarm point to meet in the center and trace. You should have the underarm curve duplicated in the center of the sleeve.
Draw a horizontal line indicating the elbow line. If the elbow isn’t indicated on the original pattern, measure your arm either from the underarm or shoulder. Cut the pattern from the back side seam to sleeve center. Cut the pattern from the hem along the center to just before the elbow line, leaving a small hinge point of paper. Rotate the paper to open up a dart along the elbow line. The dart should be about 3/4 inch wide. Tape extra paper underneath the opened dart. Tape the overlapping pattern at the hem. The width of the sleeve hem will be shorter due to the overlap. Measure the amount of overlap and add that amount to the right (front) sleeve at the hem. Extend up to meet the elbow line.
Draw an elbow dart 3 inches long and 3/4 inch wide (the amount the paper was opened). There will be extra fabric, indicated in green. This is to provide ease over the elbow. The angle between the sleeve midline above the elbow and sleeve midline below the elbow will be about 175 degrees. A little more or less is fine.
The undersleeve on classic Chanel jackets is about 2.5 inches wide at the underarm tapering to 2 inches at the wrist. This is for smaller sizes; you may want to adjust for larger sizes/ fuller bicep. From the center line, measure towards the sleeve back 1 and 3/8 at underarm, 1 and 1/4 at elbow and 1 and 1/8 at wrist. For the front, measure from center towards sleeve front 1 and 1/8 at underarm, 1 and 1/8 at elbow and 7/8 at wrist. Connect the points to form the undersleeve. Shown in red.
Now remove the corresponding amounts from the side seams. Shown in blue. Trace the undersleeve onto pattern paper. I place the upper portion of the undersleeve on the bias. The lower portion won’t be on the true bias but it will be off grain. This will allow the undersleeve to stretch when worn for comfort. Chanel sleeves are intended to be slim fitting and the bias provides a little wearing ease. Trace the upper and lower sleeve sections. Your patterns should look like this:
Using the hem length from the original pattern adjust the bottom of the sleeve. The sleeve back which joins the undersleeve should be 1/2 to 3/4 inch longer than the corresponding seam along the undersleeve. The excess length in the back sleeve will be eased in the elbow area. The seam joining the sleeve back to sleeve front will be the same length on both back and front. The front sleeve seam which joins to the undersleeve should be 3/8 to 1/2 inch shorter than the undersleeve seam. The upper sleeve seam will be steamed and stretched before sewing to give the sleeve proper shape. The sleeve hem should be slightly longer in the back and angle upwards to the front. Add vent extensions for buttons if you want. The top of the sleeve cap can be curved to decrease the amount of fabric needing to be eased into the armseye.
Ever wish you could clone yourself? How much easier to make fitting adjustments if you could just step outside your own body and work on you. Here’s how: pad a standard dressform to your measurements and cover it with a custom drafted muslin to replicate your own shape.
Why construct your own form? Once you have a duplicate of your body, fitting becomes SO much easier. You’ll also have an understanding of pattern drafting so style/ fitting changes to commercial patterns are less of a mystery. If your size changes you can adjust the padding and cover to reflect those changes. Couture houses create custom forms for their clients so why not do it for yourself?
The process begins with accurate measurements. Those numbers are used to draft a custom pattern which duplicates the body.
The pattern is cut in muslin and any adjustments made. It’s a skin tight fit.
The pattern is cut apart and transferred to heavy weight muslin. Additional seaming is added to the bust area for better shaping.
Use a dressform that’s SMALLER than you. If you start with a form by bust measurement, it’s invariably too large across the back and shoulders. I usually chose a form that’s at least 3-4 inches smaller than the bust.
The cover is sewn together at the shoulders leaving the side seams open. That makes it easier to get the cover into place without dislodging any of the padding. Start at the shoulders and work down the body. Bra cups fill out a larger bust; shoulder pads can be used to fill out the hip area. Polyester quilt batting works well to smooth out the shape. Tear rather than cut the batting to eliminate ridges. A small steamer helps compress the batting and makes it stick to itself. This is like sculpture. It can be helpful to have a photo of your body: front, back and side views. Work from the top down. Fold the cover down to check if you have padded too little, too much or in the wrong place. Pin the sides closed to check. When the cover is filled out you’ll hand sew the sides closed.
Fold seam allowances under and whip stitch the sides together using strong upholstery thread. Draw some registration marks every couple of inches to keep the sides aligned while you’re sewing.
Steam the cover well. It will shrink slightly and tighten up. Draw balance lines (bust, waist and hip) with a permanent marker. Vertical balance lines at center front and back can also be added.
For a custom arm, here’s the pattern I use. There are NO SEAM ALLOWANCES. I use either heavy muslin or cotton drill cloth for the two main arm pieces and shoulder. Lighter weight muslin covers the cardboard ovals.
I’ve traced the stitch lines in blue dashed lines and am adding 3/8 inch seam allowances. Transfer the vertical and horizontal balance lines also. I use washable marker. Notice the vertical line down the upper arm pivots at the elbow.
There is ease on the upper arm at the elbow point. If you try and match up the stitching lines there is excess fabric which needs to be eased in to create the elbow shape. Stitch the back seam first.
If your balance lines are slightly askew at the elbow, blend into a smooth line across the seam. The marks will dissolve with water after you topstitch the line. Press the seam open. I use a topstitching (has a larger eye) needle and two strands of black thread to trace the balance lines using a 3.5mm stitch length. There are three horizontal balance lines, one at the elbow, one at the underarm and another about 2 inches up from the underarm. Extend the upper balance line to cross both sleeve sections.
Close the remaining seam matching the stitched balance lines. Press open. Close the dart at the top of the sleeve. Cut the shoulder piece (looks like a shoulder pad) from drill cloth. It needs a seam on one side only. I serge the outer edge to prevent fraying. Using a 4.5m stitch, sew along the top of the sleeve. It will gather up slightly which is all you need. Don’t try and ease it like a set-in sleeve.
Clip within the seam allowance on the shoulder section. Mark the mid point and attach it to the arm, matching the mid point to the dart on the sleeve. Make sure you have right sides facing each other. It should look like this.
To stuff the sleeve I use soft polyester fleece. I cut a piece the length of the sleeve plus about 2 inches. Roll up the fleece, not too tightly, and gauge about how much is required to fill out you sleeve. I want the sleeve to be full but not tightly packed and stiff. The wrist and lower arm needs less fill than the upper arm so I shape the fleece like this. I’ve used about 30 inches an have cut off one corner so that the lower arm has less stuffing than the upper.
Begin rolling at the shorter end forming a soft cylinder which is fatter at one end. I safety pin a length of ribbon onto the slimmer (wrist) end, insert the ribbon through the top and pull it through. If you want more or less fill pull out the roll and adjust the amount of stuffing.
Trim the fill at the armseye end leaving enough to fill out the top.
Cut ovals from cardboard for the wrist and armseye covers. I use lighter weight muslin (the drill cloth is too stiff to gather) and add about 3/4 inch seam allowances. Stitch around the edges, insert the cardboard and pull the threads up to create the covers.
I place the armseye cover against my form and mark the shoulder seam point. Notice that I’ve angled it towards the front to better replicate my arm position. Human arms tend to fall slightly in front of center. Line up the wrist oval to simulate the wrist shape. Again wrists aren’t circular; they are wider when viewed from the top of the hand than the side.
Hand sew the covers in place with a whip stitch. Your new arm can be attached with a few pins (I use flat head pins and push them at an angle to avoid snagging the garment). This pattern is for the right arm. If you would like two arms just flip the pieces and make a matching form for the left side. See how easily her arm bends and I’ve found this version much more workable than the premade ones.
This will make a fairly slim arm. If your arms are larger and you want to adjust the pattern I would suggest this method. Trace the pattern onto your preferred paper and slash the upper and lower arm sections. I don’t cut up my master pattern until I’m happy with the changes. If the first alteration doesn’t work I haven’t destroyed the original and it’s much easier to start over.
Divide the amount you want to adjust by 4 and spread the pattern sections by that amount. It doesn’t need to be the same for the entire length of the pattern. You might want an extra inch at the wrist and an extra 2 inches at the bicep. Overlap the sections if you need a smaller arm. Likewise the length, both above and below the elbow can be adjusted. The ovals for the armseye and wrist covers will need to be adjusted and I would just use trial and error. There is a mathematical formula for figuring out the circumference, long and short axis of an ellipse but you don’t want to see it. Anyone with a math background will understand..
I’ve received requests to teach this and have done several workshops. With the current stay-at-home situation, on line classes are a necessity. I’ve taught this remotely using Zoom and it worked well. Those who participated had a buddy to help with measurements but it is possible to fit yourself. I’ve done it and it’s not impossible. There are a few tricks like putting a separating zipper at center front to make the cover easy to get on and off. When the fit is perfected, the zipper is removed and side seams opened. It’s also more accurate than pinning. A few measurements (like the cross back width) will need to be calculated rather than direct measure.
The dressform cover pattern can also be adjusted with ease added to create a custom size master pattern block. You can use this to either create your own designs or help with adjustments to a commercial pattern.
If you’re interested and want more details, leave a comment and I’ll get in touch. Everyone stay safe.


 Steam the cover well. It will shrink slightly and tighten up. Draw balance lines (bust, waist and hip) with a permanent marker. Vertical balance lines at center front and back can also be added.


