I’ve written about this in the past but have revised the method slightly. I’ve seen converting the two piece sleeve to a three piece by simply splitting the upper sleeve at the shoulder point. This method results in a wide under sleeve. The classic Chanel design has a much narrower under sleeve section. I’ve found the easiest way is to convert the two piece pattern to a one piece sleeve; then split the sleeve.
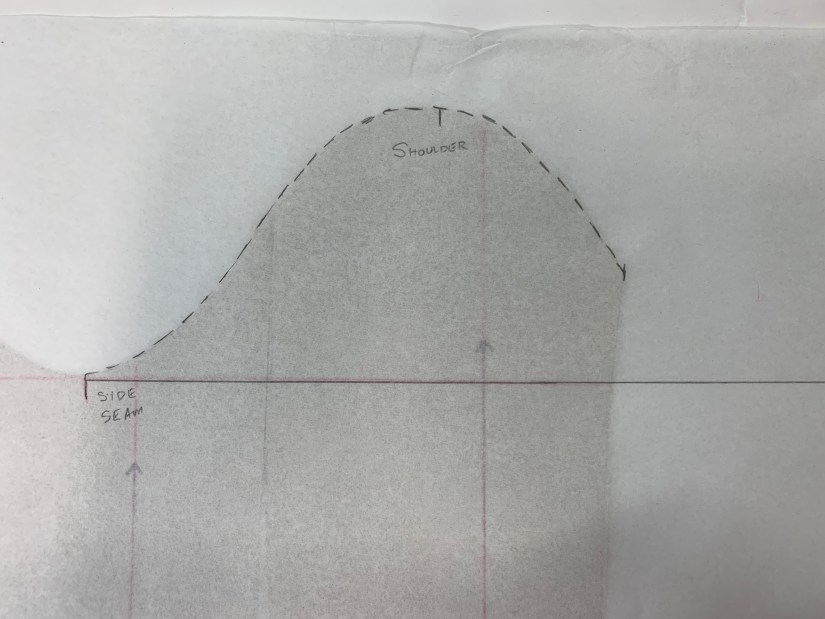
First cut off the seam allowances from your pattern. Pattern drafting is always done with no seam allowances. You will add seam allowances after all drafting is completed. Extend the grain lines the full length of the pattern. If the elbow point isn’t indicated, measure your arm and determine your elbow point. Line up the upper and under sleeve patterns along the underarm line. Make sure the grain lines are parallel to each other. Trace the top of the sleeve from the underarm point on the under sleeve around to the front of the upper sleeve.

Shift the pattern to complete the top of the sleeve on the right side. Draw a horizontal line connecting the underarm points. Draw a horizontal line to indicate the elbow position; also draw the finished hem of the upper sleeve.

 Determine the midpoint of the underarm line (line which will divide the sleeve in half lengthwise). Extend this point to the bottom of the sleeve.

Determine the finished width of the sleeve hem. Divide by 2. Mark 1/2 finished hem width on either side of center. Connect the underarm points to the points on the hem for side sleeve shaping.

Shift the midpoint of the sleeve about 1/2 inch towards the right (front of sleeve). Extend this point up to meet the top of the sleeve. This moves the shoulder point, also known as the pitch point, a little further to the front and places the finished sleeve more in line with the natural position of the arm.

Fold the left (back of sleeve) underarm point to meet the just marked offset center point. Trace the armseye seam from the side seam to fold.

When you unfold the paper, it should look like this:

Repeat for the right (front side). Fold the right underarm point to meet in the center and trace. You should have the underarm curve duplicated in the center of the sleeve.

Draw a horizontal line indicating the elbow line. If the elbow isn’t indicated on the original pattern, measure your arm either from the underarm or shoulder. Cut the pattern from the back side seam to sleeve center. Cut the pattern from the hem along the center to just before the elbow line, leaving a small hinge point of paper. Rotate the paper to open up a dart along the elbow line. The dart should be about 3/4 inch wide. Tape extra paper underneath the opened dart. Tape the overlapping pattern at the hem. The width of the sleeve hem will be shorter due to the overlap. Measure the amount of overlap and add that amount to the right (front) sleeve at the hem. Extend up to meet the elbow line.

Draw an elbow dart 3 inches long and 3/4 inch wide (the amount the paper was opened). There will be extra fabric, indicated in green. This is to provide ease over the elbow. The angle between the sleeve midline above the elbow and sleeve midline below the elbow will be about 175 degrees. A little more or less is fine.
The undersleeve on classic Chanel jackets is about 2.5 inches wide at the underarm tapering to 2 inches at the wrist. This is for smaller sizes; you may want to adjust for larger sizes/ fuller bicep. From the center line, measure towards the sleeve back 1 and 3/8 at underarm, 1 and 1/4 at elbow and 1 and 1/8 at wrist. For the front, measure from center towards sleeve front 1 and 1/8 at underarm, 1 and 1/8 at elbow and 7/8 at wrist. Connect the points to form the undersleeve. Shown in red.

Now remove the corresponding amounts from the side seams. Shown in blue. Trace the undersleeve onto pattern paper. I place the upper portion of the undersleeve on the bias. The lower portion won’t be on the true bias but it will be off grain. This will allow the undersleeve to stretch when worn for comfort. Chanel sleeves are intended to be slim fitting and the bias provides a little wearing ease. Trace the upper and lower sleeve sections. Your patterns should look like this:

Using the hem length from the original pattern adjust the bottom of the sleeve. The sleeve back which joins the undersleeve should be 1/2 to 3/4 inch longer than the corresponding seam along the undersleeve. The excess length in the back sleeve will be eased in the elbow area. The seam joining the sleeve back to sleeve front will be the same length on both back and front. The front sleeve seam which joins to the undersleeve should be 3/8 to 1/2 inch shorter than the undersleeve seam. The upper sleeve seam will be steamed and stretched before sewing to give the sleeve proper shape. The sleeve hem should be slightly longer in the back and angle upwards to the front. Add vent extensions for buttons if you want. The top of the sleeve cap can be curved to decrease the amount of fabric needing to be eased into the armseye.