The creation of this ensemble required much more problem solving than might appear. The fabric is a lovely designer boucle from Mendel Goldberg Fabrics and the contrast color stripes, both vertical and horizontal, presented a challenge in matching.
I constructed the sheath dress first. The darker navy stripe looked too dominate when placed on the center front. A better placement was to have the more muted blue stripe at center front. Placing the same at center back resulted in two dark navy lines next to each other along the side seam which didn’t look so wonderful. The solution was to move the center back just slightly and also shift the side seam towards the back.


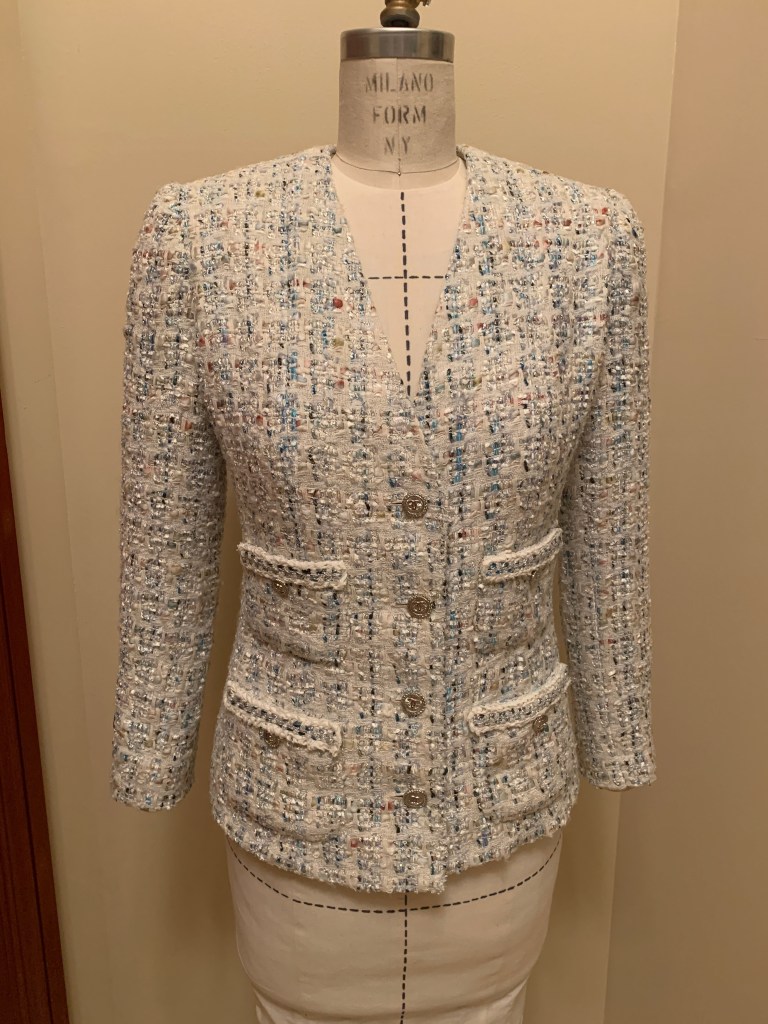
The jacket was to be just below the waist with 3/4 length sleeves. My goal was to have the dominant stripes line up when the jacket and dress were worn together. A classic French jacket design has princess seams ending at the shoulder. While cutting the fabric as per the pattern fit my client’s custom padded mannequin, the extreme mismatch of the fabric design wasn’t so great.


My customary way of dealing with this is to shift the princess line closer to the neck and use steam to manipulate the fabric into shape. Anyone who has taken a French jacket class with me has experimented with this technique. Unfortunately, the fabric just wouldn’t cooperate. This boucle was mostly cotton, which doesn’t yield as easily as wool, to heat and steam. I might have been able to get away with putting in a dart, but the converging lines on the upper chest didn’t look great.


What worked best was to rotate the princess seam into a horizontal bust dart. I created a new princess seam which was shifted closer to the side seam and away from the bust point. Waist shaping was incorporated into the seam. Cut along the new seam line. The part of the dart closest to the side seam can be joined while the remainder of the dart forms what’s known as a Dior dart. Apply the same alteration to the back pattern by relocating the princess seam to start in the armseye. Waist shaping gets moved to the new seam lines.


Finished result of all this careful pattern work and attention to stripe placement. Vertical lines on both the dress and jacket match!! I was careful to place the horizontal pink stripes away from the fullest part of the bust. The Dior dart was also placed midway between two pink horizontal stripes so not not to appear awkward when sewn. Keeping the spacing between pink stripes consistent between the dress and jacket also needed to be taken into consideration. It probably looks effortless but if you’ve ever matched plaids, know otherwise.


The lining is a Pucci print chiffon underlined with pink silk crepe de chine. Yes, the lining was underlined. The chiffon print was such a perfect compliment to the boucle it had to be used but too transparent to hide the inner construction. Interestingly white underlining didn’t make the chiffon as opaque as a light pink.


Finishing details were handworked buttonholes with the reverse side of buttonholes finished with very narrow faux bound buttonholes. I used a variety of coordinating yarns plus a few fibers pulled from the boucle yardage as trim.


So much thought went into the creation of this and my client is thrilled with the result. Thanks for reading.