I’ve been writing this blog since 2014 and am thrilled to learn the tutorials presented are helpful to other sewists. Joyce posted photos of her completed jacket on Instagram and tagged me as a resource for her construction methods. I invited her to write a post, highlighting the information she found especially valuable.
Thank you Joyce, for taking the time to write this and allowing me to share your work.

Hello! My name is Joyce. After my recent completion of a French jacket, Mary asked me to write about my experience in a post for her blog. Before we get started, here’s a bit about me: I live in southern Manitoba, Canada with my husband, who is also my best friend! We have raised two children, who have blessed us with five grandchildren. I am a retired Interior Design Consultant & Kitchen Designer. My talented mother taught me to sew, crochet, knit, and hand embroider. From the time I was five years old, she allowed me to use her sewing machine. I made a lot of clothes for my dolls until the age of ten when I began sewing my own clothes. My favourite things to sew are coats, jackets and dresses. My favourite fabrics are made of natural fibers.
About seven years ago, I began dreaming of making a French jacket. While reading blogs of sewists who documented their experiences on the subject, I became aware of the hours involved, as well as the couture techniques they had learned along the way. It was when I discovered Mary’s blog, cloningcouture.com, that I soon realized what a treasure store of information it is. Her precision and her impeccable attention to detail reveal incredible skill. I was amazed that she was willing to share her extensive knowledge and experience with her readers at no cost to them. I read each post in detail, bookmarking those I wanted to refer to later.
By early 2019, I had collected all my supplies for this project, and was ready to begin. My fabric is appropriately called “Giverny Tweed”. The lining is silk charmeuse.
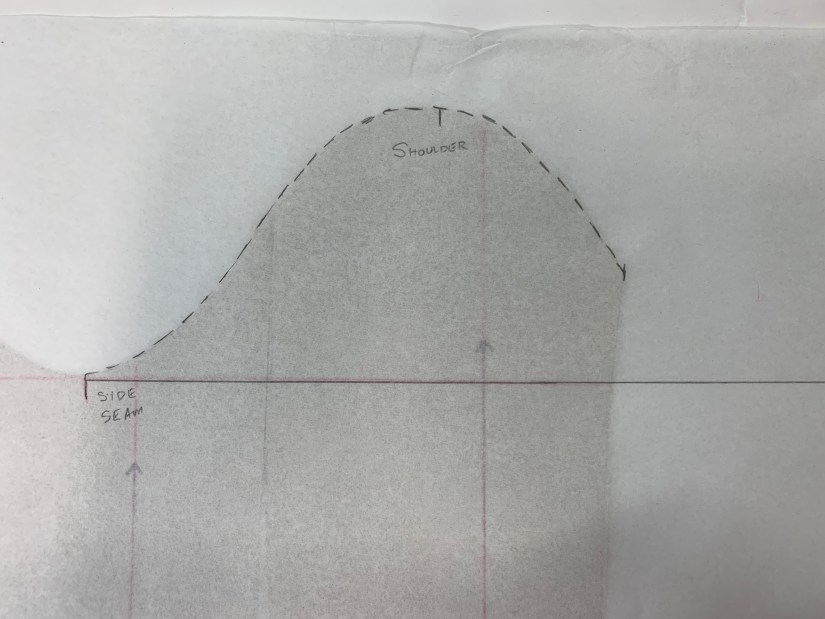
Of course, the first step was to make a well-fitting toile. I cut the body of the jacket according to Vogue 8804, but in reading online reviews, I heard repeatedly that the sleeve in this pattern was wide. Since I have thin arms, I knew I would have to draft a narrower sleeve. This is where Mary’s post https://cloningcouture.com/2014/08/04/chanel-and-the-sleeve/came to the rescue. I know she has since updated it, but her original method worked for me! I also changed my sleeves to full-length instead of the three-quarter length from the pattern.
As many of you already know, after fitting the toile, it is cut apart and used as the pattern to cut the pieces in the tweed and lining fabrics, adding wide seam and hem allowances. In hindsight, I should have fused Pro-Sheer Elegance Couture interfacing to the tweed at this point, since I was working with a fabric that frays very easily. Mary gives this advice in the following post: https://cloningcouture.com/2018/02/15/finishing-details-the-french-jacket/Instead, I used a stepped zigzag to secure the fibers along the edges.

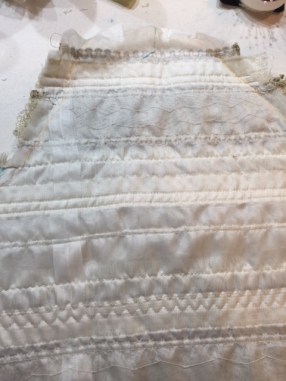
Over the next couple of weeks, I interfaced the fronts with silk organza, quilted the silk charmeuse lining to the front and back pieces, before joining them along the princess and side seams. I really enjoyed slipstitching the lining seams together by hand.
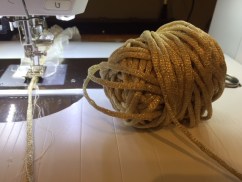
Now that the body of the jacket was taking shape, it was time to turn my attention to the trim. I was unable to find a ready-made trim that complemented my fabric, but then I remembered Mary’s post on making your own. My first attempt was a crocheted chain using fibers from the tweed, but it was too narrow and did not contrast enough with the fabric. I was intrigued by Mary’s detailed instructions on Kumihimo braiding, so I decided to try my hand at it. See her post here: https://cloningcouture.com/2017/08/30/create-custom-trim-for-your-french-jacket/After locating a Kumihimo plate at my local fabric store and watching some YouTube videos on 10-strand braiding, I was ready to begin. After a couple of false starts, while deciding which fibers to use, I settled on four blue strands and two ivory from my fabric, in combination with four strands of ivory Phildar yarn left over from a sweater I knitted for my husband many years ago.
This was the set-up I used. It is certainly not the traditional way, but it worked for me. Every few inches I had to stop and release more material from my “bobbins”. It took me about three days to work out my setup and make three and a half yards of trim.

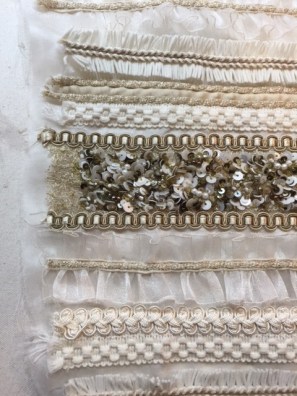
You can see it being “auditioned” here with the buttons I planned to use. Btw, although these were inexpensive buttons, they remind me of Coco Chanel’s favorite camellia rose.

After making the trim, I did some work on the sleeves, then packed the project away before going on vacation in March 2019. As it turned out, this is where the project stalled out until a couple of weeks ago.
I had been putting off making the handworked buttonholes, but one day I gathered up courage and got to work. First, I made a sample buttonhole to work out the method. Then, in a pleasant afternoon’s sewing, I made five buttonholes on the jacket front. You can see Mary’s post on buttonholes here: https://cloningcouture.com/2020/01/07/buttonholes-and-more-trim/
After crossing this hurdle, I knew I was on the home stretch. The next two days were spent finishing the sleeves.

After this, I applied the trim to front and neck edges with a running stitch and the occasional backstitch. It was actually easier to do than I thought it would be. Then I fellstitched the lining to the jacket edges. This was my favourite step!


In summary, I learned so much about couture sewing methods while working on this project. I easily spent a hundred hours on it, but the result is something I will wear with much satisfaction for years to come. It has also given me a great appreciation for the work of couturiers. They are indeed a skilled lot!

Mary, many thanks for all your informative, detailed and inspiring posts on couture sewing! Thanks also for letting me share my experience with your readers.
You can find me on Instagram at amakersshowandtell, where I post photos of my projects. They include sewing, watercolor painting, home decorating, gardening, knitting, and occasionally, upholstery.
Best regards, Joyce


 Although many machines can sew acceptable buttonholes, there is nothing like a handworked buttonhole to distinguish a garment as couture. Now for the good and the bad. The good thing about making buttonholes by hand is there is one basic stitch and you simply repeat it over and over. The bad is that it takes hours, and hours, and hours of practice to get the stitches narrow and evenly spaced with just the right tension.


 Wide seam allowances prevent too skimpy seams and the walking foot kept the layers from shifting during the quilting process.


 One stitch file is the pillow used to pad the stitches and the other file is the tack down and embroidery stitches.


