Evening Wear

A Black Tie Wedding: What to Wear

My last post detailed my pool party tunic for the wedding our family attended in Miami earlier this month. The wedding was black tie and of course I created a special dress (when friends and family know you sew, you can’t exactly show up at these affairs in a store bought garment).

Here is the inspiration design and spectacular fabric from B&J’s. I spotted this while shopping in the NYC garment district and knew this would be the fabric to work with.

inspiration

The black silk taffeta from Como, Italy is a border design composed of hand painted flowers and dimensional black flowers in what felt like vinyl paint. A closeup look shows the brush strokes. This design was definitely done by hand; there is somewhat of a repeat but there are irregularities characteristic of hand work.

flower-closeup

Now that I have the fabric, what to do with it? Sometimes the characteristics of fabric dictate the design. I wanted a slim fitting style with fullness at the hem. I did a toile using released box pleats, but it just wasn’t right.

box-pleating

Flaring the skirt using a border print poses problems. The hemline has a distinct curve which causes he border to appear off grain. Layout showing a conventional pattern shaping:

layout-1

The hem curve may not look pronounced in this scaled down illustration but it became quite noticeable when enlarged to full scale. Solution: break up the fullness into multiple smaller sections which allowed the hem to follow the horizontal line of the border. I had three yards of fabric and planned for the hem fullness to be distributed as 1 yard in the front and 2 yards in the back. Lower bodice sections fit nicely in between the skirt sections.

layout-2

My custom dress form also needed a little tweaking as this design would follow the back hip area closely. Most dress forms stop at the hip line but I wanted mine to extend down past the low hip. I constructed a new cover and also added two flexible arms. Details of how to modify a dress form in this way will come in a future post.

refined-dress-formdress-form-arm

The dress was designed using a combination of draping and flat pattern design. I applied style lines to the form to drape the bust and hip areas. The side seam was shifted towards the back; I felt the back seam lines worked better this way. The front had a single princess line; hem flare started 9 inches below the low hip and flared to 36 inches in the front, 12 inches in each of the 6 back sections for a total hem width of 108 inches.

style-lines-1style-lines-2

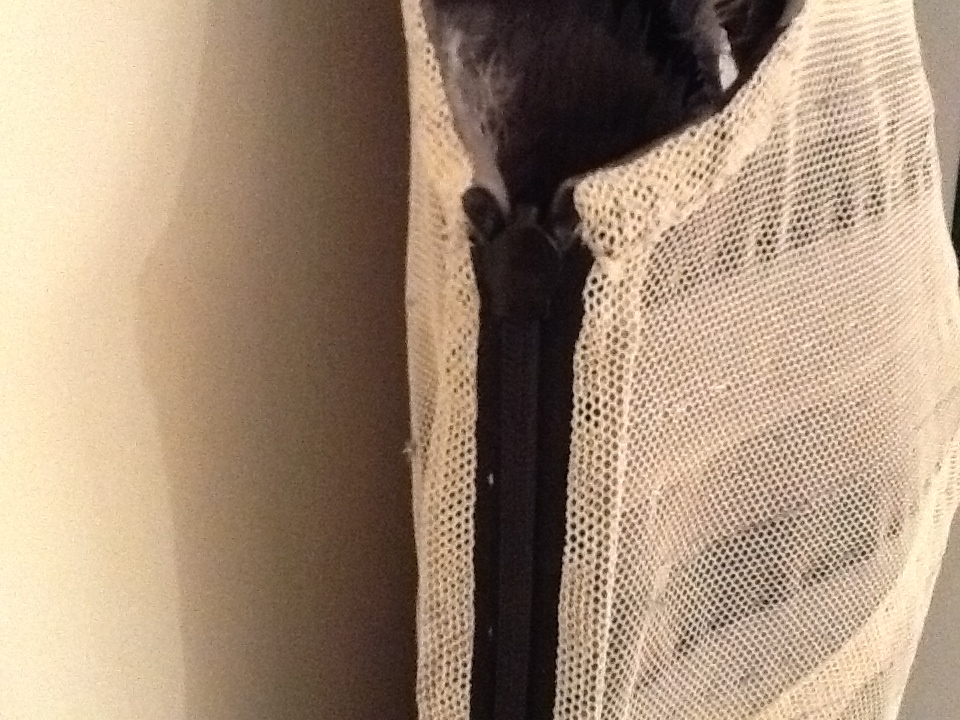
The silk taffeta was underlined with silk organza. A layer of black cotton muslin provided additional support and extended from the waist to 9 inches below the low hip line. It was catch-stitched just inside the seam lines. The interior corset was cut from two layers of cotton tulle, one layer on the cross grain and one on the lengthwise grain (a technique I picked up from studying the work of Barbara Matera, the renowned Broadway costume designer). Spiral steel boning is enclosed within the casings. I find the tape used to stabilize armholes in tailoring makes a wonderful thin and strong way to prevent the top edge from stretching out of shape. The white zip is basted in for fitting but will be removed when the corset is sewn into the final dress.

interior-corset

I felt a lining in the hip area would be prone to shifting and might cause wrinkles, so I opted to finish the seams in this area with lengths of grosgrain ribbon. The white boning which extends from the top to low hip is one length of horsehair braid stretched, steamed and zig-zig stitched into another length of un-stretched horsehair braid. I find this boning is flexible yet smooths the seams over the body in a slim fitting garment.

interior-boninginterior-hip

I found a wonderful  embroidered tulle with three dimensional flowers to form the upper bodice and sleeves. An underlayer of cotton tulle was fitted and thread traced for use as a pattern when cutting the heavily embroidered tulle. Having each section with seam lines thread traced made it much easier to place the design so it would be mirror-imaged from right to left sides.

final-tulle-fittulle-used-as-pattern

A section of the embroidered edge was shaped to follow the collar. The decorative edge fell stitched in place and excess cotton tulle trimmed away.

collar-detailcollar-completed

I don’t care for the look of just sewing a plain seam when an appliqued seam could make the transition from one fabric to another look better. I sewed the back upper bodice through the layer of cotton tulle only; then hand appliqued the decorative tulle edge.


The front seam got a few appliques to disguise the seam. Working with lace is so forgiving as you can hide almost anything. Here is a shoulder seam before and after a little applique work. I also find it easier to work in sections and complete as much as possible before joining one section to another. Finish the skirt, inner corset, lace section and bodice before attaching them together. It saves much wear and tear on the dress.

shoulder-seam-1shoulder-seam-2

front-view

side-view

back-view-skirt

Another small detail gleaned from Barbara Matera: raising your arms in a close-fitting dress can be difficult. Solution: add an underarm gusset. I cut a football-shaped piece of stretch mesh (about 5.5 inches long by 3 inches wide) and inserted it in the underarm seam centered between the front and back. Sewing by hand was much easier than manipulating the dress into the machine. It doesn’t show and makes moving so much easier.

underarm

Have you ever had a major clothing malfunction? For the back closure  I found a zip with sheer mesh tape while shopping in NYC. It was only available as a two-way zip. I figured no problem, I would just insert as usual and not use it as a two way. Put my dress on; all’s fine. We are leaving for the ceremony and my daughter-in-law notices the zipper is starting to open in the middle of my back. Within minutes the entire back is open. I tried to run the slider to the bottom and realign the coils but no go. My husband asks if I have anything else to wear. This is an out of town affair and I didn’t exactly bring a selection of evening gowns. There is only on solution: get sewn into the dress. Fortunately my husband is an OB/GYN and has a fair amount of experience sewing (humans that is). I did have a supply of needles and thread so, with Holly holding a cell phone light on the sewing (operative) field, I told him to just whipstitch (non-interrupted running stitch), the zipper tapes (incision) closed. I had a backup supply of needle and thread in my evening bag just in case but his stitching held firm throughout the night. I’m replacing the zip with my standard invisible version which has never once failed.

20170115_212318

Evening Wear, Lace

Three Gowns; One Pattern

Don’t we all love a pattern that fits perfectly and can be modified in multiple ways. I created this gown for a client last year. The dress worked so well she requested more variations. This one was done with French ribbon lace and a full circle skirt of silk tulle.

Ana

For the second version I fashioned the bodice from an Oscar de la Renta guipure lace and paired it with silk velvet A-line skirt. The black fox collar and cuffs are vintage and were restyled to fit the gown.
complete gown 2complete gown 1


The bodice lace (from Mood Fabrics) worked better cut crossgrain as the pattern could be cut attractively at the waist seam. I’ve shown it here running lengthwise. By rotating the bodice pattern 90 degrees, I was able to use the leaf pattern as an edging.

Oscar Lace

The lace was backed with black silk organza and black silk crepe de chine formed a built in strapless slip. The lace edge was flipped up out of the way, waistline seam sewn and then the edge tacked down to the velvet skirt.

Lace Overlayfront bodice

The lace was positioned as not to interfere with the side seam. Silk velvet is tricky to sew and will shift all over the place if you don’t baste. I find diagonal basting holds it firm.

invisible zipSide Seam

Vintage fox collar and cuffs were trimmed to size, backed with grosgrain ribbon, and attached with snaps. I found holding the fur out of the way by placing it at the edge of my work surface saved many frustrating thread tangles.

fur snaps

The third version required extending the bodice a few inches below the waist. For this I used a wonderful Armani stretch satin from B&J Fabrics. The lace is from Mood. If you happen to shop for lace in Mood, Carman is wonderful to work with and knows every piece of lace in her department. The skirt is a simple flared shape cut from 4 ply silk crepe.

white bodice layoutthread tracing

The bodice needed some sort of interfacing and I found Pro Tricot from Fashion Sewing Supply a wonderful product. I was skeptical about fusing a stretch fabric but the interfacing stretches and worked beautifully. I’ve thread traced the seam lines with silk thread. The armhole was cut wider at the shoulder as we were considering an extended shoulder line like a small cap sleeve, but would up just trimming the armhole at the natural shoulder line.

The heavy guipure lace had a shiny finish on the right side. I reminded me of patent leather. I planned to cut out motifs and arrange them in mirrored pairs on the bodice. Rather than cut and try to match individual pieces, I arranged the lace right sides together and shifted it around until the pattern on both layers matched. Pin together and then cut out the motifs as matched pairs.

lace pairs

I cut varying size and shaped motifs to form the pattern I had in mind. Now for hours of hand sewing as every motif was stitched in place. I made a wonderful pressing tool which is a bag of heavy muslin filled with sand. Press the appliqued sections wrong side up and the lace will sink into the sand and prevent you from pressing the lace flat and damaging the effect.

b&w gown armholessandbag

The bottom edge of the bodice faced with silk organza. The first fitting on the dress form showed the bodice hem flared out a bit to much; easily corrected at this stage.

b&w gown bodice hemb&w gown 1

An invisible zip closed the back. How to insert a white zip into black fabric? I hand sew the zippers as I have much more control that way. Press the coils of the zipper open and sew with a backstitch just inside the zipper coil. Hand stitching allows you to vary the stitch distance from the zipper coil. If you’ve ever sewn a zipper into a garment where the thickness if one section is substantially different from another, you know that the zipper often refuses to jump over the hump. I’ve stitched just slightly further away from the coil at this point to allow the zipper to close smoothly. Notice also I switch from black to white thread. A tiny bit of zipper tape shows but it’s preferable to the zip not closing or breaking. Some might prefer a lapped zipper application, but I like the clean line of an invisible zipper. A ribbon waist stay is added.

zip black to whiteb&w waist stay


The white zipper is well concealed. I waited until the zipper was installed before sewing the last bits of lace motifs in place so they would match perfectly at the back.

b&w gown back

b&w gown finished

couture sewing, Evening Wear

Runway Dress, Part 2

Now that you have yards of assorted strips you are ready to start attaching them to the tulle under-dress. Only the right side seam of the dress has been sewn, so lay it out flat. Decide how long the finished dress is and mark a hemline 10 inches above the finished length. I used the polyester organza and cut a strip 21 inches wide and the hemline width plus 1 inch. Fold this wide strip right sides together and sew 1/2 inch seams along the short sides. Turn right side out and press only the seams; leave the bottom edge as a soft roll. Polyester organza doesn’t want to press flat, so the fabric will help to maintain this rolled edge look. Sew the strip on the line you have marked, establishing the finished length of the dress.

Now work your way up placing the strips as you like using the photograph as a guide. I hand sewed them in place as I feel that hand stitches make a softer, more fluid garment. You can also machine sew. The ultrasuede was difficult to hand sew, so I used the machine for those strips.ImageImageImage

Stop at the waist. Decide the shape of the neckline and the placement of the uppermost strips. I used a double layer of the polyester organza, stay stitched the neckline and armholes. Then hand rolled the edges catching only the undermost layer of fabric.ImageImage

Work your way down to the waist in the same manner. I found hand sewing the bust area much easier to control than machine sewing. Stop when you reach the waist. Sew a length of satin ribbon to cover the raw edges at the waist. Sew the left side sean inserting an invisible zipper. I also left a slit from the hem to mid-thigh.

Image

ImageImage


Views of the inside showing rows of hand stitching.Image

Image

The finished work

ImageImage


couture sewing, Evening Wear

Chanel Runway Dress; Easier Than You Think

Chanel gownI noticed this dress from a recent Chanel runway show and set out to copy it. Two photos showing the original dress.Chanel gown detail
I started with a simple sheath dress such as this McCalls pattern but you could use anything similar.012
If you aren’t sure how it will fit make a test dress in muslin. It needs to be slim fitting but not skin tight. Make sure to peg the skirt. That means taper the side seams below the hip line. You want the hem narrower than the hips; that makes for a more slimming line.
Cut the dress from a sheer, flexible fabric. I used cotton tulle in a nude color. You could also use silk organza but I find the tulle works best. Nylon tulle is NOT the same thing. Cotton tulle can be difficult to find locally but most better shops in cities carry it. I use Mood, B & J and others and they do mail order.
Sew the darts and the right side seam with the wrong side out. That means your darts and seam will be facing out like a lining. Leave the shoulders and left seam open for now. It will make placing the trim strips much easier.
Now for the fringed strips. I bought 2 yards each of light, medium and dark gray silk organza. I also got 2.5 yards of both medium and dark sparkle POLYESTER organza. You will be cutting some of the trim with a soldering iron and silk can’t be cut with a heat tool; it will just burn. Very important to get 100% polyester.
Working with one color of silk at a time, cut 4 to 5 inch wide BIAS strips from the yardage. You will wind up with yards and yards of bias strips. I recommend cutting some test strips from a corner before you cut the entire yardage to test the width. Make the strips wider or narrower if you need.
Press your bias strips in half the long way so now you have narrow double layer strips. Take a stiff brush and fray the cut edges. I placed a piece of canvas on my pressing surface and brushed away. The brush will damage your ironing board cover, so please use something to protect it. I found canvas better than a smooth, slippery surface as the silk didn’t slip around. I used a brass scrub brush.006

Next work on the polyester trim. Cut several bias strips from each color of the poly organza. I made mine about 3 inches wide. Don’t cut the entire yardage as you will need some for the large strip at the hem and also for the top of the dress.
You will need a heat tool to cut the wavy edge so it doesn’t fray. Cutting with scissors will leave a raw edge and that won’t last long. The heat tool will sear the edges and prevent fraying. I used an inexpensive soldering iron from Radio Shack. Make sure yours has a pointed tip.
You will also need a piece of plate glass. I used a scrap from an old window and wrapped the edges with duct tape to prevent injury. Draw some wavy lines on a piece of paper. When you are happy with the design place the paper under the glass so you can see your design. You can also cut freehand, but having the pattern to follow was easier for me.
Heat up your tool and place a strip of organza with one edge along your drawn line. The fabric is on top of the glass and can now be cut with the soldering iron. Make sure you work with one layer at a time as multiple layers will be melted together. Practice this a few times on scraps before starting. You need to cut slow enough to allow the heat to cut through the fabric but fast enough to prevent melting and holes.009010
Last is the fringed strips. I used lightweight charcoal Ultrasuede and cut 1.5 to 2.5 inch wide strips on the crossgrain. Ultrasuede is most flexible that direction and you also will need only about 1/2 yard; nice since it’s not inexpensive.
Chalk a line about 1/2 inch in from one long edge, turn on a movie and get comfortable. Arm yourself with the sharpest scissors you can find and cut fringe. The chalk line is a guide of how deep to cut and I just eyeballed about 1/8 inch for the width.
008005
Next post will be how to start putting everything together. Let me know if anything is unclear. This is not a quick and easy project but do-able if you take it slow and focus on one step at a time. No wonder the price tag is astronomical at Chanel!