Cloning Designer Garments, couture sewing, Drafting Patterns, Draping, Dress Forms, Uncategorized

A Designer Skirt and Family Wedding

So much had happened since my last post; all of it good.  My son and daughter-in-law welcomed baby Milena. Her arrival coincided with my construction and installation of draperies in their new home. Needless to say, it was a very, very busy time.

Milena

After helping the new family get settled, it was time to head home and prepare for my dear sister-in law’s wedding, held in our backyard. When you’re the resident family dressmaker, weddings mean loads of sewing; all of it fun and leading up to a happy celebration.

The rehearsal dinner was an informal gathering and I chose to replicate a designer skirt I had seen.  This Oscar de la Renta skirt, from his “paint splatter” collection was white denim with applied sequins and priced at a mere $1900.

Inspiration Skirt

I had a length of white denim with a bit of lycra in the stash.  The skirt front was drafted by using a jeans pattern, lapping the right over left front, and tapering to a mid-calf length straight skirt. The back was slightly more complicated. My jeans pattern back wouldn’t cooperate and produce a well fitting rear.  Draping on my custom dress form solved the problem.

Skirt Drape 1 Skirt Drape 2

I placed style lines for the back yoke, waistband and side seam.  The waistband is slightly lowered at center front. I used flat felled seams and the only problem was my machine didn’t like the bulk of multiple fabric layers and the thicker thread I was using for topstitching.  I found that hammering (use a clean regular carpenters hammer) the seams, especially at points where seams intersected, made a huge difference. Hammering the fabric prior to sewing seems to soften and compress the fibers. A heavy duty jeans needle also helped. The long, sharp point pierced the denim much easier preventing skipped stitches and thread nests.

TopstitchingSequin Closeup

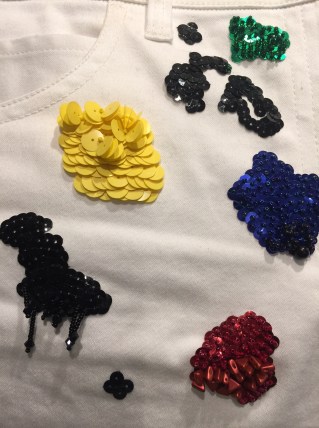
Now for the fun part. I gathered sequins, beads and started drawing. An air erasable marker lets you preview the placement and size of the “paint blobs.”
The large yellow sequins had holes in the center but I decided they would be better if the holes were closer to one edge. Joanns Fabric carries this punch in the leatherworking department. It’s pricey at about $40 (great time to use the discount coupon), but makes the tiniest holes and was perfect for the task.

Hole Punch

Completed and on to the more wedding sewing.

Close-up Finished skirt

Next post (and I promise it will be soon) will detail the design and construction of the bride’s dress, little girls’ dresses, mother-in-law’s dress and (as if I didn’t have enough going on) a Chanel style tunic constructed from a wonderful fabric from Mendel Goldberg. Here’s a few preview shots:

Casey Mia

Sage Chanel Dress Preview

I also want to mention that my friend, Kate Davies, has published a book, Making Life More Beautiful, about sewing, crafting, knitting and life. I met Kate while on a trip to London and immensely enjoyed the time with her. She is doing a sew-along emulating the style of Frida Kahlo, so hop over to her site and check it out.

Kate book

Also, I’ve written another article for Threads Magazine detailing the draft and construction of a designer skirt.  The skirt was based an Yves St. Laurent style straight skirt and I’ve explained many of the details that take an ordinary style into the designer realm.  There is also a web extra explaining a few adaptations which are helpful when using a heavier fabric, such as a designer boucle.

Threads Cover

Thanks for reading!!!

Dress Forms

Make a Custom Flexible Dressform Arm

Before I start on the instructions to create a custom arm for your personal sized dress-form a quick update on Wolf Dress-forms. Sadly the company is out of business and Peter Lappin of Male Pattern Boldness tells the story. Wolf forms occasionally show up at tag sales, store closings, on EBay or Craig’s List but they can command a hefty price. If you are lucky they can be purchased for around $200. Best of luck if you embark on a search.

I’m always looking for snippets of information as to the workings of couture ateliers. The film, Signe Chanel, shows an inside view of Chanel’s workrooms and I noticed that the mannequin arm is extremely soft and flexible. Not at all like the rigid arm form which came with one of my forms.

Pre Made ArmPre Made Attachment

This arm is very heavy and intended to be attached by tying the tapes around the neck. Unfortunately this never worked well and was difficult to insert into the garment sleeve. I’m including my pattern for a custom sleeve form as a printable pdf document. Hopefully I’ve formatted it correctly. This is my first attempt using Adobe Illustrator and have found the learning curve fairly steep. The pattern tiles are 7.5 x 10 inches so expect 1/2 inch margins all around if you are using US paper. It should also print out on A4 paper fine, just adjust the margins. Print out page 1 to check that the size box prints at 4″ x 4.”

PDF Layout

Mannequin Sleeve

There are NO SEAM ALLOWANCES. I used cotton drill cloth for the two main arm pieces, cotton muslin for the oval armhole and wrist covers and cardboard to insert into the armhole/wrist covers.

Fabricsitch lines

I’ve traced the stitch lines in blue dashed lines and am adding 3/8 inch seam allowances. Transfer the vertical and horizontal balance lines also. I use washable marker. Notice the vertical line down the upper arm pivots at the elbow.

There is ease on the upper arm at the elbow point. If you try and match up the stitching lines there is excess fabric which needs to be eased in to create the elbow shape. Stitch the back seam first.

Elbow EaseElbowElbow 2Completed Seam

If your balance lines are slightly askew at the elbow, blend into a smooth line across the seam. The marks will dissolve with water after you topstitch the line. Press the seam open. I use a topstitching (has a larger eye) needle and two strands of black thread to trace the balance lines using a 3.5mm stitch length. There are three horizontal balance lines, one at the elbow, one at the underarm and another about 2 inches up from the underarm. Extend the upper balance line to cross both sleeve sections.

Elbow with corrected lineCompleted Seam

Close the remaining seam matching the stitched balance lines. Press open. Close the dart at the top of the sleeve. Cut the shoulder piece (looks like a shoulder pad) from drill cloth. It needs a seam on one side only. I serge the outer edge to prevent fraying. Using a 4.5m stitch, sew along the top of the sleeve. It will gather up slightly which is all you need. Don’t try and ease it like a set-in sleeve.

Top DartAdd SeamsCap Ease

Clip within the seam allowance on the shoulder section. Mark the mid point and attach it to the arm, matching the mid point to the dart on the sleeve. Make sure you have right sides facing each other. It should look like this.

Completed shoulderCompleted shoulder right side

To stuff the sleeve I use soft polyester fleece. I cut a piece the length of the sleeve plus about 2 inches. Roll up the fleece, not too tightly, and gauge about how much is required to fill out you sleeve. I want the sleeve to be full but not tightly packed and stiff. The wrist and lower arm needs less fill than the upper arm so I shape the fleece like this. I’ve used about 30 inches an have cut off one corner so that the lower arm has less stuffing than the upper.

Cut Fleece

Begin rolling at the shorter end forming a soft cylinder which is fatter at one end. I safety pin a length of ribbon onto the slimmer (wrist) end, insert the ribbon through the top and pull it through. If you want more or less fill pull out the roll and adjust the amount of stuffing.

Rolling fleecePull through

Trim the fill at the armseye end leaving enough to fill out the top.

Fleece at top

Cut ovals from cardboard for the wrist and armseye covers. I use lighter weight muslin (the drill cloth is too stiff to gather) and add about 3/4 inch seam allowances. Stitch around the edges, insert the cardboard and pull the threads up to create the covers.

Cardboards

I place the armseye cover against my form and mark the shoulder seam point. Notice that I’ve angled it towards the front to better replicate my arm position. Human arms tend to fall slightly in front of center. Line up the wrist oval to simulate the wrist shape. Again wrists aren’t circular; they are wider when viewed from the top of the hand than the side.

Scye cover rotatedAttach Wrist

Hand sew the covers in place with a whip stitch. Your new arm can be attached with a few pins (I use flat head pins and push them at an angle to avoid snagging the garment). This pattern is for the right arm. If you would like two arms just flip the pieces and make a matching form for the left side. See how easily her arm bends and I’ve found this version much more workable than the premade ones.

CompletedBendable Arm

This will make a fairly slim arm. If your arms are larger and you want to adjust the pattern I would suggest this method. Trace the pattern onto your preferred paper and slash the upper and lower arm sections. I don’t cut up my master pattern until I’m happy with the changes. If the first alteration doesn’t work I haven’t destroyed the original and it’s much easier to start over.

Adjust

Divide the amount you want to adjust by 4 and spread the pattern sections by that amount. It doesn’t need to be the same for the entire length of the pattern. You might want an extra inch at the wrist and an extra 2 inches at the bicep. Overlap the sections if you need a smaller arm. Likewise the length, both above and below the elbow can be adjusted. The ovals for the armseye and wrist covers will need to be adjusted and I would just use trial and error. There is a mathematical formula for figuring out the circumference, long and short axis of an ellipse but you don’t want to see it. Anyone with a math background will understand! Enjoy.

Evening Wear

A Black Tie Wedding: What to Wear

My last post detailed my pool party tunic for the wedding our family attended in Miami earlier this month. The wedding was black tie and of course I created a special dress (when friends and family know you sew, you can’t exactly show up at these affairs in a store bought garment).

Here is the inspiration design and spectacular fabric from B&J’s. I spotted this while shopping in the NYC garment district and knew this would be the fabric to work with.

inspiration

The black silk taffeta from Como, Italy is a border design composed of hand painted flowers and dimensional black flowers in what felt like vinyl paint. A closeup look shows the brush strokes. This design was definitely done by hand; there is somewhat of a repeat but there are irregularities characteristic of hand work.

flower-closeup

Now that I have the fabric, what to do with it? Sometimes the characteristics of fabric dictate the design. I wanted a slim fitting style with fullness at the hem. I did a toile using released box pleats, but it just wasn’t right.

box-pleating

Flaring the skirt using a border print poses problems. The hemline has a distinct curve which causes he border to appear off grain. Layout showing a conventional pattern shaping:

layout-1

The hem curve may not look pronounced in this scaled down illustration but it became quite noticeable when enlarged to full scale. Solution: break up the fullness into multiple smaller sections which allowed the hem to follow the horizontal line of the border. I had three yards of fabric and planned for the hem fullness to be distributed as 1 yard in the front and 2 yards in the back. Lower bodice sections fit nicely in between the skirt sections.

layout-2

My custom dress form also needed a little tweaking as this design would follow the back hip area closely. Most dress forms stop at the hip line but I wanted mine to extend down past the low hip. I constructed a new cover and also added two flexible arms. Details of how to modify a dress form in this way will come in a future post.

refined-dress-formdress-form-arm

The dress was designed using a combination of draping and flat pattern design. I applied style lines to the form to drape the bust and hip areas. The side seam was shifted towards the back; I felt the back seam lines worked better this way. The front had a single princess line; hem flare started 9 inches below the low hip and flared to 36 inches in the front, 12 inches in each of the 6 back sections for a total hem width of 108 inches.

style-lines-1style-lines-2

The silk taffeta was underlined with silk organza. A layer of black cotton muslin provided additional support and extended from the waist to 9 inches below the low hip line. It was catch-stitched just inside the seam lines. The interior corset was cut from two layers of cotton tulle, one layer on the cross grain and one on the lengthwise grain (a technique I picked up from studying the work of Barbara Matera, the renowned Broadway costume designer). Spiral steel boning is enclosed within the casings. I find the tape used to stabilize armholes in tailoring makes a wonderful thin and strong way to prevent the top edge from stretching out of shape. The white zip is basted in for fitting but will be removed when the corset is sewn into the final dress.

interior-corset

I felt a lining in the hip area would be prone to shifting and might cause wrinkles, so I opted to finish the seams in this area with lengths of grosgrain ribbon. The white boning which extends from the top to low hip is one length of horsehair braid stretched, steamed and zig-zig stitched into another length of un-stretched horsehair braid. I find this boning is flexible yet smooths the seams over the body in a slim fitting garment.

interior-boninginterior-hip

I found a wonderful  embroidered tulle with three dimensional flowers to form the upper bodice and sleeves. An underlayer of cotton tulle was fitted and thread traced for use as a pattern when cutting the heavily embroidered tulle. Having each section with seam lines thread traced made it much easier to place the design so it would be mirror-imaged from right to left sides.

final-tulle-fittulle-used-as-pattern

A section of the embroidered edge was shaped to follow the collar. The decorative edge fell stitched in place and excess cotton tulle trimmed away.

collar-detailcollar-completed

I don’t care for the look of just sewing a plain seam when an appliqued seam could make the transition from one fabric to another look better. I sewed the back upper bodice through the layer of cotton tulle only; then hand appliqued the decorative tulle edge.


The front seam got a few appliques to disguise the seam. Working with lace is so forgiving as you can hide almost anything. Here is a shoulder seam before and after a little applique work. I also find it easier to work in sections and complete as much as possible before joining one section to another. Finish the skirt, inner corset, lace section and bodice before attaching them together. It saves much wear and tear on the dress.

shoulder-seam-1shoulder-seam-2

front-view

side-view

back-view-skirt

Another small detail gleaned from Barbara Matera: raising your arms in a close-fitting dress can be difficult. Solution: add an underarm gusset. I cut a football-shaped piece of stretch mesh (about 5.5 inches long by 3 inches wide) and inserted it in the underarm seam centered between the front and back. Sewing by hand was much easier than manipulating the dress into the machine. It doesn’t show and makes moving so much easier.

underarm

Have you ever had a major clothing malfunction? For the back closure  I found a zip with sheer mesh tape while shopping in NYC. It was only available as a two-way zip. I figured no problem, I would just insert as usual and not use it as a two way. Put my dress on; all’s fine. We are leaving for the ceremony and my daughter-in-law notices the zipper is starting to open in the middle of my back. Within minutes the entire back is open. I tried to run the slider to the bottom and realign the coils but no go. My husband asks if I have anything else to wear. This is an out of town affair and I didn’t exactly bring a selection of evening gowns. There is only on solution: get sewn into the dress. Fortunately my husband is an OB/GYN and has a fair amount of experience sewing (humans that is). I did have a supply of needles and thread so, with Holly holding a cell phone light on the sewing (operative) field, I told him to just whipstitch (non-interrupted running stitch), the zipper tapes (incision) closed. I had a backup supply of needle and thread in my evening bag just in case but his stitching held firm throughout the night. I’m replacing the zip with my standard invisible version which has never once failed.

20170115_212318

couture sewing, Dress Forms

The Dress Form in Action

Here it is, the first dress created with the help of my new custom molded dress form. This would have been next to impossible to get right without the help of a perfect body double. Much of the work took place on the back. I needed a semi-formal dress for a destination wedding in the Bahamas. The bride requested all guests wear white. Although the ceremony was beachside, the reception called for semi-formal attire. Try buying something that fits that bill.

Ceremony on the Beach

I created a version of the Dior design worn by Nicole Kidman some years ago. I thread traced the seam lines into white 4 ply silk crepe and embroidered floral designs on the front using multiple hoopings. Since embroidery can cause the fabric to shrink and/or pucker, check the seam lines against the pattern after all embroidery is finished.Full Length View


Silver metallic mesh was positioned on the back and I printed templates of the embroidery designs on transparent film to finalize the design. The embroidery designs were placed to create a picture frame effect around the metallic mesh. The mesh was somewhat stretchy and having the dress on the form made getting the placement so much easier.

Back View

Another view of the back with skin toned fabric underneath. The zipper is hidden in the left side seam.

Back EmbroideryLiningAs this was to be worn in the tropics, I chose a fine Swiss cotton jersey for the lining. This was comfortable to wear and provided opacity so that the hot pink skirt lining did not show through. To attach the lining I put the dress on the form inside out and fitted the lining around the neck, armholes and back.

Back Lining

Finally a hot pink lining for the lower skirt which shows when walking.

Skirt Lining

dress 5

This is entered in the SewStylish Spring fashion Challenge at Threads Magazine.