couture sewing, Tailoring, Uncategorized

Make Your Own Professional Pressing Tools

Pressing plays such an important role in producing great results when sewing. Unfortunately, many professional pressing aids are difficult to find and extremely expensive. They tend to be bulky and heavy which further contributes to the cost if you need to have them shipped. I’ll share some of my favorite tools and methods I use to make my own for very little cost. Warning: You need access to a few power tools or someone who has them.

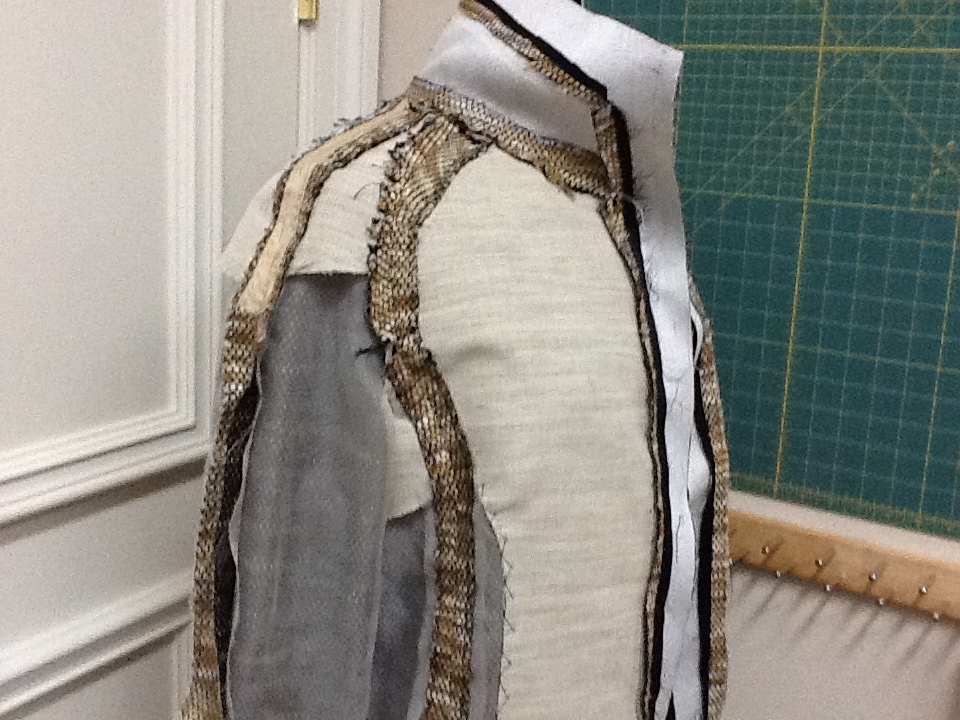
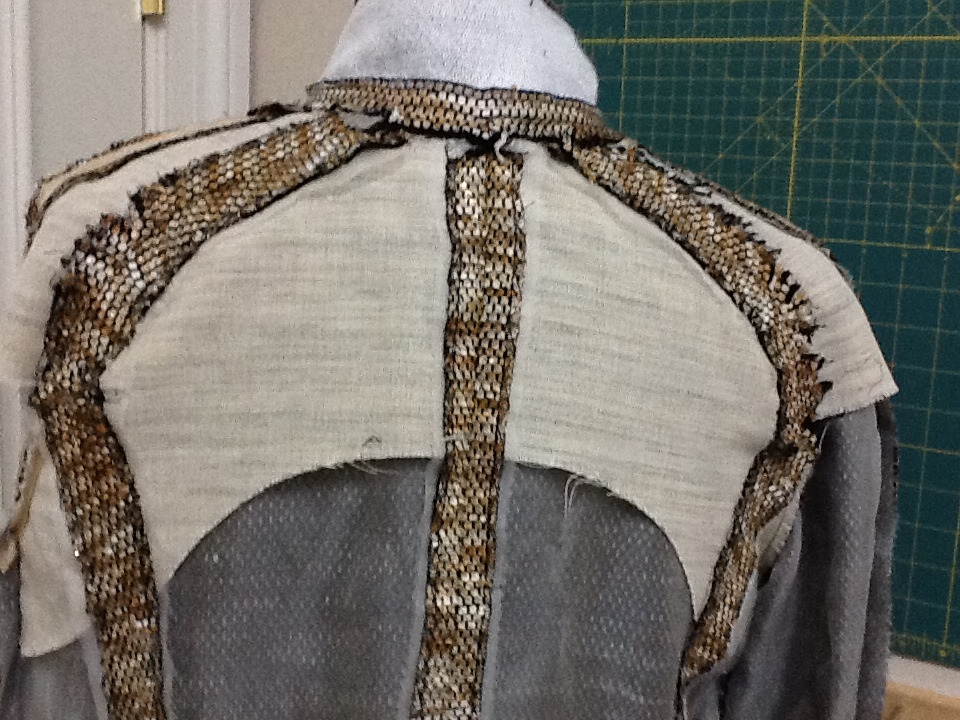
I love this press buck for long, gently curved seams such as the back sleeve seam in jackets, hip curves for pants/skirts or center back seam with shaping at the neck and waist. I also works well for basting the canvas to the front of a tailored jacket.

This is about 28 inches long, 8 inches wide and 3.5 (measured from the bottom of the wood) inches high at the highest point. To construct this, you’ll need one piece of wood 8” x 28” x 3/4 for the base and one piece of wood 10” x 30” x 3/4”, two 4” high legs plus wood screws. Print out the file for Press Buck here.

Trace onto the 10” wide piece of wood. The pattern is for 1/2 the template, so flip and trace the opposite side. Cut out with a jigsaw. I used two unfinished short legs from Home Depot and attached them as shown. My legs had bolts at the bottom. I drilled a hole slightly larger than the bolt to allow the legs to sit flat on the wooden base. Attach the remaining piece of wood to the legs from the underside so the screws don’t show (countersink the screws so they don’t scratch or snag any surface).

I used a length of heavy wool and cut concentric shapes as shown. You want the thickest part on top of the right hand leg, tapering to nothing along the edges.

View from the top of layers. I cut a paper pattern the shape of the bottom layer and worked upwards. Cut a layer of wool fabric, trimmed the pattern down a little around the edges and continued until the shape was built up. View from the side. The thickest part is about 3.5 inches high including the wood. In other words, 3/4” thick wood plus 2.75” of fabric.

Cover the entire top with two layers of wool. Staple the wool to edges of the wood base.

I added a finishing layer of wool felt (available in the utility fabrics section at JoAnn’s), wrapped it under the edge and secured with double sided masking tape.

Ease the felt around the curves, stick to tape and trim the excess.

For the cover, add about 2.5 inches all around the pattern. Cut from heavy muslin. Cut a bias strip about 1 and 1/8 wide long enough to go around the outside edge of the cover (piece as necessary). Starting in the middle of the larger curved end, turn end of bias under and stitch at 1/4 inch. Fold end under when you reach starting point.

Wrap the bias around a thin sturdy cord and stitch, making sure not to catch the cord when sewing. The cord will act as a drawstring to tighten the cover. I’m nudging the cord against the fold and stitching along the seam line (badly in need of a manicure; COVID hands).

Place the cover on the press buck, making sure there is equal amount to turn under on all sides. Place a few pins to hold the cover in place while you pull the drawstring tight and tie.

Adjust the gathers and steam to smooth out any wrinkles. I’ve added a couple of lengths of twill tape secured with safety pins along the underside of the long edges to tighten up the cover in that area.

The sleeve board is made the same way except instead of multiple layers of wool, the surface is flat.

Cut a piece of acoustical ceiling tile using the same template. Glue it in place. Cover with thick felt and a muslin cover. The muslin cover should be about 2.5 inches larger than the pattern template to allow for the increased thickness. The combination of ceiling tile and thick felt makes a pin-able surface to secure the work when pressing.

Sleeve board. This one is much more stable than most. A rolling tool chest stores loads of supplies and the top is a sheet of plywood covered with the pin-able tile and felt. The heavy canvas cover can be replaced when worn. Can you tell Home Depot is a great sewing supply store.

Last tool is a point presser.

Cut 3/4 inch wood the shape of the pattern and mount from the underside. The base is 8” x 28.” Shape the point with a wood file and sand smooth.

I have more of my favorite makes coming: seam stick, pressing block and pin cushion which goes around the palm of your hand. I think it’s easier to use than the typical wrist location. Thanks for reading and enjoy making new tools.

Cloning Designer Garments, couture sewing, creating designer trim, French jacket trim, French Jackets, Tailoring, Uncategorized

Buttonholes and More Trim

C2F04906-FBA3-42ED-A583-0BEE9E6284D2
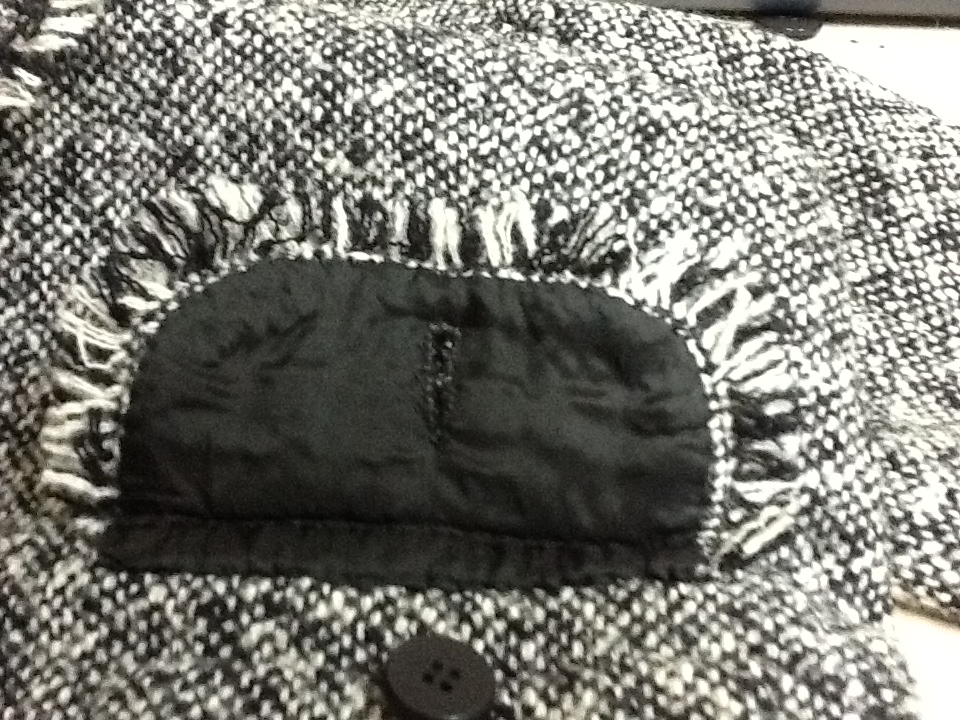
Although many machines can sew acceptable buttonholes, there is nothing like a handworked buttonhole to distinguish a garment as couture. Now for the good and the bad. The good thing about making buttonholes by hand is there is one basic stitch and you simply repeat it over and over. The bad is that it takes hours, and hours, and hours of practice to get the stitches narrow and evenly spaced with just the right tension.

There are a few hints that can make this process easier. Using professional materials does make a difference. After making hundreds of buttonholes I’ve found there really is no substitute for Gutermann gimp. It’s not easy to find outside of professional tailoring suppliers but it makes a tremendous difference in the quality of the finished buttonhole.

Gimp is a stiff cord that lifts the stitches off the surface of the cloth and gives a smooth surface for the buttonhole stitches to sit on. Silk buttonhole twist also comes in various weights. The thicker size F is easier to work with and requires fewer stitches but produces a bulkier buttonhole. My preference is Gutermann R753 which is just a bit thinner and makes a finer buttonhole.

Cutting the buttonhole is also easier with a couple of tools. I found an antique buttonhole cutter which cuts the circular hole and slit in one step. This probably isn’t sharp enough to use.

299DA0BE-F273-47A0-AA6B-3AA94CE417D4 0183CA8B-BFEE-4652-83E0-BF98F27E3A4F

What works for me is a sharp hollow punch for the keyhole and a chisel for the slit.

C2115563-0C90-4FA0-AED0-8403FB072607 0A072FBD-4ACA-4141-8B8F-A91C68B693BE

To actually make this buttonhole first carefully mark where you want the buttonhole and baste all the layers of fabric together. This prevents  things from shifting around while you are working. I forgot to take a photo of just the basting so this photo shows the buttonhole cut. Blue thread is the basting.

CCF3C16E-28C3-416B-BD1F-DD0D541E6416

Before cutting anything (this is especially useful if you’re working on a loosely woven boucle type fabric) machine stitch around the buttonhole. I run two rows of stitching using about a 0.8 to 1.0 mm stitch. The machine stitching will really hold everything in place.

41872E87-ED4D-4A56-A156-7F724D452D79

How’s the time to cut. Unlike machine buttonholes which are cut after stitching, the handworked buttonhole is cut first. I use the hole punch pliers to cut a clean hole. Then carefully place the appropriate size chisel along the center of the buttonhole and tap the chisel a few times with a hammer. I use thick cardboard or a piece of heavy scrap leather underneath both the hole punch and chisel to prevent damage to the tools.

I prefer the look of a teardrop shaped buttonhole so I carefully trim away the little triangles at the base of the circular hole.

I begin stitching the buttonhole with the rounded end away from me and begin work on the left side. Thread the gimp on a large eye needle, put it between the fabric layers and bring it up just inside the cut edge. Wax and press the buttonhole twist. Rule of thumb is that 1 yard of twist for 1 inch buttonhole. Stitches are worked by inserting the needle about 1-2 mm from the cut edge. Wrap the thread in the direction you are sewing; in this case I’m wrapping the thread around the needle clockwise. Pull the thread through and upwards forming the purl knot on the top edge. Using a traditional tailor’s thimble is helpful to control your needle and place the stitches accurately. Putting you left thumbnail where you want the needle to exit the fabric also helps. You want the stitches almost touching but not crowded. Practice definitely helps. Your 10th buttonhole will look much better than the first and number 100 even better.

33CAFA4B-361B-405B-98E2-47401BB07E0E BF389A5E-4F19-43AC-9B6F-5A812333CA5D

Work up the left side, fan the stitches around the circular end and down the right side. Turn the cloth so you are always making the same stitch from the same position. The cloth moves, your hands and stitches don’t. Bend the gimp around the buttonhole as you work.

2889694E-1D4B-4BCB-A2ED-EAC23E68190C

When you get back to where you started pass the gimp between fabric layers and cut it off. Take three stitches across both sides of the buttonhole with the silk twist and bury the thread. Baste the edges of the buttonhole together and use a bodkin to shape the end into a nice circular shape. Press and leave the basting in place until the garment is finished.

In my quest to replicate Chanel jackets, I did a little sleuth shopping. These are from the new spring cruise collection. Looking at the price tags, I’m happy to be creating my own.

The trim was what I was most interested in. I’ve managed to create a fairly good duplication and am working on refining and variations.

Here’s my version.

Buttonholes, advanced garment shaping using ironwork, Chanel style trims and more in a French jacket class, Palm Beach Gardens, FL February 10-15. Only 2 spots left; more classes coming. Dates to be announced.

Cloning Designer Garments, couture sewing, Drafting Patterns, French Jackets, Tailoring, Uncategorized

French Jacket: The Details

In this post I’ll explore the seemingly little details will make your completed jacket look professional. I love the look of a patterned fabric perfectly matched across the seam lines. Here are the changes I make to the pattern. I also shape certain garment pieces using heat and steam.

A basic princess line pattern. I’ve drawn it on grid paper. It has been cut so that horizontal threads in the fabric match along the lower portion but look what happens in the upper chest area.

077935F7-3AB5-4432-AC2B-C925A101A0D8 First Draft

Here’s what happens if I’m able to manipulate the fabric in the side front.

draft 2 draft 3

In order to minimize the amount of shaping required, I’ve shifted the front princess seam from the bust point upwards and brought it closer to the neck. The violet pattern shows the original; in the red I’ve shifted the princess seams (both front and back so they match at the shoulder) closer to the neck. Overlaying the patterns shows the changes. The same amount of fabric removed from both center fronts and backs has been added to the side back and fronts.

pattern 1 pattern 2

Here is an illustration done on a full figured model. The first photo shows the fabric without shaping. Second photo shows how the fabric pattern matches and gives a much less disruptive line.

Linton demo 1 Linton demo finished

The ironwork does push a lot of fabric into the armseye area and makes the grain quite unstable. I deal with this by cutting a piece of silk organza using the original pattern and baste it in place. The armseye can be further stabilized by taping the seamline. The lining is cut according to the pattern and basted in place before quilting (this is a sample and the lining wouldn’t stop below the armhole).

Linton demo 3 Lining basted

Here’s the front of my white jacket. I’ve moved the princess seam and manipulated the fabric.  The horizontal lines in the weave are continuous. I’ve chosen to add a standup collar. It is also cut as a straight piece and shaped with the iron. Cardboard cut to the shape and size of the finished collar helps press a smooth curve and keeps both sides identical.

Shaping side panel White jacket front

collar 1 collar 2 template

An easy way to match the fabric design when cutting sleeves is to pin the muslin sleeve onto the jacket body. Pin scraps of fabric to the muslin sleeve, matching the fashion fabric along seam lines. Remove the muslin sleeve, lay it flat keeping the scraps of fashion fabric in place. Carefully trim along the seam lines. Now you have an exact guide to cut the sleeves and be sure they will match. The sleeves should be mirror images of each other but check to be sure.

pin sleeve pin scraps

cutting template

Next I’ll tackle handworked buttonholes. If you would like hands-on instuction, I’m teaching a French jacket class in Palm Beach Gardens, FL from February 10-15, 2020. We’ll cover fitting, ironwork using professional equipment, jacket construction, custom trims, handworked buttonholes and more. If you’re interested, leave your contact info and I’ll send further details.


Cloning Designer Garments, couture sewing, French jacket trim, French Jackets, Tailoring, Uncategorized

Finishing Details; The French Jacket

Thank you all for the many comments and compliments about this jacket.  The finishing details are what sets French jackets apart and make this jacket unique.  In addition to the custom trim, French jackets feature hand worked buttonholes, sleeves are set by hand, countless tiny stitches secure the lining and a metal chain inside the jacket allow it to drape perfectly when worn.

I think the sleeves are actually easier to set by hand and would be almost impossible to do by machine due to the unique construction methods. Although it would be easier to sew the armseye seam through all layers, I find joining only the outer fabrics together before hand basting the lining in place gives a softer, more fluid feel.

Here’s an inside view of the armseye seam.  Probably one if the messiest times in jacket construction. Yes, I used Pro Sheer Elegance Couture interfacing which was fused the jacket sections. It’s extremely lightweight, flexible and doesn’t change the drape of the tweed.  Linton actually recommends doing this with their more loosely woven fabrics.  I’ve serged the edges of the tweed with a wide stitch but finished the seams of the lining with a narrow two thread stitch using fine thread. I like Gutermann Skala 360-U81, Invisafil by Wonderfil Threads, or 80 weight Maderia or Aurifil cotton.  I use two strands of regular sewing thread, waxed and pressed, to set the sleeve.  I sew the top part from the right side using tiny fell stitches and the underarm portion from the inside with a backstitch.

Setting Sleeve by hand Free seam allowances

Notice at the point where the shoulder seam meets the sleeve seam, the seam allowances haven’t been caught but are allowed to float free.  This allows the seam to press more smoothly and feels less rigid.  I’ve not included the sleeve lining; I feel I get a better result by joining only two layers of fabric at one time.

Sleeve headSleeve head shaped

I create a sleeve head from cotton batting. Cut about 2.5 inches wide and 7 inches long. Fold along a long side about 1.5 inches from the edge, pull along the folded edge while steam pressing to curve.  The folded edge is sewn along the armseye seam at the sleeve cap to provide additional shape and support.

Jacket inside out Sleeve head inserted

Baste the sleeve lining just inside the armseye seam and trim away the excess fabric. I’ve struggled with getting the lining over the sleeve cap evenly if the jacket is lying flat. I’ve found it much easier to turn the jacket inside out and place on my dress form with a sleeve form attached. Now the jacket and sleeve are supported and it’s easier to manipulate the lining into position.

Pin around seam Gathering line Pull up gathers

Pin along the seam and sew a line of tiny running stitches. Pull the gathering thread up to fit and tie a tailors knot at each end. Trim off the excess and the fabric will fold under easily along the gathering line. I set the sleeve cap first, baste, then remove the jacket from the form.  The lining at the underarm is brought up and around the seam allowances.

Seam EasedSleeve underarm

I had originally planned for front buttons, but decided I liked the look of trim without buttons, and considered a front zipper.  Botani Trimming in NYC makes custom zippers and does mail order. You select the zipper tooth size, length, color and pull. The zipper arrives in a few days and they even had chain for the hem.  Finding the right zipper in a local shop would have been impossible.  Just as an interesting side note, Botani sells Lampo zippers. They are made in Italy and the same brand that Chanel uses!

Custom Zip Lining at Zip Zipper Inside

How to deal with the lining? I could have folded it back past the zipper teeth and stitched into place but that left the zipper teeth exposed on the inside of the jacket. In true couture fashion, I wanted to cover up that metal.  Placing a length of ribbon inside the fold beefed up the edge of the silk charmeuse so it would be less likely to catch on the zipper pull.  This was one time when that rigid, slightly raised edge on polyester ribbon was useful.  Now zipper teeth are concealed, both inside and out.

The dreaded buttonholes next.  Machine made buttonholes lack the couture finish this jacket needed.  I’ve experimented with countless ways to improve my hand worked version.  I’ve found that sewing around the buttonhole before cutting, especially in a fabric such as this, helps tremendously to keep the layers together.  Marking and sewing this manually on the machine requires much twisting and turning of the fabric so I searched for an easier way.  My machine sews a square buttonhole using a straight stitch so I tried that, stitching around the buttonhole twice, once at a narrow width and again a little wider.

Machine buttonholes

Looks OK but I didn’t like the thread buildup at the beginning and end (impossible to stop the machine from knotting the threads) plus I really wanted a keyhole buttonhole.

Hoop setup Buttonholes in hoop Embroidery buttonholes

My Bernina does embroidery and I have digitizing software so I created a template for the buttonholes. I hooped a square of heavy muslin, stitched out the placement lines for the sleeve; then cut out a window so the stitching wouldn’t get caught on the muslin. The sleeve was pinned onto the muslin. Working wrong side up worked better. The sleeve was easier to place and keep the fabric clear of the stitching area, plus the embroidery foot wouldn’t get snagged on the loose fibers of the tweed.  The embroidery software will insert buttonholes automatically, but I wasn’t able to adjust the shape and stitch length satisfactorily. I also wasn’t able to do the double rows.  Mirror the image for the other sleeve and remember to cut another window so your muslin doesn’t get stitched to the fabric.

Stranding Buttonholes  Best Buttonhole

There are several YouTube videos showing hand worked buttonholes if you need a review. I worked under a magnifying light and tried to keep the buttonhole stitches just inside the second row of machine stitching. It provided a nice guide for straight, narrow stitches. Buttonholes aren’t easy and most people say they need to work a hundreds before somewhat mastering the art.  I’m always trying to make mine better but these aren’t bad.

I’ve been inspired by the photos of sheath dresses with matching jackets ( Helen Haughey’s class looked wonderful) so that’s next in the sewing lineup. Thanks for reading.


couture sewing, Tailoring, Uncategorized

Do You Dread Making Pants?

How many sewers have difficulty with the fit of pants? The sewing is relatively straightforward; only two fronts, two backs and a waistband or facing.  The truth is that pants ARE hard to fit. You’re asking flat fabric to attractively cover a very bumpy section of the body.  Jackets have multiple seams and attached sleeves which allow for many more fitting opportunities. One of my favorite resources is Cutter and Tailor.com which offers truly expert advice.  It is written for professionals and much of the information is geared to the expert sewer but I thought some of the ironwork techniques weren’t that complicated.

I had made a pair of pants using Style Arc’s Claudia pant. The pant is designed for stretch woven fabric but I used a non-stretch wool and added a little extra to the seams to compensate. I eliminated the seam at center front leg. The pants fit OK but I wanted to see if they could be improved.  I had purchased the fabric from B & J’s in NYC and it was not something I was willing to trash.  I tend to use better fabrics and am willing to take apart and redo if necessary.  Quality materials and natural fibers just behave better and I’m happier with the end result.

CLAUDIA-PANT

Some pattern instructions direct you to stretch the back inner leg seam while joining it to the front and also point out the need to stretch the back crotch seam but the degree of iron shaping necessary for better fit isn’t clear.

There is an  extensive article  in Cutter and Tailor about shaping the pant sections with the iron and very detailed, clear photos describing exactly how this should be done. Search for “ironwork.”  If you Google “pressing” you will get directions on how to press ready-made pants. The author points out:

The correct fit of trousers cannot be achieved by cutting alone, for this must be achieved for the most part through ironwork. Many more errors in trousers have their origins in inadequate ironwork than in the cut. The most important factor in trousers is their width. Different widths demand a different method of working up with the iron, although difference in posture and body habitus also influence this. Even the most perfectly calculated cut could never create well fitting trousers without the proper ironwork.

I eliminated most of the lower leg shaping and concentrated on the hip and seat area.  My fabric wasn’t the most pliable but eventually succumbed to stretching, heat and steam. I worked with both back sections placed right sides together at the same time. That way the stretching was equal on both right and left sides.

Pant Shaping

The pants have a half lining of soft cotton/silk voile and hand under-stitching along the waist facing.

Pants Lining Inside Pants

I’m much happier with the fit and will definitely incorporate this technique in future pant construction. My next pair will be from a softer wool which will be easier to shape but even the fit of this tightly woven plaid improved with some extra iron work.

Pants FrontPants side

All my resident photographers were unavailable so I resorted to some cell phone mirror shots. The dark fabric doesn’t show too well but it’s pouring rain so no chance of outdoor shots.

While responding to comments I found this info which may be helpful if you are having trouble with basic fitting. Note how many drafts were needed before the pants were even attempted in fabric! Also see how small some changes were and how other fit issues could result from a change.

Threads Braid


Tailoring

Vogue 1440 Finished

I hate having unfinished projects cluttering up the workspace, so before getting to work on the bridal gown, I needed to finish Vogue 1440.  I left off with a fitted shell but no sleeves. I have given up on the sleeve shape of most patterns and find I get much better results with my own draft.

DSC_0048
The cap has less ease in the back and more rounded at the front to accommodate the ball of the shoulder. I also raised the underarm and decreased the overall width.
Here is the muslin showing that most of the easing is in the front.
DSC_0051
I also shaved an inch and a half off the collar width
DSC_0056
The sleeve was stretched and steamed into shape.
DSC_0065
before setting the sleeve, snug the back of the armhole which creates a pocket for the shoulder blade.
DSC_0069
The collar back was too floppy and benefited from a felt collar stand. This was interfaced with hair canvas, pad stitched and applied to the collar back.
DSC_0070
To maintain the soft drape of the front I stay stitched 3/4 inch from the edge and fringed the cut edge.
DSC_0072
Most trims are far too stiff and would have destroyed the drape of the front section. Black chenille yarn was soft enough to apply to both front and back sides without altering the drape of the wool boucle. I chose to omit the seam piping. The boucle is underlined with silk organza and lined with silk crepe de chine.
DSC_0079
DSC_0077
DSC_0078

Tailoring

Vogue V1440: Tweaking the Fit

DSC_0046
I came across this Donna Karan Vogue pattern. The jacket looked like a fun, easy to wear, garment. I also loved the interesting style lines and curved seaming.
DSC_0047
First a word about size selection. I’ve found that it works much better to select your pattern size by your high bust measurement, NOT the full bust. I measure 32″ high bust and 34″ full bust. That would mean I should cut a size 12. Size 12’s are ridiculously huge on me. The neckline gaps open and the shoulders are HUGE. I go down two sizes and cut a size 8, which is 31.5 bust. That fits me much better in the neck, armholes, and shoulders, areas which are much more difficult to alter than side seams. I’ve found that the high bust is a truer measure of your bone structure and will give a better fit. You may need to alter for a full bust and/or fat tissue, but those changes are easier than the neck/shoulder areas.
Here is my first muslin, cut exactly according to the pattern. It’s shown on my form which is an exact duplicate of my shape.
DSC_0033
Here’s the back view.
DSC_0032
There is a huge amount of ease at the underarm along the side seam. In order for the side seams to match up the front piece needs to flare out away from the body. Not the look I’m after.
DSC_0029

The side seam also flares out at the hem much more than I would like. The pattern line drawing looks to me like a fairly slim fitting jacket. I have a long torso and the waist also needs to be lengthened by 1 and 3/8 inches.
Here’s a view of the original on the left side and the altered version on the right side.
DSC_0034
DSC_0036

Changes to the pattern. The red lines are the new seam lines. I’ve raised the underarm and reshaped the armseye. I’ve also removed fabric from the collar at both the neck and front edge.
DSC_0035
Style tape makes it easier to redraw this seam line. The triangle shaped section has excess pinned out which will be removed in the redraft. I’ve repositioned the bust dart for a smoother fit.
DSC_0028
The altered flat pattern.
DSC_0039
Most of the alterations are along the side seam and armhole. One major change is to reposition the grain line on the triangular shaped piece. I wanted more waist shaping but didn’t want to add additional seam lines to already busy lines. I placed the bottom and back edges of the triangular piece on an almost true bias and the front edge was slightly off grain. Stretch the bottom and back edges while steam ironing.
DSC_0044
How it now conforms to the body curves and shapes the waist better.
DSC_0045
The curved edge along the jacket front will also be steam stretched to hug the body.
The collar and front piece is basically a curved ruffle. Take a tip from Roberta Carr  (her book: Couture:The Art of Fine Sewing)  and do not clip this seam until after it’s sewn and then clip at precise intervals to control the ruffles.
DSC_0042
If you try this pattern pay attention to the fabric choice. A softly draping tweed or loose weave will work best. Anyone else tried this design?

French Jackets, Tailoring

Jacket Finished, Plus Two More

The last step in finishing was to add pockets. I played around with different sizes and debated two versus four. A great way to visualize size and placement is to cut pockets from shop towels (they are heavier than paper towels) and play around until you get the right look.

P1000203
I had four larger buttons and decided to add them at the center front. They are sewn at the right front edge and don’t actually fasten.
I find it easiest to get pockets exactly the same size and shape by pressing the pocket around a cardboard template. I interfaced the pocket with bias cut interfacing which is cut just a tad smaller than the finished pocket. The bias gives the pocket a softer shape. I cut a slightly smaller template for the lining.
P1000172
Slip stitch the lining to the pocket, attach trim and slip stitch to the jacket. Don’t catch the lining when doing this.

P1000173
I had a chance to get a closeup look at some geniune Chanel jackets at an upscale resale shop on Madison Ave. and noted some distinctive details. Trims are applied after construction and are made to be removed if necessary for cleaning. More about my findings in the next post.
I was sidetracked by an request from my daughter-in-law. She was invited to join the hunt staff of our local equestrian team. Hunt staff wear red jackets and bespoke versions are a small fortune. Since I had made her wedding gown, she figured a jacket would be an easy task.
Just make a tailored jacket from a commercial pattern, right? Wrong. Riding clothing is another animal. We combined my research and her knowledge and came up with a punch list of what this garment needed.
*Roomy armholes with significant ease in the back to allow the rider forward arm movement
*Sleeves pitched much more forward than conventional clothing as the arm is held almost horizontal
*Abrasion resistant lining in the jacket skirt to resist wear
*Flared skirt with most of the flare at the back to cover the seat while in the saddle
*Warm lining as hunt season runs through the winter
*Slippery sleeve lining to allow the jacket arms to slide freely over shirts/sweaters
Mood Fabrics had a beautiful heavy wool/cashmere/nylon fabric. They also had abrasion resistant lining and wool flannel for the upper jacket lining. I drafted a fitting muslin from cotton canvas which mimicked the weight and drape of the wool better than lightweight muslin. Note the exaggerated curve of the sleeve.
P1000148
The roomy armhole. I would never have guessed this much ease would be required.
P1000151
The jacket fabric was thick and required loads of steam and heavy use of a tailors clapper to get things flattened into shape. I found it helpful to flatten the inside of especially bulky seams with a clamp from the hardware store. Get loads of steam into the fabric, clamp it down hard, and leave until it’s cold.
P1000149
Also, don’t sew across the layers of intersecting seams. You can get a much flatter press by folding the seam allowances to one side and end the stitching at the seamline. Fold the seam allowances the other direction and begin stitching at the seamline. The seam allowances will remain free and press much flatter.
P1000150
Inside the jacket showing the various linings used.
P1000153
The color of the upper collar is unique to the particular hunt club; her’s is purple. The fabrics were so heavy and it was applied with traditional tailoring techniques.
P1000170
Here’s the finished work.
P1000175
I couldn’t resist using the leftover fabric for a matching jacket for the one year old. Fittings were a bit of a challenge on a squirmy baby but we got it done!
P1000177
Mommy and daughter out for a ride.
P1000196

Tailoring

Marfy 3182 Finished

front viewIn December I was lucky to have an unexpected trip to Paris and PROMISED my husband if I could have an outing at Janssens & Janssens (probably one of the most spectacular fabric stores in the world) that the my purchases would NOT wind up as collectibles.  Marfy 3182 was an ideal design for this fabric so this post is also a review of the pattern.

Additional views:

side view

Sorry for the blurry photo

Closeup of the fabric

Cuff detail
Cuff detail

I made a few changes to the pattern, although Marfy styles don’t usually need much tweaking. The jacket IS boxy, as the illustration shows.Pattern View

I chose to raise the front shoulder seam 3/4 inch at the front neck edge, tapering to nothing where it meets the armhole seam. The corresponding amout was removed from the sleeve.

altered front shoulderGreen thread shows the origonal pattern, red is the new line. I also removed an inch from the sleeve width. I underlined the jacket with washed silk organza which also provided a much needed layer to attach all the interfacing needed to support the lapels and collar.front interfacing

Hair canvas was inserted into the front, back, sleeves and underarm. Cut the canvas inside all stitching lines except the underarm seam; it is needed there to support the armhole. Catchstitch all interfacing to the silk organza underling being careful not to catch the face fabric. A back view of where the canvas is needed.

back interfacingI also added a layer of heavy silk organza to the collar to provide support but not add weight. This was loosly pad stitched to the under collar.

collar supportI changed the sleeve banding shape and will detail that in the next post as it is somewhat involved for anyone who wants to try it. The pattern went together easily and all necessary match points were clearly marked. The banding requires precise measuring and stitching but it all fits together if you take your time and align everything first.

lining up bands

More details in the next post.

Tailoring

Bias Fringe

This is in response to several requests for more detail on bias fringing after viewers saw my jacket in the Reader’s Closet section of Threads Magazine. I don’t have any more of the fabric used in the jacket available but have used a close substitute in these demos.

The pocket fringe is made by cutting 1 inch wide strips of fabric on the true bias. Staystitch 1/2 inch from the edge using a short (about 1 mm) stitch. Stitch again on the same line. You don’t want the fabric threads pulling loose. Use a knitting needle or tapestry needle to gently unravel the fabric along one side.Bias Fringe stripMeasure the outside edge of each pocket flap and make a strip of fringe long enough for each pocket. Sew the fringe around each flap edge rght sides together. Turn, press and fell stitch the lining to the wrong side. Trim the fringe to the finished width you want either with scissors or rotary cutter.

pocket

pocket underside

For the front lapel facing, cut a bias strip 6-7 inches wide and about 6 inches longer than the jacket front. You will need this extra length as the lower curved edge is treated like giant piping. Staystitch and unravel as before. At the top where the lapel makes a right angle, cut your bias at a right angle leaving extra to cover the underside of the neck facing.
lapel facing
Shape the bias strip to match the contour of the front lapel using a steam iron.
front jacket lapel
Turn the jacket seam under, slip baste, and sew the shaped lapel to the jacket. You won’t be able to ease all the fabric out at the lower edge where there is a curve. Sew a couple of darts in the facing to curve it around.finished corner
Red threads highlight where two darts are sewn to allow facing to curve.
facing darts
Hope this helps clarify the techniques used. Please leave a comment if you need more info.
I’m working on Marfy 3182 and hope to have that post ready tomorrow. Here are a couple of preview shots.
Marfy 3182
Marfy 3182 Jacket facing