In my recent moulage/dressform class, students used everything from a custom made full body form from Wolf to a display form found at Hobby Lobby. Evidence that you can get almost anything that resembles a body to work.
We ripped the existing base off the display form and replaced it with a wooden dowel. The dowel fit into a sturdy cast iron base and was a huge improvement over the rickety wooden one. Class begins with taking about 25 body measurements. We then draft a moulage, or mold, of the body. The drafted moulage pattern is cut from sturdy muslin and tested on the body. Fit adjustments are made and transferred back to the paper pattern. When all looks good, we cut the final dressform cover from heavier muslin and do one last fit check.
The muslin cover is draped onto the form. Placement and amount of padding is assessed and we start padding the form to fill out the cover. Depending on where padding is needed, I’ll suggest using various bust cups, cotton quilt batting or polyester batting. The poly batting is steamed to compress and firm up the shape. The display form fit her neck and shoulders surprisingly well. Bust, waist and hips can all be customized with layers of compressed batting.
At the opposite end of the dressform spectrum is a custom made full body form from Wolf. This student had wrestled with fitting problems for years and tried everything from body scan versions to this custom model but nothing seemed to address a key fit issue.
She had already drafted a custom cover to fine tune the fit. It needed firmer padding and a key adjustment for a high hip. After drafting the moulage it was test fit and elastic tied around the waist to pinpoint the fit issue. The right hip significantly higher causing skirts and pants to ride up on the right side. Notice the position of the waist when her back draft is laid out on a grid. Lowering the hem on that side really doesn’t fix the problem.
We carefully marked the dressform cover and added padding to duplicate the hip contours. The finished form is a much better fitting aid with balance lines correctly placed.
We tested the fit using several of her dresses. The new mannequin pinpointed the need for a slight full bust alteration to remove the drag lines around the bust dart. The moulage patter is used to create a custom sloper or basic pattern which can be used as the basis for drafting additional styles and correcting commercial patterns.
The next custom moulage/custom dressform class will be held January 10, 11 and 12 in Palm Beach Gardens, FL. For more information: Dressform Class
Several years ago I posted a pattern and instructions for creating a custom arm for your dressform. Since then, I’ve made a few improvements to the pattern and written more detailed instructions.
Here’s the new and improved pattern. It has cut lines for adjusting the width of the biceps as well as length.
Download and print the pdf file. Pages should be assembled as shown.
Be sure to set your printer to print at “actual size” or “no scaling.” The test square on page 1 should measure 2 inches square. The file is 7 pages. Tape together as shown and cut out the pieces. You will have an upper arm, lower arm, wrist cover, armseye cover, and shoulder attachment which will enable you to pin the arm to your dressform. The pattern has NO SEAM ALLOWANCES. This is to make any alterations you need to do easier. It is drafted for a bicep measurement of 11 inches. If you want a smaller or larger biceps, cut on the dotted lines and overlap or spread the pieces to desired measurement. Measure along the balance line located at the underarm on the lower arm and corresponding balance line on the upper arm. The length of the two balance lines added together are the finished biceps measurement. You can also lengthen or shorten the length between shoulder and elbow and elbow to wrist as desired. If you alter the biceps width, remember to add to the circumference of the large oval the same amount you added to the biceps. The wrist circumference can be increased or decreased in the same way. Adjust the wrist oval in the same way so that the circumference of the oval matches your desired width.
Here’s a sample layout if you want to increase the biceps width. Cut the upper and lower arm patterns apart on the dotted lines. Spread by the desired amount (if you want an additional 1 inch, spread the sections 1/4 inch). Notice I’ve increased the wrist only 1/8 inch at each cut line for a total of 1/2 inch more at the wrist circumference. You’ll also need to alter the wrist and armseye covers to compensate. This can be a bit of trial and error as the circumference of an eclipse (oval) isn’t straightforward math the same as a circle. Smooth out the seam lines over any spaces.
Cut out pattern pieces and lay out on sturdy muslin. I use this heavy weight muslin: Cloning Couture ~ Products ~ Muslin, Heavy Weight ~ Shopify (myshopify.com) but cotton drill cloth is a good sub. Add 3/8 inch seams with these exceptions: 3/4 inch seam allowance around the armseye oval and 1/2 inch around the wrist oval. Cut two shoulder attachment shapes. I prefer to mark the cutting lines lightly in pencil. Tracing with dressmakers carbon paper can leave unwanted marks on the finished arm form.
Mark all balance lines and match points with an erasable marker.
Stitch two rows of machine stitching 3/8 and 1/4 away from the cut edge along the elbow. Pull bobbin threads to take up ease in the elbow area. Tie threads.
Steam the elbow area to smooth the seam. Make sure you don’t have any creases. Join the upper and lower arms along points A, B and C. Press the seam open.
Close the dart at the top of the shoulder. Press towards the back.
You can add the balance lines now. Either stitch along the vertical and horizontal balance lines with contrasting thread or draw lines with a permanent marker. The lines can also be added when the arm is completed but it’s easier to do now when it’s flat. Smooth out any little jog at the elbow.
Stitch the remaining seam along points D,E and F. Press the seam open. I use a sleeve board and seam stick made from a length of stair rail handrail with one flat side.
Stitch along the top of the arm with a longer (about 3.75mm) stitch at 3/8 and 1/4 from cut edge. Pull bobbin threads to create a curve at the top of the arm.
Steam the seam allowance to shrink excess fabric. Be careful not to press in creases. Tie thread ends. Place the two shoulder attachment pieces right sides together and stitch around the outer convex curve. Trim seam to 1/8 inch, turn, press and stitch close to the edge. Clipping the seam isn’t necessary if you trim the seam allowance to 1/8 inch.
Matching shoulder points, pin the shoulder attachment piece to the top of the arm. Make sure you orient so that front and back are correct. Start at the shoulder point and work out from there. The shoulder attachment will end just past the seams.
With the arm on top, stitch the arm to the shoulder attachment.
Turn the seam allowance towards the arm.
Cut the batting to stuff the arm. I use high loft quilt batting to stuff the arm. Using small bits of batting to fill out the arm shape will result in a lumpy, bumpy arm. A better way is to use a larger piece of batting rolled. I start with a piece of high loft (about 3/4 inch) polyester batting cut 30 inches by 24 inches. Roll up the 30 inch width and determine if that gives you a roll the measurement of your biceps. 30 inches of my batting loosely rolled results in a tube 11 inches in circumference. If you adjusted your biceps, then the 30 inch dimension might need to be adjusted. 24 inches is the length of the arm from tip of shoulder to wrist. If you lengthened or shortened the pattern, adjust as necessary. Tear, rather than cut one 24 inch side. This will give a smooth edge when rolled. Start rolling from the short (13 inch) side. The resulting roll of batting will be fatter at one end and taper to a smaller diameter which will be the wrist. Temporary quilt adhesive spray helps adhere the edge. Test the dimensions of your roll and when all looks good, spray the feathered edge with adhesive spray, roll and press the feathered edge down. You should end up with a roll that is fatter at one end and tapers at the other, like an arm.
To pull the roll of batting through the arm, pin a length of ribbon to the narrow end. Attach a weight and drop the weight through the top of the arm. Pull the ribbon through while pushing the batting in from the top.
Turn up 3/8 inch seam allowance at the wrist end of the arm. Cut cardboard the size of the wrist cover pattern. Hand sew a running stitch 1/4 inch from the edge of the fabric. Pull the threads to gather the fabric around the cardboard shape And tie securely. Press to flatten. Mark all match points. The wrist should be an oval with the longer side of the oval matching the marked balance line on the upper arm.
Check that all points match and whip stitch, using strong thread, the fabric covered oval to the wrist.
Cover the armseye oval in the same way. Handsew a running stitch around the edge, pull thread and tie, covering the armseye oval. Mark the match points. Make sure you have the underarm and shoulder points oriented correctly. The back armseye length is slightly longer than the front, so the shoulder point is slightly forward of center. Press to flatten.
Check that there isn’t excess batting in the armseye area and the arm will sit flat against the dressform. You want enough batting to fill out the top of the sleeve but not so much that the arm is pushed away from the dressform.
This is the hardest part: attaching the armseye cover. Pin match points at the shoulder. Work around to where the shoulder attachment ends on both sides, pinning in place as much as possible. I use a sturdy needle and upholstery or heavy duty polyester thread. Begin sewing so that you will attach the section along the top of the arm first, then moving towards underarm section. If you can use a thimble, it will help immensely. I’ve found stitching like this: bite into the arm section and take a small stitch parallel to the seam line. Pass needle through the fabric on the armseye cover along the edge of cardboard, then back to the arm. Pull tight every stitch or two. Keep an eye on your match points to be sure all will line up.
Take a couple of extra stitches where the shoulder attachment ends as that will be a stress point when you use the arm form. The area along the underarm can be sewn with a whip stitch as the arm is flexible and easier to sew along that area.
Attach the arm to your form with pins. I use Clover double forked pins and angle them so they are pointing inwards. Use one pin at the shoulder, one in front and one in back. Push them in parallel to the surface so that just the tiny curve is visible. There are no pin heads to snag on clothing. Determine the best pitch (angle) for your arm. Some arms are pitched with the arm more forward, others figures have the arm angled more towards the back. You can draw the shoulder line on the shoulder attachment when you’ve determined the ideal placement.
Arm pitched forwardArm more towards vertical
I use Clover forked pins to attach the arm to dressform. Angle the pin so it’s pointing downwards. It holds the arm securely and the rounded tip doesn’t snag on clothing.
The idea for a flexible arm came while watching Signe Chanel. The film gave an inside view of Chanel workrooms and all their mannequins were outfitted with these wonderfully flexible arms. I’ve tried the arms supplied with commercial forms which are rigid and heavy. I’m much happier with this version. No wonder this is what Chanel uses.
This pattern makes an arm for the right side. If you want an arm for the left side, just flip the pieces over and duplicate. You can also print the pattern at 50% and use it for a half-size dressform. If making a half-scale arm, use regular quilting weight muslin as the heavier weight will be difficult to handle. I keep seam allowances at 3/8, maybe trimming slightly, but 1/4 inch tends to fray easily and makes things difficult. Enjoy!
I’ve written about the process of drafting a skin tight pattern to duplicate your body and using it as the basis for creating a custom dress form. Now that you’ve invested hours in perfecting a draft of your own body, what can you use it for?
Here’s an image that was posted on one of the dressmaking FaceBook groups I follow. It’s a button front Chanel style; looks fairly simple but it has several design elements that elevate it to couture level.
The shoulders are slightly extended with a squared shape. I’ve marked what looks like the sleeve seam in yellow. It’s narrower than a standard shoulder and the extended shoulder width comes from clever shaping of the sleeve. The collar sits away from the neck and looks like it has been worked into shape using ironwork rather than being cut to shape. The shaping appears to be concealed by princess seams which end close to the neck rather than mid-shoulder, as many princess seams do. Moving the princess seam closer to the neck allows the horizontal lines in the boucle fabric to carry across the front chest into the sleeve as one unbroken line.
I’ll walk through the steps I use to recreate this dress. Start with your moulage draft. This draft is done to half scale and fits my half-scale mannequin. Working in half scale is easier to show the entire draft and design yet is large enough to demonstrate details.
This will be a slim fitting dress so I’ll add minimum wearing ease to the draft. The changes are shown in red.
Next I’ll relocate the princess seam to end near the neck on both front and back. I’ll also narrow the shoulder to compensate for the width added by the altered sleeve. Deciding how wide to make the finished shoulder is a personal design choice. I want this to be slightly extended yet not look like football padded shoulders. I decided to make the shoulder 3/4 inch narrower. I’ll add about 1 inch to the shoulder in the sleeve. The added width will be supported by a small shoulder pad.
Moving the princess seam closer to the neck is important as it allows the horizontal lines in the boucle fabric to span the upper chest in an unbroken line. Here’s how the pattern will match if the princess seam ends at mid-shoulder and what happens if the princess seam gets shifted. Additional shaping and perfect pattern matching can be achieved in the side panel by coaxing it into shape using heat and steam.
Sample dress on the mini-mannequin. I’ve drawn horizontal lines to demonstrate how the fabric will match. I use Osnaburg fabric as it replicates the boucle fairly well. The weave is looser than ordinary muslin and can be shaped much like a boucle.
Views of the shoulder, sleeve and collar. Also one shot of how the horizontal lines would mis-match if the princess seam had not been repositioned.
The collar is cut straight on the crossgrain and shaped with heat and steam into the necessary curve. I’ve created a collar stand, attached the outer collar and positioned it so it doesn’t hug the neck tightly.
Height has been added to the sleeve cap and darts added to produce the extended, squared shape. Here’s how to draft the sleeve:
The diagram on the left shows the armseye of the dress. On the right is a short, one-piece sleeve drafted to fit that armseye. Notice the length of the back and front seams are the same for both armseye and sleeve head: no sleeve cap ease is wanted for this alteration.
I’ll raise the sleeve cap 3/4 inch and dart out the resulting ease. I’ve positioned the sleeve cap darts one inch either side of the shoulder point. Draw a horizontal line connecting the front and back underarm point. Draw a vertical line from the shoulder point to intersect the underarm line at right angles. Connect the dart points to the point where the two guidelines intersect.
Cut open the pattern as shown. Raise the center of the sleeve cap 3/4 inch tapering to nothing at the underarms. The top of the sleeve cap will spread open. Position the triangle of original pattern section midway to divide the sleeve cap opening in half. The original sleeve cap shape is shown in red, new line in black. Draw two darts the width of the opening and 3/4 inch (the amount the sleeve cap was raised) long. Measure the length of the seam (front and back) and compare to the armseye. If the seam line of the sleeve cap is longer, increase the width of the darts slightly to compensate. The necessary ease has been added by the darts and extra ease will alter the “squared” shape of the finished sleeve cap.
Crease the paper and fold the darts closed. I fold both darts towards center. The original sleeve cap line will need to be smoothed out as shown. Also note that the darts will create a fold just beyond the original seam line. In this draft, that distance is 1/4 inch. This is what will create the straight line for the “square” shoulder shape.
Leaving the darts folded, cut along the new seam line. Your completed sleeve pattern should look like this.
I’ll tackle the collar and collar stand in full scale in the next post. Stay well and happy sewing.
Ever wish you could clone yourself? How much easier to make fitting adjustments if you could just step outside your own body and work on you. Here’s how: pad a standard dressform to your measurements and cover it with a custom drafted muslin to replicate your own shape.
Why construct your own form? Once you have a duplicate of your body, fitting becomes SO much easier. You’ll also have an understanding of pattern drafting so style/ fitting changes to commercial patterns are less of a mystery. If your size changes you can adjust the padding and cover to reflect those changes. Couture houses create custom forms for their clients so why not do it for yourself?
The process begins with accurate measurements. Those numbers are used to draft a custom pattern which duplicates the body.
The pattern is cut in muslin and any adjustments made. It’s a skin tight fit.
The pattern is cut apart and transferred to heavy weight muslin. Additional seaming is added to the bust area for better shaping.
Use a dressform that’s SMALLER than you. If you start with a form by bust measurement, it’s invariably too large across the back and shoulders. I usually chose a form that’s at least 3-4 inches smaller than the bust.
The cover is sewn together at the shoulders leaving the side seams open. That makes it easier to get the cover into place without dislodging any of the padding. Start at the shoulders and work down the body. Bra cups fill out a larger bust; shoulder pads can be used to fill out the hip area. Polyester quilt batting works well to smooth out the shape. Tear rather than cut the batting to eliminate ridges. A small steamer helps compress the batting and makes it stick to itself. This is like sculpture. It can be helpful to have a photo of your body: front, back and side views. Work from the top down. Fold the cover down to check if you have padded too little, too much or in the wrong place. Pin the sides closed to check. When the cover is filled out you’ll hand sew the sides closed.
Fold seam allowances under and whip stitch the sides together using strong upholstery thread. Draw some registration marks every couple of inches to keep the sides aligned while you’re sewing.
Steam the cover well. It will shrink slightly and tighten up. Draw balance lines (bust, waist and hip) with a permanent marker. Vertical balance lines at center front and back can also be added.
For a custom arm, here’s the pattern I use. There are NO SEAM ALLOWANCES. I use either heavy muslin or cotton drill cloth for the two main arm pieces and shoulder. Lighter weight muslin covers the cardboard ovals.
I’ve traced the stitch lines in blue dashed lines and am adding 3/8 inch seam allowances. Transfer the vertical and horizontal balance lines also. I use washable marker. Notice the vertical line down the upper arm pivots at the elbow.
There is ease on the upper arm at the elbow point. If you try and match up the stitching lines there is excess fabric which needs to be eased in to create the elbow shape. Stitch the back seam first.
If your balance lines are slightly askew at the elbow, blend into a smooth line across the seam. The marks will dissolve with water after you topstitch the line. Press the seam open. I use a topstitching (has a larger eye) needle and two strands of black thread to trace the balance lines using a 3.5mm stitch length. There are three horizontal balance lines, one at the elbow, one at the underarm and another about 2 inches up from the underarm. Extend the upper balance line to cross both sleeve sections.
Close the remaining seam matching the stitched balance lines. Press open. Close the dart at the top of the sleeve. Cut the shoulder piece (looks like a shoulder pad) from drill cloth. It needs a seam on one side only. I serge the outer edge to prevent fraying. Using a 4.5m stitch, sew along the top of the sleeve. It will gather up slightly which is all you need. Don’t try and ease it like a set-in sleeve.
Clip within the seam allowance on the shoulder section. Mark the mid point and attach it to the arm, matching the mid point to the dart on the sleeve. Make sure you have right sides facing each other. It should look like this.
To stuff the sleeve I use soft polyester fleece. I cut a piece the length of the sleeve plus about 2 inches. Roll up the fleece, not too tightly, and gauge about how much is required to fill out you sleeve. I want the sleeve to be full but not tightly packed and stiff. The wrist and lower arm needs less fill than the upper arm so I shape the fleece like this. I’ve used about 30 inches an have cut off one corner so that the lower arm has less stuffing than the upper.
Begin rolling at the shorter end forming a soft cylinder which is fatter at one end. I safety pin a length of ribbon onto the slimmer (wrist) end, insert the ribbon through the top and pull it through. If you want more or less fill pull out the roll and adjust the amount of stuffing.
Trim the fill at the armseye end leaving enough to fill out the top.
Cut ovals from cardboard for the wrist and armseye covers. I use lighter weight muslin (the drill cloth is too stiff to gather) and add about 3/4 inch seam allowances. Stitch around the edges, insert the cardboard and pull the threads up to create the covers.
I place the armseye cover against my form and mark the shoulder seam point. Notice that I’ve angled it towards the front to better replicate my arm position. Human arms tend to fall slightly in front of center. Line up the wrist oval to simulate the wrist shape. Again wrists aren’t circular; they are wider when viewed from the top of the hand than the side.
Hand sew the covers in place with a whip stitch. Your new arm can be attached with a few pins (I use flat head pins and push them at an angle to avoid snagging the garment). This pattern is for the right arm. If you would like two arms just flip the pieces and make a matching form for the left side. See how easily her arm bends and I’ve found this version much more workable than the premade ones.
This will make a fairly slim arm. If your arms are larger and you want to adjust the pattern I would suggest this method. Trace the pattern onto your preferred paper and slash the upper and lower arm sections. I don’t cut up my master pattern until I’m happy with the changes. If the first alteration doesn’t work I haven’t destroyed the original and it’s much easier to start over.
Divide the amount you want to adjust by 4 and spread the pattern sections by that amount. It doesn’t need to be the same for the entire length of the pattern. You might want an extra inch at the wrist and an extra 2 inches at the bicep. Overlap the sections if you need a smaller arm. Likewise the length, both above and below the elbow can be adjusted. The ovals for the armseye and wrist covers will need to be adjusted and I would just use trial and error. There is a mathematical formula for figuring out the circumference, long and short axis of an ellipse but you don’t want to see it. Anyone with a math background will understand..
I’ve received requests to teach this and have done several workshops. With the current stay-at-home situation, on line classes are a necessity. I’ve taught this remotely using Zoom and it worked well. Those who participated had a buddy to help with measurements but it is possible to fit yourself. I’ve done it and it’s not impossible. There are a few tricks like putting a separating zipper at center front to make the cover easy to get on and off. When the fit is perfected, the zipper is removed and side seams opened. It’s also more accurate than pinning. A few measurements (like the cross back width) will need to be calculated rather than direct measure.
The dressform cover pattern can also be adjusted with ease added to create a custom size master pattern block. You can use this to either create your own designs or help with adjustments to a commercial pattern.
If you’re interested and want more details, leave a comment and I’ll get in touch. Everyone stay safe.
So much had happened since my last post; all of it good. My son and daughter-in-law welcomed baby Milena. Her arrival coincided with my construction and installation of draperies in their new home. Needless to say, it was a very, very busy time.
After helping the new family get settled, it was time to head home and prepare for my dear sister-in law’s wedding, held in our backyard. When you’re the resident family dressmaker, weddings mean loads of sewing; all of it fun and leading up to a happy celebration.
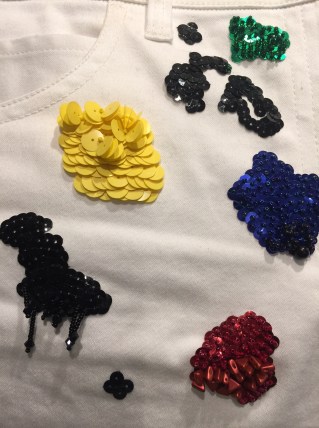
The rehearsal dinner was an informal gathering and I chose to replicate a designer skirt I had seen. This Oscar de la Renta skirt, from his “paint splatter” collection was white denim with applied sequins and priced at a mere $1900.
I had a length of white denim with a bit of lycra in the stash. The skirt front was drafted by using a jeans pattern, lapping the right over left front, and tapering to a mid-calf length straight skirt. The back was slightly more complicated. My jeans pattern back wouldn’t cooperate and produce a well fitting rear. Draping on my custom dress form solved the problem.
I placed style lines for the back yoke, waistband and side seam. The waistband is slightly lowered at center front. I used flat felled seams and the only problem was my machine didn’t like the bulk of multiple fabric layers and the thicker thread I was using for topstitching. I found that hammering (use a clean regular carpenters hammer) the seams, especially at points where seams intersected, made a huge difference. Hammering the fabric prior to sewing seems to soften and compress the fibers. A heavy duty jeans needle also helped. The long, sharp point pierced the denim much easier preventing skipped stitches and thread nests.
Now for the fun part. I gathered sequins, beads and started drawing. An air erasable marker lets you preview the placement and size of the “paint blobs.”
The large yellow sequins had holes in the center but I decided they would be better if the holes were closer to one edge. Joanns Fabric carries this punch in the leatherworking department. It’s pricey at about $40 (great time to use the discount coupon), but makes the tiniest holes and was perfect for the task.
Completed and on to the more wedding sewing.
Next post (and I promise it will be soon) will detail the design and construction of the bride’s dress, little girls’ dresses, mother-in-law’s dress and (as if I didn’t have enough going on) a Chanel style tunic constructed from a wonderful fabric from Mendel Goldberg. Here’s a few preview shots:
I also want to mention that my friend, Kate Davies, has published a book, Making Life More Beautiful, about sewing, crafting, knitting and life. I met Kate while on a trip to London and immensely enjoyed the time with her. She is doing a sew-along emulating the style of Frida Kahlo, so hop over to her site and check it out.
Also, I’ve written another article for Threads Magazine detailing the draft and construction of a designer skirt. The skirt was based an Yves St. Laurent style straight skirt and I’ve explained many of the details that take an ordinary style into the designer realm. There is also a web extra explaining a few adaptations which are helpful when using a heavier fabric, such as a designer boucle.
This is an experiment in the art of trompe l’oeil as the French call it, or to deceive the eye. I’ll explore how to alter the grain of fabric to create the illusion of a less bumpy and curvy shape. I’ll also use my custom shoulder pads as explained in my last post and in my article for Threads Magazine to transform asymmetrical shoulders into an evenly shaped figure.
I’ve chosen a loosely woven patterned fabric and will create a Chanel style jacket for this figure. The dress form has been marked with the standard balance lines. Notice the back view which clearly shows the right shoulder much more sloped than the left. A note to those readers who have seen my posts about various types of dress forms. This is an adjustable foam style with dials. Not my favorite but after padding to match the figure it works fine. A professional model is nice but you can make anything work!
The style lines are added in purple tape. I’ve chosen to bring the princess line closer to the neck edge which creates a more vertical line makes it easier to shape the fabric in the next step.
In order to even out the shoulders I constructed shoulder pads using my pattern from the Threads Magazine article. I added additional layers to the right shoulder pad to make the shoulder height the same on both sides. Rather than try and alter a pattern, it was easier to drape the jacket directly on the form. Note that I carefully marked right and left sides. Although the garment sections look symmetrical on the form they are vastly different when laid flat.
The red stitches show final alterations to the shoulders. Height is added to accommodate the shoulder pads and I widened the shoulder line to balance the torso for a more flattering shape.
Rather than cut the side front and side back garment garment sections according to the pattern, I wanted to shape the fabric to follow the seam lines and minimize an off-grain cut at the shoulder line. For the side front I started with a rectangle of fabric. I pinned the toile to the fabric and rotated the fabric so that the straight grain lined up with the princess seam. As you can see, this caused excess fabric to bunch up along the front armhole.
Working slowly with a steam iron, start easing the fabric towards the armhole. The fibers will compress and you will be able to ease out much of the excess fabric.
Work carefully as you don’t want to press permanent creases into the fabric. Depending on how pliable your fabric is, you may be able to ease all of the extra out. If not just readjust the seam line to be slightly off grain but you should be able to work the seamline almost on the straight grain. Fabric choice is crucial here. Most loosly woven boucles will ease nicely. My fabric was a little tighter weave than most wool boucles and I was able to ease almost all of the excess fabric out. Trim the excess fabric at the armhole.
The fabric is now nicely shaped but very unstable and will want to return to its original shape. I cut a stay from lightweight cotton and basted it to the fabric. I’ve added two rows of machine stay stitching and eased the armhole to correspond to the toile. Stay tape keeps the shoulder seam from stretching out of shape. This fabric wanted to ravel badly. Although many couture sources frown on using a serger I use it to overlock the seams and prevent fraying. I use a very lightweight Guttermann thread (not regular sewing thread) so as not to add bulk to the seam. The lining is cut according to the pattern (not shaped as the boucle), basted and quilted as usual following the weave of the fabric. Your quilting lines will curve and a walking foot as well as diagonal basting will keep everything lined up without puckering.
This clearly shows the distorted weave but it will be hidden under the arm and the jacket front will show a flattering vertically placed weave. The side back is handled the same way. It will be easier to shape as you won’t be dealing with the bust. It does nicely conceal rounded shoulders and back.
I used purchased navy fringe and sewed a narrow white cord in the middle. Two pockets looked better than four as I wanted to minimize the bust. The princess seams are barely visible and the jacket gives a taller and slimmer appearance.
I’m working on more custom trim and have a beautiful piece of Linton tweed for the next venture.
Before I start on the instructions to create a custom arm for your personal sized dress-form a quick update on Wolf Dress-forms. Sadly the company is out of business and Peter Lappin of Male Pattern Boldness tells the story. Wolf forms occasionally show up at tag sales, store closings, on EBay or Craig’s List but they can command a hefty price. If you are lucky they can be purchased for around $200. Best of luck if you embark on a search.
I’m always looking for snippets of information as to the workings of couture ateliers. The film, Signe Chanel, shows an inside view of Chanel’s workrooms and I noticed that the mannequin arm is extremely soft and flexible. Not at all like the rigid arm form which came with one of my forms.
This arm is very heavy and intended to be attached by tying the tapes around the neck. Unfortunately this never worked well and was difficult to insert into the garment sleeve. I’m including my pattern for a custom sleeve form as a printable pdf document. Hopefully I’ve formatted it correctly. This is my first attempt using Adobe Illustrator and have found the learning curve fairly steep. The pattern tiles are 7.5 x 10 inches so expect 1/2 inch margins all around if you are using US paper. It should also print out on A4 paper fine, just adjust the margins. Print out page 1 to check that the size box prints at 4″ x 4.”
There are NO SEAM ALLOWANCES. I used cotton drill cloth for the two main arm pieces, cotton muslin for the oval armhole and wrist covers and cardboard to insert into the armhole/wrist covers.
I’ve traced the stitch lines in blue dashed lines and am adding 3/8 inch seam allowances. Transfer the vertical and horizontal balance lines also. I use washable marker. Notice the vertical line down the upper arm pivots at the elbow.
There is ease on the upper arm at the elbow point. If you try and match up the stitching lines there is excess fabric which needs to be eased in to create the elbow shape. Stitch the back seam first.
If your balance lines are slightly askew at the elbow, blend into a smooth line across the seam. The marks will dissolve with water after you topstitch the line. Press the seam open. I use a topstitching (has a larger eye) needle and two strands of black thread to trace the balance lines using a 3.5mm stitch length. There are three horizontal balance lines, one at the elbow, one at the underarm and another about 2 inches up from the underarm. Extend the upper balance line to cross both sleeve sections.
Close the remaining seam matching the stitched balance lines. Press open. Close the dart at the top of the sleeve. Cut the shoulder piece (looks like a shoulder pad) from drill cloth. It needs a seam on one side only. I serge the outer edge to prevent fraying. Using a 4.5m stitch, sew along the top of the sleeve. It will gather up slightly which is all you need. Don’t try and ease it like a set-in sleeve.
Clip within the seam allowance on the shoulder section. Mark the mid point and attach it to the arm, matching the mid point to the dart on the sleeve. Make sure you have right sides facing each other. It should look like this.
To stuff the sleeve I use soft polyester fleece. I cut a piece the length of the sleeve plus about 2 inches. Roll up the fleece, not too tightly, and gauge about how much is required to fill out you sleeve. I want the sleeve to be full but not tightly packed and stiff. The wrist and lower arm needs less fill than the upper arm so I shape the fleece like this. I’ve used about 30 inches an have cut off one corner so that the lower arm has less stuffing than the upper.
Begin rolling at the shorter end forming a soft cylinder which is fatter at one end. I safety pin a length of ribbon onto the slimmer (wrist) end, insert the ribbon through the top and pull it through. If you want more or less fill pull out the roll and adjust the amount of stuffing.
Trim the fill at the armseye end leaving enough to fill out the top.
Cut ovals from cardboard for the wrist and armseye covers. I use lighter weight muslin (the drill cloth is too stiff to gather) and add about 3/4 inch seam allowances. Stitch around the edges, insert the cardboard and pull the threads up to create the covers.
I place the armseye cover against my form and mark the shoulder seam point. Notice that I’ve angled it towards the front to better replicate my arm position. Human arms tend to fall slightly in front of center. Line up the wrist oval to simulate the wrist shape. Again wrists aren’t circular; they are wider when viewed from the top of the hand than the side.
Hand sew the covers in place with a whip stitch. Your new arm can be attached with a few pins (I use flat head pins and push them at an angle to avoid snagging the garment). This pattern is for the right arm. If you would like two arms just flip the pieces and make a matching form for the left side. See how easily her arm bends and I’ve found this version much more workable than the premade ones.
This will make a fairly slim arm. If your arms are larger and you want to adjust the pattern I would suggest this method. Trace the pattern onto your preferred paper and slash the upper and lower arm sections. I don’t cut up my master pattern until I’m happy with the changes. If the first alteration doesn’t work I haven’t destroyed the original and it’s much easier to start over.
Divide the amount you want to adjust by 4 and spread the pattern sections by that amount. It doesn’t need to be the same for the entire length of the pattern. You might want an extra inch at the wrist and an extra 2 inches at the bicep. Overlap the sections if you need a smaller arm. Likewise the length, both above and below the elbow can be adjusted. The ovals for the armseye and wrist covers will need to be adjusted and I would just use trial and error. There is a mathematical formula for figuring out the circumference, long and short axis of an ellipse but you don’t want to see it. Anyone with a math background will understand! Enjoy.
Many sewers dream of owning a dress-form that duplicates their body. Anyone who sews knows how tough it can be to fit yourself. Imagine the luxury of being able to put your semi-completed garment on your body and step away to evaluate the look and fit.
I’ve tweaked the form a few times since then (extended the hipline lower) but the method remains the same. My reference lines (bust, waist, high and low hip, center front and back seams) are marked by machine stitching with two strands of black thread before attaching the cover. The style tape in this photo is for the gown I was draping.
This gown was draped and fitted on my custom form and required very little final adjusting.
My key to knowing where and how much to pad the form is guided by a custom drafted moulage (Suzy Furrer’s Craftsy Class walks you through the drafting) which is sewn in lightweight canvas and forms the new dress-form cover. Several readers have asked about using one of the fitting patterns by Butterick/Vogue, etc. or even a princess line dress pattern.
Butterick patterns were on sale so I made bodices from B5627, the fitting pattern. I measure for a size 12 but normally cut an 8 when using one of the big 4 patterns. The results:
Size 12 on the left, size 6 on the right. I adjusted the bust for a C cup on both samples.
The size 6 fits my form pretty well but the 12 is ENORMOUS! Who allows this much ease in a fitting shell? Another view showing how much extra room.
Experienced sewers know to downsize but if you blindly follow the measurement charts the result will be a very over-sized garment and multiple fitting adjustments. If you want to skip pattern drafting at least choose the size based on your high bust measure (that’s the one taken high up under the arms) and EXHALE when measuring.
The size 6 still needs minor adjusting but wouldn’t be impossible to work with. I’ve narrowed the back, added to the front and taken a dart to conform to the chest hollow. The bust point needs lowering by an inch. I would also raise the underarm in front if using this for a form cover.
The process is messy but worth it. Un-bonded cotton batting makes it easy to feather out edges and it also compresses well. Rochford Supply sells this by the roll; too much for one form but maybe split among your sewing buddies. Don’t use light weight muslin for the cover. It needs to be sturdy and drill cloth works wonderfully.
Have fun with this. It’s not a project to finish in a day but once completed you will not regret the time spent. Next post I’ll show how I construct a pair of flexible arms. Questions, problems or suggestions: please comment.
My suggestions for specific forms:
Wolf: The top of the line. Very well made by hand from paper mache. Heavy base and cage very smooth and well finished. Mechanism sturdy and constructed to last more than a lifetime. I have one of these (found on Craig’s List for $200). The cover was almost gone but inner structure functioned perfectly and with a new cover she looks wonderful. New Wolf forms are $800 and up depending on options.
Superior, Royal, Milano: Very well made with sturdy mechanisms and heavy cast iron bases. The cages are well finished and no rough edges to snag fabrics. Very close to the quality of Wolf. I found a Milano form at a going out of business bridal shop. These brands sell new for $650 to $750.
PGM, The Shop Company: Fiberglass forms covered with a layer of foam and canvas. These are probably the most cost effective if you are buying a new form. PGM forms cost more ($299 to $229) than those from The Shop Company ($195 to $219). The skirt cage on the PGM form has more supporting wires than The Shop Company version. I’ve worked with these forms and the wire cages have rough edges which are a snag risk for fabrics although this is easily overcome by covering the cage with canvas. I haven’t used either brand long enough to attest to the longevity of the shoulder/height mechanisms. If you are looking for the least expensive option this is probably the way to go. You will probably be adding padding and your own canvas cover so the fiberglass and foam covering won’t be a factor.
Adjustable Forms: Don’t waste your money. Flimsy bases and they tend to tip over. The body proportions are STRANGE. I once took a hacksaw to the shoulders of one because they were so badly shaped. They aren’t that much less than the much sturdier version by The Shop Company. I’ve also worked with these and the gaps created by changing sizes and the adjustable dials bothered me less than the lightweight base. Fitting entails a fair amount of tugging and pulling on the garment and it’s extremely frustrating to have your creation on the floor because the form constantly tipped over.
Duct Tape Forms: Wrap yourself in duct tape or plaster casting tape. There are tons of videos demonstrating this process. Some have had luck but most have ended up trashing the final product. I think the toughest part of this approach is constructing a solid stand. I actually tried this once just to see how it would work. For the time, effort and money for materials I would opt for one of the lower cost professional models with cast iron base.
Here it is, the first dress created with the help of my new custom molded dress form. This would have been next to impossible to get right without the help of a perfect body double. Much of the work took place on the back. I needed a semi-formal dress for a destination wedding in the Bahamas. The bride requested all guests wear white. Although the ceremony was beachside, the reception called for semi-formal attire. Try buying something that fits that bill.
I created a version of the Dior design worn by Nicole Kidman some years ago. I thread traced the seam lines into white 4 ply silk crepe and embroidered floral designs on the front using multiple hoopings. Since embroidery can cause the fabric to shrink and/or pucker, check the seam lines against the pattern after all embroidery is finished.
Silver metallic mesh was positioned on the back and I printed templates of the embroidery designs on transparent film to finalize the design. The embroidery designs were placed to create a picture frame effect around the metallic mesh. The mesh was somewhat stretchy and having the dress on the form made getting the placement so much easier.
Another view of the back with skin toned fabric underneath. The zipper is hidden in the left side seam.
As this was to be worn in the tropics, I chose a fine Swiss cotton jersey for the lining. This was comfortable to wear and provided opacity so that the hot pink skirt lining did not show through. To attach the lining I put the dress on the form inside out and fitted the lining around the neck, armholes and back.
Finally a hot pink lining for the lower skirt which shows when walking.
This is entered in the SewStylish Spring fashion Challenge at Threads Magazine.
After my last post I acquired a couple more dress forms and decided to do two things. First was to use Suzy Furrer’s method of drafting a moulage for different shapes. Second was to try using those moulages on non-professional forms and post a review. Although a professional form is a very nice addition to your sewing tools, it can be pricey and you may have an older form and not have the space or funds for another.
The good thing is that this is a one-time purchase. You need to select a dress form based on your bone structure, NOT your bust measurement. I have found the most accurate way to do this is to compare your cross-front width to the form. PGM publishes this on their website: pgmdressform.com. If buying a form from EBay or Craig’s list, ask the seller to give you this dimension. Also check the shoulder length and cross back width. Your form should fit you at the shoulders and neck. Anything else can be padded. If you start with form that’s too big in the shoulders, you’ll never be able to get an accurate fit. Compare your shoulder, cross front and cross back measurements with any form you are considering. Get as close as you can with these three dimensions and fix the rest with padding. The padding can always be redone if you lose or gain significant amounts of weight, but your bone structure won’t change. The most common mistake seems to be getting too large a form.
There are many companies who make professional dress forms and I’ll list some of them here.
Wolf has always been the gold standard of dress forms. They are made by hand and last more than a lifetime. They are also the most expensive. Pricing depends on the options you select and Wolf forms can be over $1000. Occasionally one shows up on EBay or Craig’s list but they usually aren’t any bargain.
PGM sells online at pgmdressform.com. They offer three options: collapsible shoulder and shaped hip for $399, collapsible shoulder with flat hip for $299, non-collapsible shoulder and flat hip for $199. You can always create your own hip shaping with pads but the shaping is nice to have a place to start. Collapsible shoulders make it easier to get garments on and off the form. The main drawback I found is that the wire cage at the bottom isn’t as nicely finished as the Wolf form, and can snag delicate fabrics. You can cover the cage with muslin if this is a problem.
Roxy also sells online at roxydisplay.com. I have no experience with this company. One review I read rates them below PGM but better than the adjustable with dials. Foxy has forms with collapsible shoulders for $249.
Fabulous fit sells a molded foam version for $387 and a professional model which looks like the ones at PGM and Roxy. The professional model sells for $887. They also offer a kit of fitting pads for the bust, shoulders, hips, thigh, etc. You can purchase this separately. I found the molded foam version at a garage sale for $25. I wouldn’t suggest these. There are better forms for less money.
Least desirable in my opinion are the forms which feature dials that allow you to adjust the bust, waist and hip. The base is lightweight and they tip easily; very frustrating when you are trying to pin or adjust a garment. The dials leave spaces which can be annoying to work around. I did cover one just to try and make it somewhat usable.
Now for the moulage review. I made three moulages for totally different figures and each one fit almost perfectly on the first try. I found learning to take accurate body measurements the hardest part. My three drafts looked entirely different but each fit amazingly well.
Once you have your chosen form, draft and sew the moulage. I left the center front seam open when fitting myself and the center back open for fitting others. When you are happy with the fit, sew a final version in whatever fabric you choose for the cover. I would advise a medium weight cotton or linen. A natural fiber fabric will mold to the form easier than a synthetic. You want to be able to pull the cover tightly over the form so a knit is not suitable.
Here is my Fabulous Fit form ready to begin.
I used cardboard to add 5 inches to the length. She also needed minor surgery at the back armhole and a slight breast reduction. This was accomplished with a kitchen bread knife. Bra cups were stuffed and positioned on the form with pins. Since the neck was rough I draped a pattern to cover the neck and sewed it to the moulage before starting to pad.
Notice the side seams are 3/4 inch wide and have been stay stitched. This makes it easier to turn and sew the sides evenly. The moulage is sewn together at the shoulders and armhole facings attached to neatly finish the armseyes. The side seams are left open. Also note the position of the armhole on the form and on the moulage. The form positions the arm angled backwards. The moulage reflects a more normal arm position.
Start fitting the cover and padding at the top. Notice how the shoulders fit well but padding is needed to fill out the remainder of the cover. After the shoulders are fitted, position and pad the bust. You can use bra cups or a bra that fits well and you are willing to sacrifice it. Fabulous Fit also offers a kit of fitting pads but I did just as well using bra cups and shoulder pads.
Continue to work your way down the form. I used a combination of shoulder pads, fusible fleece, heavy felt; just about anything you have on hand will work. Do frequent checks to be sure you are getting the desired shape. Pin in place and remove the pins as you add subsequent layers. I also used a steam iron to compress the padding as I worked.
I used two large shoulder pads to establish the bumm shape and refined it with upholstery batting. I also added a layer of upholstery batting as the final layer. Upholstery batting feathers easily and covers the irregularities. Take your time. It can take a few redos to get the shaping right but you will do this once and have your double for years.
Once she is stuffed pin the sides together and do a final check that you are happy with the fit. Leave one side pinned while you sew the other side seam; otherwise the cover will shift. Fold the side seam allowances in and mark every inch to help keep the front and back aligned as you hand sew. I started at the waist seam and marked up and down from there. If you don’t put these guide points in and just start sewing you will wind up way off when you reach the end of the seam. Guess how I found that out?
I find it easiest to start at the bottom and sew up. Use a 36 to 40 inch length of upholstery thread. You want enough to finish the seam but not so much the thread knots and is too long to work with. Why not just use a center back seam? First I found the padding shifted around too much when I tried to get a back seamed cover on and off. Also you need the side seams raised so they can be felt when you use this form for fitting and draping. Look at the professional forms. They are all finished like this.
Insert the needle about 1/8 inch from the folded edges keeping the needle parallel to the floor. Pull the thread tight (you want this seam raised) and place the next stitch about 3/8 inch away. I sew with my right hand and hold the thread taut with my left. You may need a clip or two at the waistline.
Finished! All she needs now is a heavy steaming to shrink the cover slightly.
This custom cover was done on an adjustable form with dials. The figure was petite with a small bust. The moulage draft fit on the first try with one minor adjustment to shorten the front waist.
Another draft for a fuller figure with large bust and abdomen. Once again the moulage instructions produced a perfectly fitting mold.
If you want to make fitting much easier, invest some time to create your own double. I’ve done a few now and it still takes time but what a difference when I’m fitting garments!


 Steam the cover well. It will shrink slightly and tighten up. Draw balance lines (bust, waist and hip) with a permanent marker. Vertical balance lines at center front and back can also be added.