Uncategorized

Color Matched Trim

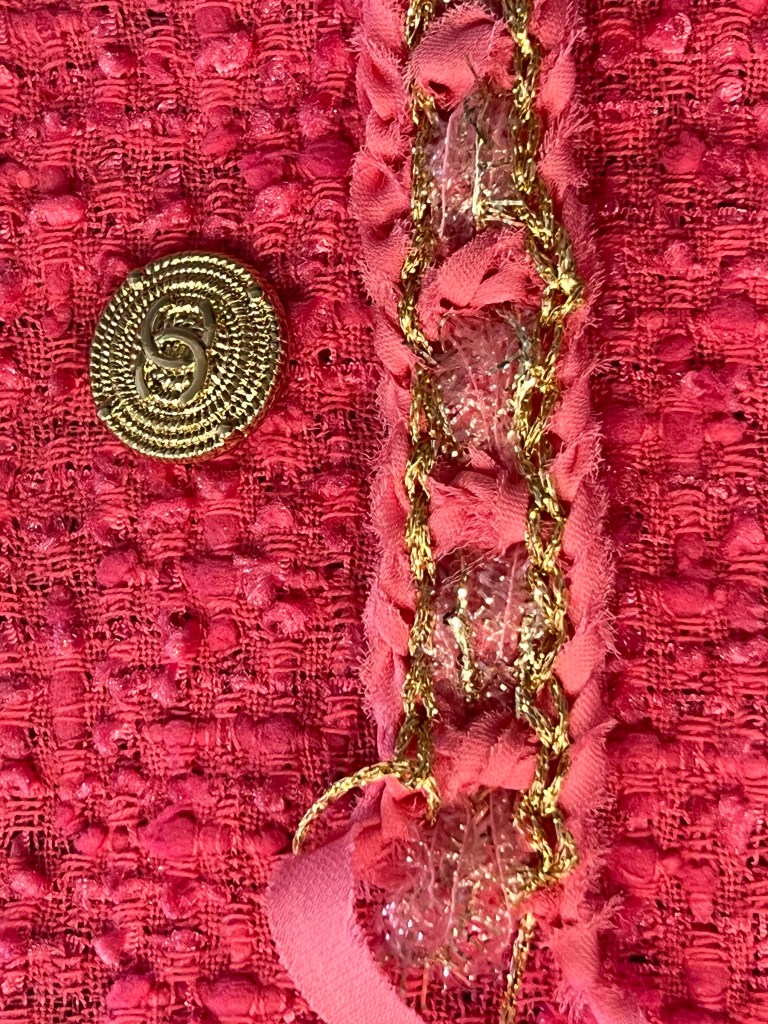
Finding trim is easier if you’re looking for black, white or common color. This fuschia jacket made from a wonderful soft Mendel Goldberg boucle wasn’t going to be easy, particularly if I wanted to avoid introducing another color. I did add silver or gold, depending on buttons.

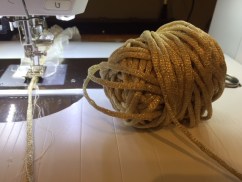
When creating a trim, I make several variations to experiment with different yarns. If you’ve attended one of my trim classes, the techniques will be familiar.

All examples of trim use the same basic method. I make samples about 4 inches long. Once you decide which version to use, calculate the finished amount of trim you need. Measure the sample created with 20 stitches. If 20 stitches gives you 4 inches of trim and you need 40 inches, then start with a chain of 200 stitches.

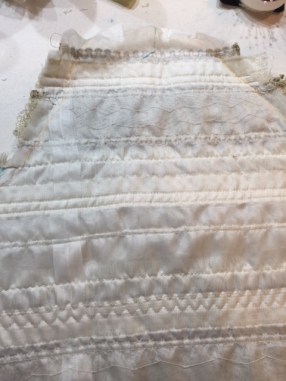
First create a crochet base. Chain 20 plus 3. Turn and make a double crochet in every stitch. Weave a brass tube through the finished base to block it and even out the stitches.

Let cool and remove the tube. Weave a smaller tube through the stitches as shown. Pull the desired yarn or fabric through. Push the woven strand to one side and weave the tube through, alternating in and out with the first strand.

Chain stitch around the edge. Here I’m using a strand of flag yarn pulled from the boucle fabric. Using strands of yarns from the fabric guarantees a perfect match.

Finish with a chain stitch in the center. I did a version in gold and one in silver to audition with different buttons.

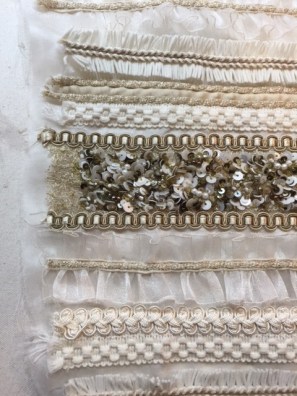
Trim 1: Using a size F hook, crochet the base with Sesia Elegant yarn with color: Rose. Chain 23, turn and make double crochet in every stitch.

Cut bias strips of fuschia silk double georgette 1.5 inches wide, fold in half lengthwise and stitch scant 1/4” from folded edge. Turn and stuff the silk tube with bulky yarn.

Weave the silk tubes though alternate double crochet stitches. Make a chain stitch through the middle with gold yarn. Finish the edges with a chain stitch using flag yarn pulled from leftover boucle.

Trim 2: Same as trim 1 except use size D hook for the base. Weave 3/8” wide bias strips of silk georgette through. Chain stitch through the middle with size C hook. Edge with the flag yarn from fabric.

Trim 3: Crochet base making double crochet every stitch. Weave one row of gold tape yarn, one row 3/8” wide silk georgette, one row gold tape yarn. Edge with flag yarn from the fabric.

Trim 4: Crochet base using gold metallic yarn and size E hook. Chain stitch along each edge with flag yarn from boucle fabric.

Trim 5: Use 3/8” wide bias strips of silk georgette as yarn. Crochet the base. Weave 4 strands pink tinsel yarn plus two strands metallic yarn through. Chain stitch inside the edge with gold metallic yarn.

Hard to make a decision. Possibilities are endless and by making your own trim you can guarantee a perfect match. Two opportunities to further explore French jacket construction and trims: New England Retreat, September 19-24 and Couture Sewing Class, Palm Beach Gardens, FL, January 16-21. 2023. These classes are not limited to making a French jacket but if you choose to work on a jacket, you will receive the identical information presented in the November French jacket class. The classes are small and allow for individualized instruction. You will receive my 100 plus page manual describing construction techniques unique to the French jacket plus an extended session on trims.

Enjoy creating your own unique trims.

Cloning Designer Garments, couture sewing, Uncategorized

Tips for Sewing Leather

Making leather garments can be intimidating.  Leather skins are relatively expensive and there is no room for adjustments as stitching marks are permanent. I’ve discovered a few tips that make sewing leather look more professional.

Always, always make a test garment in medium weight muslin. Get the fit perfect before cutting anything in leather. The test garment can be taken apart and used as a pattern. I mark using chalk or a soft lead pencil. Ink pens tend to smear and the marks can be permanent. Even if used on the wrong side, pen marks can bleed through to the face.

I was surprised to learn that leather can be steam pressed. Many sources advise against pressing, but unless you use loads of heavy steam, it works just fine. Having a teflon shoe for your iron helps protect the leather. Teflon shoes are available from most tailoring supply sources and are specific to the iron. Here’s mine for the Naomoto gravity feed iron. Make sure you also get a steam diffuser, which is a piece of heavy felt lining the shoe. The diffuser spreads the steam more evenly and prevents marks from the steam jets. Both are available from Wawak and other sources.

Teflon Shoe Teflon shoe on iron

Gentle steam pressing is effective at removing creases. Here’s a sample that I intentionally left folded for awhile and the result of steam pressing. Some sources advised using leather tape (also known as cold tape) to stabilize the seams. The tape can be difficult to source and is a PIA to stitch through as it gums up the needle. Narrow strips of lightweight fusible interfacing worked fine.

Wrinkled Leather Pressed Leather  Stabilize seams

Darts can be difficult to press flat so I sew darts this way:

Cut away the dart. Spray a scrap of leather with temporary quilt basting spray. Carefully line up the sides of the dart and finger press gently to tack the dart closed. I position one side first; then align the second side. Doing this over a tailors ham helps get the proper contour.

Cut open dart  Dart underlay Dart Tacked Stitch dart

I’m using a leather roller foot on my Bernina; the roller feet are are also available for industrial machines and probably other brands.

Here’s the settings for Bernina. I’ve positioned the needle left of center so it stitches very close to the roller. I’ve also threaded the machine with two strands of polyester thread and wound the bobbin with two strands. Topstitching thread was a little too thick and a single strand of thread didn’t seem enough. I was surprised that the machine sewed fine with two strands in the bobbin. No adjusting was needed. Be sure and use polyester thread. The chemicals used in tanning leather will degrade cotton thread over time.

Roller foot setup Double Thread

I prefer the clean look of invisible zippers but they can be tricky to get right and you can’t remove misplaced stitch marks. Use a zipper at least 2 inches longer than the finished length. In this method you’ll need the extra length to pull the zipper slide out of the way for stitching.  I stabilize the seam with lightweight fusible interfacing. Press it on the wrong side using an iron fitted with a Teflon shoe. Stitch the seam closed up to the zipper. Lightly steam press (I also use a press cloth or brown paper when working on the right side) and pound the seam open. I use a soft face mallet and place the seam over a rounded wooden stick to prevent the seam allowance from making an impression on the right side.

Zipper Seam Pound seams

Measure the width of the zipper tape. This one is 7/8 inch. Mark exactly 1/2 of this width (7/16) on the inside seam allowance of each side of the zipper opening. Pin the zipper along the marked line placing pins within seam allowance only. Machine baste along outer edge of zipper tape.

Measure zipper tape Measure half tape width Pin Tape Baste

Repeat for the other side of the zipper. The zipper is now basted in place but since the basting stitches are on the outer edges there is enough room to reach in with narrow nose pliers or a clamp and pull the slide below where the zipper will stop. Mark where the zipper will stop. Using a regular zipper foot (an invisible zipper foot won’t work as it doesn’t allow you to end exactly where the seam begins), roll the coil out of the way and stitch close to the zipper coil. Stop exactly at the mark. I pull threads through and tie rather than back-stitching which would weaken the seam in leather. Now pull the slide to the zipper top using pliers if necessary.

Pull slide through Stitch along coil Coils stitched Pull slide closed

The stitching should look like this. Notice that the seam line stitches and zipper coil stitches don’t line up exactly. The zipper coil stitches are slightly further into the seam allowance. If the stitching lines weren’t offset just this small amount, you would get the dreaded pucker at the bottom of the zipper. Here’s the completed zipper installation totally smooth and no tell-tale sign of where the zipper stops.


Offset seams Completed

Sewing hooks and eyes on the waistband for a closure won’t work too well. I use a hook and bar with prongs and a backing plate. The waistband has been sewn on from the right side. I’ve interfaced it with Petersham ribbon and added a rectangle of Ban-Rol (a rigid interfacing which resists tearing) to support the fasteners and prevent them ripping through the leather. I’ve used an awl to create small holes for the prongs. The hardest part is determining the exact location before punching holes.

Prepped waistband Hooks Hooks back Bars back

Once the bars and hooks are in place, fold the waistband over and stitch close to the previous stitching. Trim on the underside.

Stitch waistband Trim wrong side

Finished skirt:

Skirt Front Skirt back


Cloning Designer Garments, couture sewing, Drafting Patterns, Draping, Dress Forms, Uncategorized

A Designer Skirt and Family Wedding

So much had happened since my last post; all of it good.  My son and daughter-in-law welcomed baby Milena. Her arrival coincided with my construction and installation of draperies in their new home. Needless to say, it was a very, very busy time.

Milena

After helping the new family get settled, it was time to head home and prepare for my dear sister-in law’s wedding, held in our backyard. When you’re the resident family dressmaker, weddings mean loads of sewing; all of it fun and leading up to a happy celebration.

The rehearsal dinner was an informal gathering and I chose to replicate a designer skirt I had seen.  This Oscar de la Renta skirt, from his “paint splatter” collection was white denim with applied sequins and priced at a mere $1900.

Inspiration Skirt

I had a length of white denim with a bit of lycra in the stash.  The skirt front was drafted by using a jeans pattern, lapping the right over left front, and tapering to a mid-calf length straight skirt. The back was slightly more complicated. My jeans pattern back wouldn’t cooperate and produce a well fitting rear.  Draping on my custom dress form solved the problem.

Skirt Drape 1 Skirt Drape 2

I placed style lines for the back yoke, waistband and side seam.  The waistband is slightly lowered at center front. I used flat felled seams and the only problem was my machine didn’t like the bulk of multiple fabric layers and the thicker thread I was using for topstitching.  I found that hammering (use a clean regular carpenters hammer) the seams, especially at points where seams intersected, made a huge difference. Hammering the fabric prior to sewing seems to soften and compress the fibers. A heavy duty jeans needle also helped. The long, sharp point pierced the denim much easier preventing skipped stitches and thread nests.

TopstitchingSequin Closeup

Now for the fun part. I gathered sequins, beads and started drawing. An air erasable marker lets you preview the placement and size of the “paint blobs.”
The large yellow sequins had holes in the center but I decided they would be better if the holes were closer to one edge. Joanns Fabric carries this punch in the leatherworking department. It’s pricey at about $40 (great time to use the discount coupon), but makes the tiniest holes and was perfect for the task.

Hole Punch

Completed and on to the more wedding sewing.

Close-up Finished skirt

Next post (and I promise it will be soon) will detail the design and construction of the bride’s dress, little girls’ dresses, mother-in-law’s dress and (as if I didn’t have enough going on) a Chanel style tunic constructed from a wonderful fabric from Mendel Goldberg. Here’s a few preview shots:

Casey Mia

Sage Chanel Dress Preview

I also want to mention that my friend, Kate Davies, has published a book, Making Life More Beautiful, about sewing, crafting, knitting and life. I met Kate while on a trip to London and immensely enjoyed the time with her. She is doing a sew-along emulating the style of Frida Kahlo, so hop over to her site and check it out.

Kate book

Also, I’ve written another article for Threads Magazine detailing the draft and construction of a designer skirt.  The skirt was based an Yves St. Laurent style straight skirt and I’ve explained many of the details that take an ordinary style into the designer realm.  There is also a web extra explaining a few adaptations which are helpful when using a heavier fabric, such as a designer boucle.

Threads Cover

Thanks for reading!!!

Cloning Designer Garments, couture sewing, Fabric Shopping, French jacket trim, French Jackets, Uncategorized

Embellished Sleeve Jacket

Jacket Front

This jacket was inspired from a Chanel couture collection.  For the jacket body I used a lovely open weave boucle from Mendel Goldberg Fabrics. The fabric is a very open weave and needed to be backed with another fabric for construction. I used a lightweight ivory wool crepe and quilted the two fabrics together along horizontal stitching lines. Thank goodness I used quite a bit of steam on the fabrics before quilting as the boucle tightened up with steam.

Steamed boucle  Wide seam allowances prevent too skimpy seams and the walking foot kept the layers from shifting during the quilting process.

The fun part of this jacket was designing the sleeves. I used two layers of silk organza as a base for the trim.  Scouring NYC’s garment district turned up nothing for a ruffled trim. I had planned on using butterfly pleated organza ribbon but absolutely no one had any. One store offered placing a custom order but the minimum was 100 yards and 6-8 weeks time frame. No choice but to make it.

I decided polyester organza would actually work better than silk. Silk fabric creases and presses much better than polyester but I wanted the ruffles to hold their shape so the wiry nature of polyester was an advantage. I cut strips of organza along the lengthwise grain and finished the edges with a narrow ziz-zag stitch; stitch width of 1.8mm and length of 0.5mm on my machine worked well.  The strips were gathered down the center and drawn up to a 2:1 fullness.

A narrow beige ribbon layered with gold tubular yarn from Linton was sewn down the center with a serpentine ( width 5.0, length 1.25) stitch.

Make organza trim Place Ribbon Linton Yarn

The garment district did yield several suitable trims, including a gorgeous sequin banding. The double organza sleeve was sewn along the back seam, leaving the less obvious front seam open. Seam and hem lines had been thread traced to ensure the trim fit the finished sleeve. Trim was arranged, keeping the sequined trim and ruffles out of the underarm area. The sequin banding was catch stitched on the wrong side to prevent sagging as the jacket was worn.

Trim Placement Sleeve Underside

Excess sequins removed from the seam allowances and ends of the braids are steamed and flattened before sewing the seam.

Finished sleeve trim


Jacket Sleeve

The black jacket is also complete. Fringe from the selvages was paired with a soft, flexible braid. I opted for a custom made zipper from Botani.  They use Lampo (Italian) zippers and you can choose tooth color, tape color, pull and length. The small 3mm size works well for this.

Black Jacket Black jacket closeup

Next project is a Chanel inspired summer tunic and playing with more trims. Thanks for reading.

Cloning Designer Garments, couture sewing, French jacket trim, French Jackets, Tailoring, Uncategorized

Finishing Details; The French Jacket

Thank you all for the many comments and compliments about this jacket.  The finishing details are what sets French jackets apart and make this jacket unique.  In addition to the custom trim, French jackets feature hand worked buttonholes, sleeves are set by hand, countless tiny stitches secure the lining and a metal chain inside the jacket allow it to drape perfectly when worn.

I think the sleeves are actually easier to set by hand and would be almost impossible to do by machine due to the unique construction methods. Although it would be easier to sew the armseye seam through all layers, I find joining only the outer fabrics together before hand basting the lining in place gives a softer, more fluid feel.

Here’s an inside view of the armseye seam.  Probably one if the messiest times in jacket construction. Yes, I used Pro Sheer Elegance Couture interfacing which was fused the jacket sections. It’s extremely lightweight, flexible and doesn’t change the drape of the tweed.  Linton actually recommends doing this with their more loosely woven fabrics.  I’ve serged the edges of the tweed with a wide stitch but finished the seams of the lining with a narrow two thread stitch using fine thread. I like Gutermann Skala 360-U81, Invisafil by Wonderfil Threads, or 80 weight Maderia or Aurifil cotton.  I use two strands of regular sewing thread, waxed and pressed, to set the sleeve.  I sew the top part from the right side using tiny fell stitches and the underarm portion from the inside with a backstitch.

Setting Sleeve by hand Free seam allowances

Notice at the point where the shoulder seam meets the sleeve seam, the seam allowances haven’t been caught but are allowed to float free.  This allows the seam to press more smoothly and feels less rigid.  I’ve not included the sleeve lining; I feel I get a better result by joining only two layers of fabric at one time.

Sleeve headSleeve head shaped

I create a sleeve head from cotton batting. Cut about 2.5 inches wide and 7 inches long. Fold along a long side about 1.5 inches from the edge, pull along the folded edge while steam pressing to curve.  The folded edge is sewn along the armseye seam at the sleeve cap to provide additional shape and support.

Jacket inside out Sleeve head inserted

Baste the sleeve lining just inside the armseye seam and trim away the excess fabric. I’ve struggled with getting the lining over the sleeve cap evenly if the jacket is lying flat. I’ve found it much easier to turn the jacket inside out and place on my dress form with a sleeve form attached. Now the jacket and sleeve are supported and it’s easier to manipulate the lining into position.

Pin around seam Gathering line Pull up gathers

Pin along the seam and sew a line of tiny running stitches. Pull the gathering thread up to fit and tie a tailors knot at each end. Trim off the excess and the fabric will fold under easily along the gathering line. I set the sleeve cap first, baste, then remove the jacket from the form.  The lining at the underarm is brought up and around the seam allowances.

Seam EasedSleeve underarm

I had originally planned for front buttons, but decided I liked the look of trim without buttons, and considered a front zipper.  Botani Trimming in NYC makes custom zippers and does mail order. You select the zipper tooth size, length, color and pull. The zipper arrives in a few days and they even had chain for the hem.  Finding the right zipper in a local shop would have been impossible.  Just as an interesting side note, Botani sells Lampo zippers. They are made in Italy and the same brand that Chanel uses!

Custom Zip Lining at Zip Zipper Inside

How to deal with the lining? I could have folded it back past the zipper teeth and stitched into place but that left the zipper teeth exposed on the inside of the jacket. In true couture fashion, I wanted to cover up that metal.  Placing a length of ribbon inside the fold beefed up the edge of the silk charmeuse so it would be less likely to catch on the zipper pull.  This was one time when that rigid, slightly raised edge on polyester ribbon was useful.  Now zipper teeth are concealed, both inside and out.

The dreaded buttonholes next.  Machine made buttonholes lack the couture finish this jacket needed.  I’ve experimented with countless ways to improve my hand worked version.  I’ve found that sewing around the buttonhole before cutting, especially in a fabric such as this, helps tremendously to keep the layers together.  Marking and sewing this manually on the machine requires much twisting and turning of the fabric so I searched for an easier way.  My machine sews a square buttonhole using a straight stitch so I tried that, stitching around the buttonhole twice, once at a narrow width and again a little wider.

Machine buttonholes

Looks OK but I didn’t like the thread buildup at the beginning and end (impossible to stop the machine from knotting the threads) plus I really wanted a keyhole buttonhole.

Hoop setup Buttonholes in hoop Embroidery buttonholes

My Bernina does embroidery and I have digitizing software so I created a template for the buttonholes. I hooped a square of heavy muslin, stitched out the placement lines for the sleeve; then cut out a window so the stitching wouldn’t get caught on the muslin. The sleeve was pinned onto the muslin. Working wrong side up worked better. The sleeve was easier to place and keep the fabric clear of the stitching area, plus the embroidery foot wouldn’t get snagged on the loose fibers of the tweed.  The embroidery software will insert buttonholes automatically, but I wasn’t able to adjust the shape and stitch length satisfactorily. I also wasn’t able to do the double rows.  Mirror the image for the other sleeve and remember to cut another window so your muslin doesn’t get stitched to the fabric.

Stranding Buttonholes  Best Buttonhole

There are several YouTube videos showing hand worked buttonholes if you need a review. I worked under a magnifying light and tried to keep the buttonhole stitches just inside the second row of machine stitching. It provided a nice guide for straight, narrow stitches. Buttonholes aren’t easy and most people say they need to work a hundreds before somewhat mastering the art.  I’m always trying to make mine better but these aren’t bad.

I’ve been inspired by the photos of sheath dresses with matching jackets ( Helen Haughey’s class looked wonderful) so that’s next in the sewing lineup. Thanks for reading.


French Jackets, Uncategorized

French Jackets and Custom Trim

As promised in my last post, I’ve been experimenting with more custom trims.  The fabric was ordered from Linton Tweeds last summer.  Finding suitable trim in the right colors and weight proved impossible, so the perfect solution was custom trim. Here’s a preview early in the construction process.

I cut the jacket sections following the straight grain and then shape to match the contours of the pattern.  The process is detailed in my last post.  I’ve found I prefer that look to an off-grain line along the front princess seam.

One sleeve set  Shaped front

If you look closely, you’ll also notice that I cut one inch seam allowances and serged the edges.  Although some couture sources shudder at the use of a serger, this fabric was so loosely woven that it practically fell apart just touching it.  I certainly wouldn’t sew seams with a serger, but it did provide a nice stable and clean finish.  I also serged the lining seams (using a two thread stitch and extremely fine thread).  Every Chanel jacket I’ve been inside of uses these seam finishes.

While the loose weave was maddening to sew, it made the unweaving process much easier.  I ordered an extra 1/2 yard of fabric which provided plenty of yarns to work with.  In addition to fabrics, Linton also has a wonderful selection of yarns. They are inexpensive and I always look to see if there is something suitable for coordinating a trim.

Unweaving yarns Trim Yarns plus silver

The unweaving process is messy! Work over a waste bin and keep the vacuum handy.  I unwove for an inch or so, then trimmed the warp yarns and wound the weft yarns (keeping each type separate) on a card.

There is no set formula for the braided trim so some experimentation is necessary. I set up several test strands and make a few samples until I was happy with the combination.

Practice trim

The first tries produced a braid that was too stiff and thick but I kept revising the weaving technique and number of strands.  I settled on a ten strand flat braid using this combination of teal and silver yarns.  My goal was to produce a braid that matched the fabric yet had enough of the silver to contrast.  I’ve explained the braiding process more fully in my Create Custom Trim for your French Jacket.  The weighted bobbins and counterweight are essential in maintaining even tension and keeping the braid soft and flexible. I used 10 strands, 6 yards of each combination, to produce a generous 4 yards of completed trim.

Trim weaving setup Finished Trim

The jacket closes with a custom zip and I’ve refined my techniques for hand-worked buttonholes, which I’ll show next time (coming soon, I promise!).

Finished Jacket

Before that, I wanted to show the previous jacket again. It was a birthday present for my dear mother-in-law who wore it to her recent 71st Anniversary Party.

Jacket Front with Trim Lila Jacket

How many couples are fortunate enough to have 71 years together?  They met shortly after WWII when my husband’s father returned from his service overseas as a B-24 pilot (not too many of those pilots are around either).  They enjoyed a wonderful family party including their four children, spouses, 6 grandsons and 7 great-grandchildren.


Cloning Designer Garments, couture sewing, Drafting Patterns, Draping, Dress Forms, French Jackets, Uncategorized

Manipulate the Fabric to Fool the Eye

This is an experiment in the art of trompe l’oeil as the French call it, or to deceive the eye.  I’ll explore how to alter the grain of fabric to create the illusion of a less bumpy and curvy shape.  I’ll also use my custom shoulder pads as explained in my last post and in my article for Threads Magazine to transform asymmetrical shoulders into an evenly shaped figure.

I’ve chosen a loosely woven patterned fabric and will create a Chanel style jacket for this figure.  The dress form has been marked with the standard balance lines. Notice the back view which clearly shows the right shoulder much more sloped than the left.  A note to those readers who have seen my posts about various types of dress forms. This is an adjustable foam style with dials. Not my favorite but after padding to match the figure it works fine. A professional model is nice but you can make anything work!

Fabric Form Front Form Side Form Back

The style lines are added in purple tape. I’ve chosen to bring the princess line closer to the neck edge which creates a more vertical line makes it easier to shape the fabric in the next step.

Style Lines Front Style Lines Back

In order to even out the shoulders I constructed shoulder pads using my pattern from the Threads Magazine article. I added additional layers to the right shoulder pad to make the shoulder height the same on both sides. Rather than try and alter a pattern, it was easier to drape the jacket directly on the form. Note that I carefully marked right and left sides. Although the garment sections look symmetrical on the form they are vastly different when laid flat.
Side Toile  Shoulder Pad PatternBack Toile

The red stitches show final alterations to the shoulders. Height is added to accommodate the shoulder pads and I widened the shoulder line to balance the torso for a more flattering shape.
Right Shoulder Changes.JPG Left Shoulder Changes

Rather than cut the side front and side back garment garment sections according to the pattern, I wanted to shape the fabric to follow the seam lines and minimize an off-grain cut at the shoulder line. For the side front I started with a rectangle of fabric. I pinned the toile to the fabric and rotated the fabric so that the straight grain lined up with the princess seam. As you can see, this caused excess fabric to bunch up along the front armhole.
Cut Rectangle Front
Working slowly with a steam iron, start easing the fabric towards the armhole. The fibers will compress and you will be able to ease out much of the excess fabric.

Work carefully as you don’t want to press permanent creases into the fabric. Depending on how pliable your fabric is, you may be able to ease all of the extra out. If not just readjust the seam line to be slightly off grain but you should be able to work the seamline almost on the straight grain. Fabric choice is crucial here. Most loosly woven boucles will ease nicely. My fabric was a little tighter weave than most wool boucles and I was able to ease almost all of the excess fabric out. Trim the excess fabric at the armhole.

Start Shaping Front Trim Armhole

The fabric is now nicely shaped but very unstable and will want to return to its original shape. I cut a stay from lightweight cotton and basted it to the fabric. I’ve added two rows of machine stay stitching and eased the armhole to correspond to the toile. Stay tape keeps the shoulder seam from stretching out of shape. This fabric wanted to ravel badly. Although many couture sources frown on using a serger I use it to overlock the seams and prevent fraying. I use a very lightweight Guttermann thread (not regular sewing thread) so as not to add bulk to the seam. The lining is cut according to the pattern (not shaped as the boucle), basted and quilted as usual following the weave of the fabric. Your quilting lines will curve and a walking foot as well as diagonal basting will keep everything lined up without puckering.

Cut Stabilizer Stay Front Shoulder

Completed Front Back Complete

This clearly shows the distorted weave but it will be hidden under the arm and the jacket front will show a flattering vertically placed weave. The side back is handled the same way. It will be easier to shape as you won’t be dealing with the bust. It does nicely conceal rounded shoulders and back.

Jacket Front with Trim Jacket Back Completed

I used purchased navy fringe and sewed a narrow white cord in the middle. Two pockets looked better than four as I wanted to minimize the bust. The princess seams are barely visible and the jacket gives a taller and slimmer appearance.

I’m working on more custom trim and have a beautiful piece of Linton tweed for the next venture.


couture sewing, French Jackets, Uncategorized

McQueen Top Finished and Chanel Trims

Here is the final version of the flounce top adapted from a RTW Alexander McQueen design. Shown with jeans for an outdoor summer party.

Finished Top Front

I’ve also been busy developing a method for making custom trim to match your Chanel style jacket. The next few posts will go into more detail about this but here are some previews of what’s coming. I also have an article in the latest issue of Threads Magazine which explains how I go about adding a shoulder pad to the jacket and there is also a link to the pattern.

I love creating these jackets but am often frustrated when searching for just the right trim. Often what I find is too stiff, not the right color/width, etc. If you’ve watched Signe Chanel (it’s available on youtube or DVD) you’re familiar with Madame Pouzieux, the lady who created trims for Chanel. Unfortunately she is no longer alive and I understand no one quite “got” her method. Her loom and spinning devices were very large and beyond what any home sewer could possibly fit into a sewing room.

My search for a reasonable way to replicate these perfectly coordinated soft braids led to Kumihimo plate braiding. The braiding stand is easily made and I had very good luck with an inexpensive braiding plate.

Braid Stand

Here are two jackets trimmed with braid woven on the stand using yarns in my stash and some from Linton Tweeds.

Pastel Jacket    Threads JacketPastel Jacket Front

Pastel Jacket Detail

Threads Jacket FrontJacket Front CloseupThreads Braid

The braid is very soft and flexible but unravels VERY easily. I stitch a narrow strip of tulle across the ends before cutting. The 10 strand braiding pattern works well for these jackets and I’m experimenting with other patterns. The results will be up soon.


Wedding Gowns

The Wedding Gown: Inside Details

My youngest son was recently married and I had the joy of creating my new daughter-in-law’s gown. But before elaborating on the details of her gown I thought I would share photos of gowns I created for my other two daughter-in-law’s.

My oldest and his bride opted for a beach wedding on a far flung island in the Bahamas; not easy in terms of travel and logistics, but spectacular. She chose heavy silk crepe fabric and I embroidered abstract roses on the skirt. Random petals were cut out and backed with silk organza. The embroidery doesn’t show well in the photo. Silk organza flowers covered the narrow shoulder strap and cascaded down the bodice.

liz-gown

My middle son’s bride chose an antique looking crochet lace woven from silk, wool and cashmere. The ivory lace was backed with white silk charmeuse and underlined with ivory silk tulle. The lace required precise layouts as it had a large pattern and I wanted to position the scalloped edge to skim the ground in the front. Hemming this lace wasn’t an option so the toile needed to be carefully fitted. I also played with various edge and seam finishes using the lace borders. Here is a pic of her getting unrumpled and set for her entrance.

sarah-gown

My youngest and his bride chose a beach setting for their wedding so her choice of a simple gown sewn in heavy silk crepe worked well. We designed a dress with a fitted and flared skirt, bodice with low necklines front and back, and jeweled belt.

The problem with low neckline in both front back is keeping the shoulder strap up. The bride doesn’t want to spend the night struggling with falling straps. Spiral steel boning solved the problem. After attaching the strap to the back bodice, interfacing with a channel for the boning was stitched to the underlining. The boning extends to the waistline seam in order for the strap to be supported from the waist up.  Seams were turned under and catch stitched, ready for lining.

back-boningback-strap

My first draft of the bodice had all the shaping transferred to one dart but no matter how I shaped and pressed the dart it ended in an unattractive point. The day before our final fitting I removed the front bodice and remade it using princess seaming which had a much better silhouette. I added a layer of cotton flannel to the front to camouflage a stick-on bra. The flannel was catch stitched just inside the stitching lines to avoid unnecessary bulk.

bodice-first-draftbodice-second

Firm cotton sateen reinforced the center front. I normally use silk organza for this but the deep plunge neckline needed something firmer.

front-stabilizer

The lining was inserted by hand. There was no way to do this by machine and sometimes sewing by hand is simply easier and produces better results. Hand sewing enabled me to ease the lining in much smoother than could have been done by machine.

lining-1lining-2

A final touch for good luck is a horseshoe covered in silk ribbon. I start with a small cardboard horseshoe shape. Wrap narrow silk ribbon from both ends meeting at the top. Secure with narrow double sided tape and add a bow.

hs1hs1

hs3hs4

A French bustle held the skirt up for the reception. Color coded silk ribbons made it easy to tie everything up after the ceremony.

bustle-diagram

The bow drooped but all else stayed secure.

bustle-back

veil-in-wind

preview


Drafting Patterns

Back in My Sewing Room

Hard to believe that it’s been two months since my last post. November and December were packed with travel, holidays and family. After four solid weeks of house guests and entertaining, hubby and I escaped to the west coast for a golfing holiday. Palm Springs was the starting point as we worked our way north along the Pacific coast highway.
highway

Pebble Beach was spectacular but neither of our golf games warrant the fees there so we satisfied ourselves with pics from the 18th green.

Pebble Beach
We did play several spectacular courses along the way, including two which had hosted PGA tournaments. Sand everywhere!
golf course
Last year I joined Goodbye Valentino’s Ready-to-Wear Fast and did so again for this year so that meant no buying clothes for the trip. I needed warm, lightweight and breathable golf tops. I had a stash of merino wool knit fabrics; perfect and had the added bonus of being washable.

The pattern is my knit top block from Suzy Furrer’s Craftsy course.

top body block&amp

My obsession with sleeve fitting resulted in this draft, taken mostly from European Cut by Elizabeth Allemong.

sleeve block
Notice the shape of the sleeve cap and the position of the shoulder.
How to add couture touches to a simple zip top: match stripes at the side and armseye seams.
add a zipper guard which covers the zipper teeth at the neck
add a mock turtleneck
striped top
Serged seams were too bulky and anti-couture. I did serge the cut edges with Gutermann Skala 360, a super super fine thread which adds no bulk. My serger was set for a narrow three thread stitch. Seams were sewn ina regular sewing machine using a zig-zag stitch about 0.3 mm wide and 2.3 mm long. This very slight zig-zag adds stretchability to the seam. Press open. The sleeve and bottom hems were serged along the cut edges and hand hemmed.
striped top seams
For chilly California evenings, I was intrigued by the wrap designed by Julie of Jet Set Sewing. Look for the December 29 post. I had some off white sheer wool knit and made two versions of her design.

One short one:

short shrug

And a longer version with an asymmetrical hem. The hem idea came from one of the sweaters Julie photographed in a Paris window.
Front view
Side view:
Side view
Very simple pattern. I made mine 16 inches wide at the neck and 25 inches wide at the bottom. Cut two layers, one front and one back.  The short version is 19 inches long, the long version 29 inches before hem shaping.
Pattern
Sew the side seams using a narrow zig-zag stitch. I used 5/8 inch seams, pressed open, turned under edges and slipstitched for a totally finished seam on the wrong side.
Seams
The knit rolled naturally to the right side along the top and bottom edges. Stretch the knit gently and it will roll. I tacked in place lightly.
Shaping the hem for the longer version. Fold in half with the side seams together. The center front and back will be at the fold lines. I pinned a length of narrow elastic as a guide before cutting. Be sure to flatten out the curve at the center front and back unless you want points.
Hem line
Enjoy. I’m happy to be back.