Cloning Designer Garments, couture sewing, creating designer trim, Drafting Patterns, Fabric Shopping, Uncategorized

The Chanel Style Tunic

For the backyard wedding, I wanted something easy, yet elegant. When you’re the resident dress designer/maker, showing up in something not of your own creation doesn’t work! I had my hands full with the bride, mother of bride, bridesmaids, etc. but managed to crank out a tunic style dress with Coco (and Karl) in mind.

My starting point was fabric from the Haute Couture section of Mendel Goldberg Fabrics. I chose a wonderful French boucle highlighted with tiny sequins woven into the fabric. With careful planning, the dress required only one yard of fabric; here is what was left over.

Boucle scraps

I used my basic pattern block and made the following adjustments. If you start with another tunic style pattern, and want to get this look, make sure your pattern has a high, jewel neckline. If your pattern has a lower neckline, the collar might be too large and will stand away from the neck.

Basic Sloper combine darts

Close the armhole and shoulder darts, combining them into the underarm dart. Angle the new underarm dart towards the lower edge.

Final Pattern

I chose to eliminate the front fisheye darts and transfer some of the dart shaping to the side seam. The bib placket drops from just outside the neck edge to the bust line. I played with shaping the bib wider at the top and tapering slightly but that design created a problem with trim placement. Having the bib placket the same width from top to bottom allowed the trim rows to be evenly spaced. The back was used as is with fisheye darts. The shoulder dart will be eased. The skirt was pegged about 3/4 inch from low hip line to hem.

Next I drafted a collar and stand. Some drafting books suggest curving the collar stand about 1/2 inch but I find the stand will hug the back neck better if more shaping is used. I’ll increase the curvature of the stand by shaping with a steam iron.

Collar patterns Stand pattern Collar offset curve-runner.jpg

All collar pieced are cut from cardboard which will help when pressing. I’ve also cut a collar lining pattern 1/8 inch smaller to keep the undercollar out of sight. The Curve Runner makes measuring curved edges easy; very helpful when drafting collars to fit the neck.

The cardboard helps when pressing seam allowances under and ensures the collar is perfectly symmetrical. Fell stitch the under collar to upper collar.

collar-cardboard.jpg under-collar-cardboard.jpg

collar-pinned.jpg

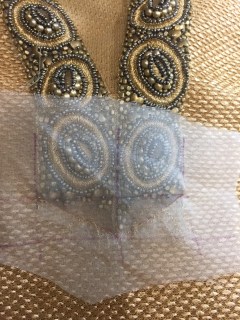
Pressing over cardboard also helps shape the collar stand. I used satin faced organza to line the collar, stand and as a base fabric for the bib. This organza is more opaque and stiffer than regular silk organza and is harder to shape into a smooth curve.

Collar band

Collar 1 Collar 2

Designing trims for the placket was the most fun part. I used the same satin faced organza as a base fabric and applied multiple layers of ribbons and braids. Most were sewn on by hand to maintain a soft, couture feel.

Designing front placket Front trim

I had some leftover tweed from Linton. I save my scraps of tweeds and boucles as there is often wonderful trim hiding in the fabric. Linton fabrics are woven with continuous strands so un-weaving produces a long continuous length of trim. I also used the fringed selvedges from the French boucle.  Also found great buttons!!!

Linton tweed Front buttonholes

Hem trim Hem 1

I had just enough scraps to cut bias strips for a hem fringe. Two layers of cotton batting padded the center. A blunt tapestry needle helps to un-weave the edges.

Finished tunic

Finished! Here’s a glimpse of the inside. Silk crepe de chine fell stitched to armseyes and placket. Side zip makes it easy to get into.

Inside view Side zip

Chanel Tunic full length

Next post will detail the design and construction of the bride’s outfit.


Cloning Designer Garments, couture sewing, Drafting Patterns, Draping, Dress Forms, Uncategorized

A Designer Skirt and Family Wedding

So much had happened since my last post; all of it good.  My son and daughter-in-law welcomed baby Milena. Her arrival coincided with my construction and installation of draperies in their new home. Needless to say, it was a very, very busy time.

Milena

After helping the new family get settled, it was time to head home and prepare for my dear sister-in law’s wedding, held in our backyard. When you’re the resident family dressmaker, weddings mean loads of sewing; all of it fun and leading up to a happy celebration.

The rehearsal dinner was an informal gathering and I chose to replicate a designer skirt I had seen.  This Oscar de la Renta skirt, from his “paint splatter” collection was white denim with applied sequins and priced at a mere $1900.

Inspiration Skirt

I had a length of white denim with a bit of lycra in the stash.  The skirt front was drafted by using a jeans pattern, lapping the right over left front, and tapering to a mid-calf length straight skirt. The back was slightly more complicated. My jeans pattern back wouldn’t cooperate and produce a well fitting rear.  Draping on my custom dress form solved the problem.

Skirt Drape 1 Skirt Drape 2

I placed style lines for the back yoke, waistband and side seam.  The waistband is slightly lowered at center front. I used flat felled seams and the only problem was my machine didn’t like the bulk of multiple fabric layers and the thicker thread I was using for topstitching.  I found that hammering (use a clean regular carpenters hammer) the seams, especially at points where seams intersected, made a huge difference. Hammering the fabric prior to sewing seems to soften and compress the fibers. A heavy duty jeans needle also helped. The long, sharp point pierced the denim much easier preventing skipped stitches and thread nests.

TopstitchingSequin Closeup

Now for the fun part. I gathered sequins, beads and started drawing. An air erasable marker lets you preview the placement and size of the “paint blobs.”
The large yellow sequins had holes in the center but I decided they would be better if the holes were closer to one edge. Joanns Fabric carries this punch in the leatherworking department. It’s pricey at about $40 (great time to use the discount coupon), but makes the tiniest holes and was perfect for the task.

Hole Punch

Completed and on to the more wedding sewing.

Close-up Finished skirt

Next post (and I promise it will be soon) will detail the design and construction of the bride’s dress, little girls’ dresses, mother-in-law’s dress and (as if I didn’t have enough going on) a Chanel style tunic constructed from a wonderful fabric from Mendel Goldberg. Here’s a few preview shots:

Casey Mia

Sage Chanel Dress Preview

I also want to mention that my friend, Kate Davies, has published a book, Making Life More Beautiful, about sewing, crafting, knitting and life. I met Kate while on a trip to London and immensely enjoyed the time with her. She is doing a sew-along emulating the style of Frida Kahlo, so hop over to her site and check it out.

Kate book

Also, I’ve written another article for Threads Magazine detailing the draft and construction of a designer skirt.  The skirt was based an Yves St. Laurent style straight skirt and I’ve explained many of the details that take an ordinary style into the designer realm.  There is also a web extra explaining a few adaptations which are helpful when using a heavier fabric, such as a designer boucle.

Threads Cover

Thanks for reading!!!

couture sewing

Another Wedding and a New Tunic

Our family is in wedding mode.  We gathered in Miami this past weekend to celebrate our nephew’s marriage. I also finally got to meet Sarah of Goodbye Valentino in person! We have been following each other’s blogs for several years and I was invited to do a guest post for the launch of “The Tunic Bible.”  I wore an ankle length tunic to the welcome party around the hotel pool; very appropriate attire.

with-sarah

The tunic fabric was purchased in Mood several years ago. It is like raffia but much softer and woven with a knit backing. The fabric is quite flexible and extremely comfortable. I used my master tunic pattern and was able to eliminate the back waist darts and incorporate the shaping into the side seams.

I enjoy having my garments look clean and finished on the inside. All seams were bound with narrow strips of bias cut china silk. I attached them with hand sewing; much more elegant and softer than machine stitching.

inside-armholeinsid-front-facing

The side vents and hem were invisibly slipstitched, catching only the knit backing, to prevent them from flipping to the right side. The collar band was faced with a scrap of gold toned silk charmeuse.

inside-heminside-shoulder

The challenging aspect of this project was to work the trim (also purchased at Mood Fabrics) so it looked custom shaped for the neckline. The neckband trim was arranged so that the motifs were symmetrical at center front and front neck opening pieces were mirror images.

tunic-trim-1

Removing the unwanted beads and stitching was tedious to say the least as I didn’t want to damage the net backing. It would be needed to back the bald areas and prevent beads from sinking into the textured fabric. Save the removed beads for later.

tunic-trim-2

To create a neat finish at the lower edge I stitched silk organza in the desire shape to face the edge. Hand stitches here; machine stitching this would have been impossible to control. Turn and trim the organza.

tunic-trim-3tunic-trim-4

tunic-trim-5

Fill in the areas with saved beads and it looks like a custom shaped trim.

Next up will be the gown I created for this black tie wedding. Sarah just published pics of her stunning outfit; be sure to take a look.