Interested in learning how to create custom trims to perfectly match your fabric? I’m offering several classes via Zoom in which we’ll explore various ways of creating trim. I developed these techniques after becoming frustrated with trims available in shops. Much of what I found was too thick, stiff and not the right colors to look like couture quality.
The classes offered on March 21 and April 11 will demo basic crochet stitches and we will create at least 6 different trims using a variety of techniques. Although I will go through all the stitches needed, you will enjoy the class more if you have a working knowledge and some practice with crochet.
Kits with crochet hooks are available if you wish to use the same materials I’ll be working with. Kits WITHOUT hooks are also available if you have hooks in sizes C, D, E and F. Purchase of a kit is not mandatory. You can source your own materials and use them along with the class. Classes are recorded and you will have one week to download the recording which you can then watch as often as you like.
I’m also offering a couture trim class on May 2. This class will focus on more complex trims using better quality fabrics and yarns. The trim kit for this class includes fabric from Mendel Goldberg and Linton Tweed plus many yarns sourced from Europe. Link for the trim kit WITHOUT hooks for those who have crochet hooks in sizes C, D E and F. You will enjoy this class if you are familiar with crochet and are comfortable working with trickier (slippery, multiple strands, metallic) yarns. You can also source your own fabrics/yarns and use this class as inspiration for creating your own versions.
Several of the trims utilize a set of brass tubes I’ve developed to facilitate trim making. I’ll demonstrate their use during class. Not all trims require their use. If you have a set, have them handy as they do make many aspects of trim easier.
I recently returned from a trip to London and was able to take photos of new Chanel trims in the Chanel shop (largest in the world) there. I’ll be showing images of trims I saw and we’ll explore how to recreate these designs for your fabrics.
Class dates are linked to registration. You may also browse the class offerings in the shop. Thanks for reading and hope to see you in class.
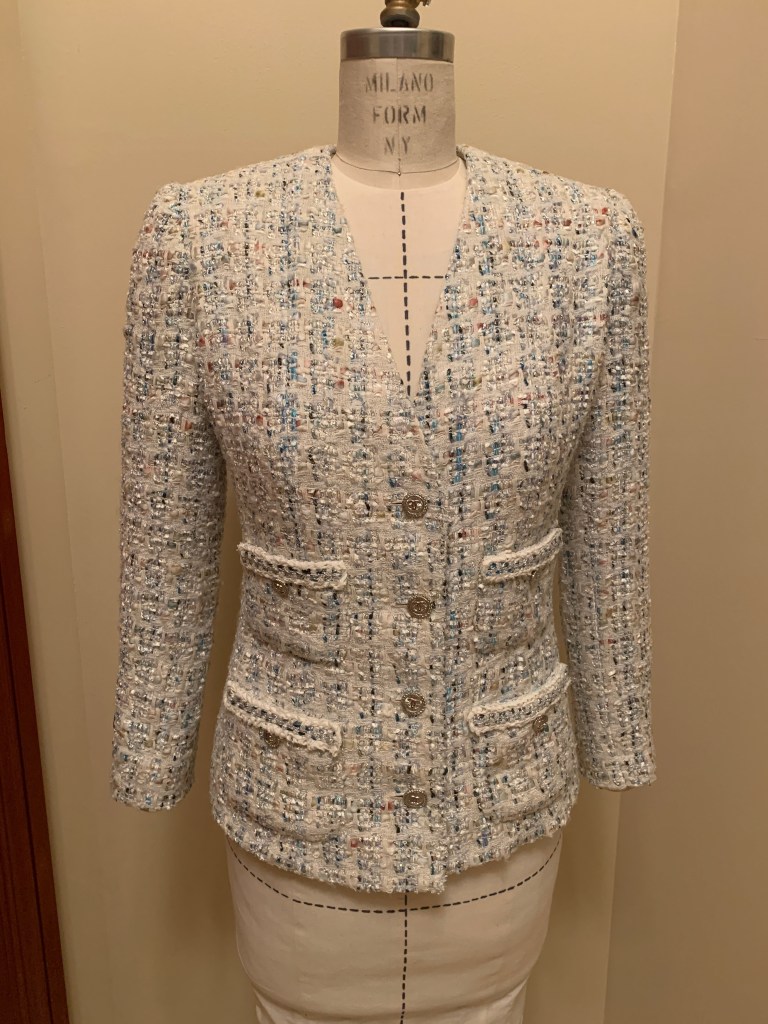
What better way to start 2023 than with a Chanel style jacket! This version used fabric from Linton Tweed and features trim created from coordinating yarn plus yarns pulled from the leftover fabric.
Vogue 7975 is a great starting point for the jacket. I shifted the princess seams closer to the neckline and shaped the fabric as described in several previous posts. The round neckline as shown in the pattern was changed to a V neck.
Creating custom trim to compliment the fabric is the part of jacket construction I enjoy most. Here’s my method for this trim: step by step.
Using a size E crochet hook, chain as many stitches as you need for the length of trim desired. I make samples using 20 stitches. Measure the length of your sample to calculate number of stitches needed. If 20 stitches makes 4 inches of trim, then I need 5 stitches for every inch of finished trim. I measure the length needed for the sleeves and make that length first just to double check that I’ve calculated right. These sleeves required 13 inches each. I add a couple of inches to allow for turning under the ends. 15 inches per sleeve times 2 sleeves equals 30 inches. If every inch requires 5 stitches then 30 inches needs 150 stitches.
I used Sesia elegant yarn and a size E hook to chain 150 stitches. Turn the chain and make a double crochet in every stitch. Here’s the (what felt like miles) length needed for the hem, front edges and neckline in one length.
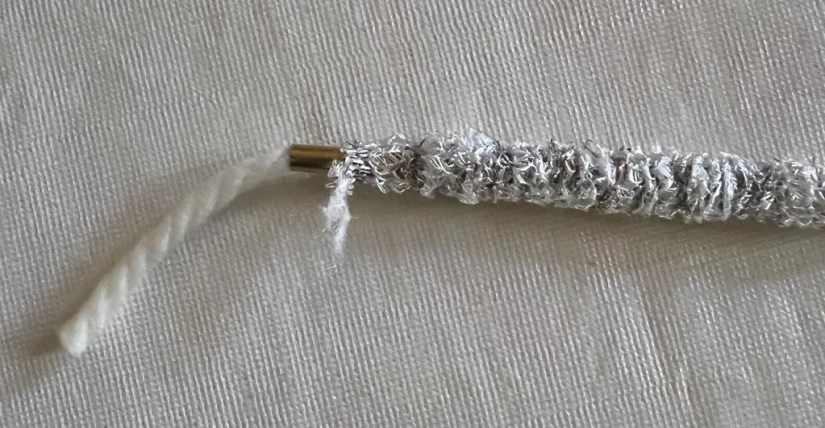
To even out the stitches I use my set of Trim Tubes. Weave a larger size tube (I used sixth largest tube) through the stitches and steam. Allow to cool and block the next stitches. This is the same as blocking your knitted or crocheted work.
Once the stitches are blocked use a smaller tube to weave two strands of yarn pulled from the leftover fabric through the crochet stitches. The yarns from the fabric are 54 inches long but they can be joined on the wrong side of the trim so the joins don’t show.
Nudge the blue yarns to one side and weave another double strand of blue yarn through, alternating the up/down with the previous row in a basket weave pattern.
I used an eyelash yarn in light grey and made a chain stitch along the edges.
Finally, a chain stitch using a smaller hook (size C) with silver cord along the middle of the trim.
Handworked buttonholes and silver buttons to complete. More jackets with new trim ideas in the works.
Finding trim for your French jacket is easier when you are working with a multi color fabric, especially one with black, white or another neutral color. I think finding something pre-made for this color would be near impossible. You could introduce a contrasting color but often that’s not what you want.
Here’s a step by step tutorial on the process I used for this trim. If you’ve taken one of. my Zoom trim classes, much of this will be familiar. I used a silver metallic yarn for the base of the trim. Using a D hook, chain the desired length. Turn and make a double crochet in the fourth stitch from the hook. Chain 1 stitch. Repeat this pattern (double crochet, chain 1) in every other stitch.
Photo on the right is a closeup of the finished crochet work. Top is “wrong” side with purl stitches, bottom image is “right” side with smoother chain stitches.
If you make several lengths of trim, be sure to be consistent in which side you choose as the “right” side. Some trims look better when one side vs. the other is used as the “right” side. For this jacket, I used the side with the purl stitches for the right side.
I used the shiny yarn with variegated shades of teal. Some yarns can be pulled through the fabric. This one didn’t pull easily, so I cut closely along each shiny yarn and pulled it out. Tie the strands together and work a chain stitch along the long edges of the metallic base. To determine number of stitches needed, I make a sample using 25 stitches. Measure the sample and multiply number of stitches by the desired finished length. This jacket required 600 stitches for a length of trim which would go around the hem, along front edges and around neck. The trim for the sleeves and pockets was worked as another piece.
The trim is uneven and needs to be steam blocked into shape. I used the third from the largest tube from the Trim Tube set. Weave the tube in and out between stitches and steam. Hover the iron over the trim; you don’t want to compress it. The tube is 12 inches long so steam 10-11 inches at a time, let cool, and weave the tube through the next section. The ends where the teal yarn has been tied together will be tucked underneath when stitching to the jacket.
Stitch the trim in place. It works best to sew the outer edge around corners, then work the trim in place along the inner edge. The join between lengths of teal yarn can be tucked to the underside. The trim is very flexible and easily navigates curves and corners. I join the trim at the left hem.
When you’ve determined where to join the ends, press hard to flatten only the trim which will be turned under. Use a tailors clapper to flatten the trim as much as possible and let cool. Turn the ends under and stitch. The join will be almost invisible.
To create a finished end (nice on pockets and the sleeve vent), measure the finished length needed. Starting along one long side (it’s harder to stop and start at a corner) make the chain stitch with teal yarn. To turn the corner, make two chain stitches in each corner. One stitch for the long side and one stitch for the short end. Make 1-2 stitches across the short end of the trim. Then two stitches in the next corner. When you reach the starting point, pull yarn to the underside and fasten with a few small hand stitches. To secure the metallic yarn, machine stitch across a few times, compress the end with steam and cut off close to the stitching. The flattened end will turn under.
I will be offering additional trim classes via Zoom. Probably one in December and more starting in January. There are also a few openings left in the January class if you would like to work in person. We’ll be doing a variety of projects in the class: pattern drafting, French jackets: both starting one and completing ones already begun, dressforms and more.
My trim classes have sold out quickly in the past, so leave a comment if you would like advance notification of the schedule. Have fun creating your custom trims.
Registration is open for classes in Palm Beach Gardens. Join the 7 day French jacket class from Monday, November 7 through Sunday November 13, 2022. These jackets involve considerable hand sewing and do take time, so expanding the class to 7 days made sense.
What is unique about this class? We will start with fine tuning the fit of your jacket toile. Detailed instructions will be sent several weeks prior to class.
Vogue 7975 is often used as the basis for a French jacket. It is easy to change the jacket’s length, neckline, sleeve and front closure. The pattern has princess seams ending in the shoulder which simplifies many fitting issues. Curvy figures need more shaping which can result in any horizontal stripe in the fabric to be mismatched along the upper part of the front princess seam. This photo shows the difference.
The right side (right side of photo) of this sample has been cut and sewn according to the pattern. For the left side, I’ve made some simple changes to the pattern and shaped the front side section with a steam iron. Note how the horizontal lines in the weave carry across the upper chest uninterrupted.
We will examine techniques to eliminate darts. For this sample, I wanted a very curvy figure, easily accomplished by a bra filled out with extra padding. It’s easy to achieve the look on a small busted model but harder when dealing with more curves.
The pronounced curves of this figure required additional shaping which could have been accomplished by adding a dart either from armhole to bust or side seam to bust.
Either dart placement isn’t ideal and will create unnecessary bulk. Fortunately most boucle fabric is pliable and can be molded with steam. Any distortion in the weave is hidden under the arm and a better solution than darts.
A few patterns have the classic three piece sleeve. Vogue 7975 has a standard two piece sleeve. It’s not difficult to convert the pattern. This method can be used on any sleeve.
Learn how to customize the look of a basic pattern. The neckline is easily converted to a stand collar, round or V-neck.
These jackets all used Vogue 7975 as the starting point
Coco Chanel said, ”never a button without a buttonhole.” Machine buttonholes are an option but handworked buttonholes are a true couture finish. Loosely woven boucle fabric isn’t the easiest to work with and mastering buttonholes does take practice. There are a few tips and tricks that make the finished result more professional.
Trims are the final embellishment. Shopping for pre-made trim can be difficult. You rarely find something that’s the perfect color, width and texture. Often trims are rigid and difficult to navigate curves and corners. Creating your own trim using fibers from the fabric and coordinating yarn isn’t difficult.
November dates not convenient? Another Couture Sewing Class is scheduled from Monday, January 16 through Saturday, January 21, 2023. This class isn’t strictly for French jacket construction but you can certainly work on one. It’s a perfect opportunity finish (or make significant progress) on a previously started jacket. Work on anything you like. Maybe you’re hesitant to work on tricky fabric or an unfamiliar style? Take advantage of expert help with planning and executing your project.
Register by clicking on ”Classes” from the main menu. Any questions email me: mf953@aol.com
I’m presenting a couture trim class with the ASG (American Sewing Guild) Atlanta chapter on Friday March 25 and Friday April 1. This is an 8 hour class (split into 2 four hour sessions) which will be presented via internet on Zoom. Both sessions will run 1:30 to 5:30 PM EST. One fee includes both sessions. The class fee also includes the trim kit so you will be able to create the trims along with me. This class was designed exclusively for the Atlanta ASG and open only to their members. The class has a few available openings and I have permission from the Atlanta group to open the remaining spots to my readers.
This trim from a Chanel jacket has always intrigued me and I FINALLY figured out a way to replicate it. It will be demonstrated in this class along with numerous other techniques including Kumihimo braiding.
If you’re interested, go to http://www.asgatlanta.org and register. The class will not be recorded so you will need to be available during class time. Registration will close on March 19 to allow time for your trim kit to be shipped to you.
There will also be a class on couture custom sleeves on Saturday, March 26 from 1:00 PM to 2:30 PM EST if you’re interested.
I will be offering additional trim classes later this spring and summer on my site. Thanks for reading.
To expand my variations of custom trim, I’ve been experimenting with tubular yarns as well as crocheting with narrow strips of fabric. Many boucles are woven using tubular yarns, such as these two.
I pulled strands of the tubular knit from the fabrics and filled them with bulky wool yarn. Wool yarn works better than acrylic or cotton as it is lofty yet soft and flexible.
The tubes can be woven through a crochet base or braided. A technique for tubes of fabric used as braided trim here. This boucle contained gold tubular yarn as well as multiple other fibers and lent itself to several variations of trim.
You can also find tubular yarns put up in rolls or skeins. Any time I find metallic silver or gold I stock up, as gold/silver compliment many fabrics.
Another interesting technique uses narrow strips of silk georgette fabric to work a chain stitch along the edge of trim. This is a version created from a combination of ivory wool yarn combined with fibers pulled from fabric yardage and edged with a chain stitch of silk georgette. The bias edge of silk frays just enough to create a soft textured finish.
Join me on Tuesday, March 1, from 5-7:30 PM (Eastern standard time) for a hands-on virtual workshop in which we’ll create multiple variations of trim. Sign up (PLEASE NOTE: This link is for the March 8 class. The March 1 class is sold out) through the Cloning Couture Shop. The class is limited to 20 participants. A kit containing crochet hooks, sample boucle fabric plus assorted yarns is available here or you can source your own materials. The class is held via Zoom and will be recorded so if you can’t participate live, the recording will be available. You can also download and re-watch the class as often as you wish.
Here is the jacket I used for demonstration in a recent French Jacket Class. The trim utilizes fibers pulled from the yardage plus silk georgette used as yarn.
I purchased this lovely boucle fabric from Apple Annie Fabrics and started experimenting with custom braids to compliment the fabric. Possible choices of materials: navy cotton tulle, gray silk georgette, chunky ivory and charcoal yarns to stuff tubing, gray yarns, ivory with flecks of gold yarn and thin silver metallic yarn.
First step was to make narrow bias tubing using the tulle and georgette. Cut bias strips of fabric about 1.5 inches wide. Fold in half lengthwise and stitch 1/4 inch away from folded edge. Trim seam to 1/8 inch.
I’ve been writing this blog since 2014 and am thrilled to learn the tutorials presented are helpful to other sewists. Joyce posted photos of her completed jacket on Instagram and tagged me as a resource for her construction methods. I invited her to write a post, highlighting the information she found especially valuable.
Thank you Joyce, for taking the time to write this and allowing me to share your work.
Hello! My name is Joyce. After my recent completion of a French jacket, Mary asked me to write about my experience in a post for her blog. Before we get started, here’s a bit about me: I live in southern Manitoba, Canada with my husband, who is also my best friend! We have raised two children, who have blessed us with five grandchildren. I am a retired Interior Design Consultant & Kitchen Designer. My talented mother taught me to sew, crochet, knit, and hand embroider. From the time I was five years old, she allowed me to use her sewing machine. I made a lot of clothes for my dolls until the age of ten when I began sewing my own clothes. My favourite things to sew are coats, jackets and dresses. My favourite fabrics are made of natural fibers.
About seven years ago, I began dreaming of making a French jacket. While reading blogs of sewists who documented their experiences on the subject, I became aware of the hours involved, as well as the couture techniques they had learned along the way. It was when I discovered Mary’s blog, cloningcouture.com, that I soon realized what a treasure store of information it is. Her precision and her impeccable attention to detail reveal incredible skill. I was amazed that she was willing to share her extensive knowledge and experience with her readers at no cost to them. I read each post in detail, bookmarking those I wanted to refer to later. By early 2019, I had collected all my supplies for this project, and was ready to begin. My fabric is appropriately called “Giverny Tweed”. The lining is silk charmeuse.
Of course, the first step was to make a well-fitting toile. I cut the body of the jacket according to Vogue 8804, but in reading online reviews, I heard repeatedly that the sleeve in this pattern was wide. Since I have thin arms, I knew I would have to draft a narrower sleeve. This is where Mary’s post https://cloningcouture.com/2014/08/04/chanel-and-the-sleeve/came to the rescue. I know she has since updated it, but her original method worked for me! I also changed my sleeves to full-length instead of the three-quarter length from the pattern.
As many of you already know, after fitting the toile, it is cut apart and used as the pattern to cut the pieces in the tweed and lining fabrics, adding wide seam and hem allowances. In hindsight, I should have fused Pro-Sheer Elegance Couture interfacing to the tweed at this point, since I was working with a fabric that frays very easily. Mary gives this advice in the following post: https://cloningcouture.com/2018/02/15/finishing-details-the-french-jacket/Instead, I used a stepped zigzag to secure the fibers along the edges.
Detail of the front, ready for machine quilting
Over the next couple of weeks, I interfaced the fronts with silk organza, quilted the silk charmeuse lining to the front and back pieces, before joining them along the princess and side seams. I really enjoyed slipstitching the lining seams together by hand.
Now that the body of the jacket was taking shape, it was time to turn my attention to the trim. I was unable to find a ready-made trim that complemented my fabric, but then I remembered Mary’s post on making your own. My first attempt was a crocheted chain using fibers from the tweed, but it was too narrow and did not contrast enough with the fabric. I was intrigued by Mary’s detailed instructions on Kumihimo braiding, so I decided to try my hand at it. See her post here: https://cloningcouture.com/2017/08/30/create-custom-trim-for-your-french-jacket/After locating a Kumihimo plate at my local fabric store and watching some YouTube videos on 10-strand braiding, I was ready to begin. After a couple of false starts, while deciding which fibers to use, I settled on four blue strands and two ivory from my fabric, in combination with four strands of ivory Phildar yarn left over from a sweater I knitted for my husband many years ago.
This was the set-up I used. It is certainly not the traditional way, but it worked for me. Every few inches I had to stop and release more material from my “bobbins”. It took me about three days to work out my setup and make three and a half yards of trim.
You can see it being “auditioned” here with the buttons I planned to use. Btw, although these were inexpensive buttons, they remind me of Coco Chanel’s favorite camellia rose.
After making the trim, I did some work on the sleeves, then packed the project away before going on vacation in March 2019. As it turned out, this is where the project stalled out until a couple of weeks ago.
I had been putting off making the handworked buttonholes, but one day I gathered up courage and got to work. First, I made a sample buttonhole to work out the method. Then, in a pleasant afternoon’s sewing, I made five buttonholes on the jacket front. You can see Mary’s post on buttonholes here: https://cloningcouture.com/2020/01/07/buttonholes-and-more-trim/
After crossing this hurdle, I knew I was on the home stretch. The next two days were spent finishing the sleeves.
Completed sleeves with trim and handworked buttonholes
After this, I applied the trim to front and neck edges with a running stitch and the occasional backstitch. It was actually easier to do than I thought it would be. Then I fellstitched the lining to the jacket edges. This was my favourite step!
Stitching the sleeves in by handSleeve lining basted into placeCompleted jacket
In summary, I learned so much about couture sewing methods while working on this project. I easily spent a hundred hours on it, but the result is something I will wear with much satisfaction for years to come. It has also given me a great appreciation for the work of couturiers. They are indeed a skilled lot!
Mary, many thanks for all your informative, detailed and inspiring posts on couture sewing! Thanks also for letting me share my experience with your readers. You can find me on Instagram at amakersshowandtell, where I post photos of my projects. They include sewing, watercolor painting, home decorating, gardening, knitting, and occasionally, upholstery. Best regards, Joyce
This is a variation of the trim in the last post. I’ve used the same crocheted base and woven three knitted cords through. For the base, I used a sport weight yarn and size E (3.5mm) hook. This will produce trim which is about 5/8 to 3/4 inch wide.
Crochet a chain the length of trim. Turn and work double crochet in the 4th chain from the hook. Work double crochet in every stitch.
Knit icord three times plus several inches the length of trim. You can use three strands of the same icord or any combination. Insert the knitted icord into the smallest tube it will pull easily through. The knitted cords can be threaded on a large needle and pulled through, but feeding them through a tube is easier and prevents the cord from fraying. A larger tube will be more difficult to weave through the crocheted base, especially when inserting the second and third rows of cord.
Weave the tube with cord inserted in and out of the crochet stitches. Hold the ends of the crocheted base and cord in one hand and pull back to remove the tube, leaving the knitted cord in place.
To prevent the knitted cord from unraveling, tie thread around the cord at the end and beginning of each length. Weave the second cord through, alternating with the first cord. Nudge the first and second cords to one side and repeat with a third cord.
A row of chain stitches can be worked in the front of each stitch along the outer edges if desired.
More examples of trim with three cords woven through the basic crochet base. The top trim used three strands of the same cord and a chain stitch worked along the edges. The bottom trim used fine variegated sock yarn for cords, the darker shade along the edges and lighter shade in the middle. Have fun creating additional combinations. Trims using a three strand braid as a base coming next.
Since the last post on creating custom trims, I’ve been inventing more combinations and ways to vary the three cord braid shown in this post. Here are a few ideas.
I’m usually frustrated when shopping for pre-made trims. What’s available is wrong colors, wrong size, too rigid, they have 2 yards and I need 5, etc., etc… Much easier to create your own. I’ve developed two trim styles, one based on a three cord braid and the other on a crocheted base. This post will cover trims based on a three cord braid. I’ll explain the crochet base in the next installment.
The cords used for the braid should be 3/16 to 1/4 inch wide. Soft, pliable cords made from tubes of fabric filled with wool yarn work very well. Knitted fabric tubes created with this knitter have volume yet are flexible and won’t result in a stiff finished braid.
This little gadget is available on Amazon. It produces yards and yards of soft, knitted cord in minutes. I’ve discovered a few helpful hints for getting this to work. 1. Use THIN yarn: fingering, lace or sock weight yarn works great. Thicker yarns such as sport weight will cause the tiny latch hooks to jam up and break. I see tons of product reviews of customers complaining that it broke with medium weight yarn. The directions say fine yarns and they mean it. Yarn with a relatively smooth surface also works best; fuzzy yarns and those with slubs tend to get caught on the hooks. Start slowly and make sure the yarn is feeding properly. If the yarn doesn’t drop below the hooks, try adding more weight to the end of the cord emerging from the bottom of the knitting device.
I often fill the knitted cord with a contrast color yarn. The fill adds some volume and is more interesting than a solid color. I created this set of brass tubes to help with turning, filling and weaving the trim.
I’m using the third tube from left (5/32 inch) and a 2.75mm (size C) crochet hook. Exact size isn’t important. Choose a size that is large enough for your filler will slide through easily and is small enough to fit through the middle of the knitted tube.
Insert the crochet hook, hook first into the tube. It will stop when the flattened thumb rest reaches the tube opening.
Insert the rounded end of the crochet hook into a stitch in the knitted tube and thread the hook and tube into the middle of the knitted tube. Hold the open end of the tube against a table or your leg to keep the crochet hook in place. Don’t try and force the hook further into the tube or you will cause damage. The tube can be threaded through the knitted tube but the slightly rounded end of the crochet hook makes it easier.
Make sure the entire length of knitted tube is on the brass tube and remove the crochet hook. Fold a length of heavy thread in half. The thread should be several inches longer than the brass tube when folded (brass tube is 12 inches long so thread should be at least 30 inches). Insert two cut ends of thread into one end of brass tube and push through until the thread comes out opposite end.
Insert end of filler through the thread loop. Pull the two opposite ends of thread. The filler will be pulled through the brass tube.
Holding both filler and knitted tube in your left hand, gently pull the brass tube with your right hand, easing the knitted cord over the filler.
Cut the filler several inches longer than the knit cord. I pull the finished cord gently, pin to my ironing surface and steam to block and set the stitches. Make the cord a little longer than you think you need. If I’m creating trim for a jacket or dress, I break the trim construction into manageable lengths. I’ll do the pocket trims as one length, sleeve trim as one or two lengths. If I’m making a length to do the neck, fronts and hem as one length, save until last when you’ve practiced with shorter lengths and worked out any problems. If I need to fill a very long length, start at the midpoint and work to each end. Much easier than working all the way from one end to the other.
Next post will cover braiding and adding crochet edging to create a more finished look.
Testing out trims to compliment this Linton tweed fabric. Trim turns a right angle corner easily. Beige linen yarn knitted tube with black wool filler yarn woven through black crocheted base. Line of metallic silver chain stitched through middle.