
Subscribe to continue reading
Subscribe to get access to the rest of this post and other subscriber-only content.
Exploring the world of couture sewing
Subscribe to get access to the rest of this post and other subscriber-only content.
This past October, Threads Magazine invited members of ASDP (Association of Sewing and Design Professionals) to create an outfit based on historical patterns. For my entry, I chose to create a feminine version of a WWII bomber pilot jacket. The jacket was worn over a blouse of soft silk georgette and incorporated design elements found in 1930’s and 40’s clothing. Coordinating slacks of wool lined with silk crepe de chine completed the ensemble.

My entry was awarded “Finest Construction”!!! Due to space constraints of the magazine, some of the construction details couldn’t be included. Knowing that the competition would be other professionals, inspires you to produce your best work, plus incorporate couture level techniques.
Historical research revealed that most WWII bomber crews painted images of pin-up girls on their planes. The artwork was a bit of light-heartedness during dangerous times, served as a good luck charm and reminded the men of loved ones left at home. My late father-in-law was a B-24 bomber pilot stationed in the Philippines. His crew named the plane “Dumb Dora” after a popular cartoon strip of the time. Dumb Dora was embroidered on the lining as a nod to this tradition.
I feminized the jacket by using a French metallic lace (from Mendel Goldberg Fabrics). The lace was underlined with grey linen and black silk tulle; lined with silk charmeuse . I chose tiny tooth zippers which didn’t compete with the delicate feel of lace.


One particularly challenging detail was to line up the lace motifs to match when the front zip was closed. Collar and lining both inserted by hand.


The blouse is a modified version of a Marfy pattern, available free, on the Marfy website. Look under “patterns” for the free top. I extended the shoulders and added cap sleeves. If you use the Marfy pattern, be aware that the underarm is quite high. I lowered it about 1.5 inches. The pattern is designed with gathering along the front neck, but it’s easy to convert to released pleats. Blog post from 2014 explains how. Tiny self covered buttons close the back. Narrow French seams on sides and shoulders give a clean finish to the inside.


A typical hem finish in the 1930’s-40’s was a picot edge. I found considerable overlap of the terms “hemstitch” and “picot hem” while researching the topic. The Art of Dressmaking (Butterick Publishing Company, 1927) describes Picot Edging as “simply machine-hemstitching cut through the center.” Doesn’t work!! Cutting through the middle as described causes everything to come undone. Singer made a machine, the 72W19, which has two top threads but I think only one bobbin. I managed to find the instruction manual on-line but it seems to refer to only one bobbin. It’s also described as a hemstitch machine, so the stitches done with this machine also might come undone if cut through the middle. Attachments also exist for vintage Singer machines which move the fabric side to side, replicating a zig-zag stitch but again, one top thread and one bobbin.


My method of replicating the stitch is as follows: I used stitch 1345 (Bernina 780 machine). The stitch does a triple stitch lengthwise, then a triple stitch to the right side, repeat. Other machines probably have something similar. Adjusted stitch for length of 3.6mm and width of 3.5mm. I used a 90/14 topstitching needle; the wing needle created pulls and too large of a hole in my silk georgette fabric. If you are using a cotton or linen fabric, the wing needle may work better. Lay tissue paper over the fabric and (using 50 weight cotton thread) stitch about 3/4″ away from the raw edge. Tear the left side of the tissue away.


Tear the right side of tissue paper away. There will be little pieces of tissue between the stitches. I picked them out with fine tweezers. You could experiment with water soluble topping. I didn’t as I didn’t want to wash the completed silk georgette top. Using very sharp scissors, cut just outside the horizontal stitches. You don’t want to nick the thread as that would cause stitches to come undone. Run your fingers back and forth along the cut edge to fray it slightly.


Looks better when done with matching thread. A simple pair of solid tissue weight wool slacks, lined with silk crepe de chine complete the outfit. The challenge required a complete ensemble, so it was nice to have one uncomplicated piece.

I’m working on the next Challenge to be held in Denver this October. No previews as Threads prohibits any publishing of your work before it appears in the magazine. Wish me luck!!
The Couture Trim class will be held Tuesday, May 2 from 5-7 PM (Eastern time USA). If you registered, you should have received a link via email to the class. If you didn’t receive it, please send me an email: MF953@aol.com ASAP. Most of the time, cyberspace cooperates but things do get misplaced, so check that you have the information to join the class.
When registering for an on-line class please include your email. I’ve had a couple of incorrect/missing email addresses. Unfortunately, I can’t send you a Zoom link without your email.
I’ve secured a larger workroom in Bristol, so there are a couple of openings in the Rhode Island class. The house we used last year will be used as well as another Air B&B which has a much, much larger workspace as well as 4 private rooms. I’ll be sending additional info over the summer to those registered.
There are a few openings in the Couture Trim workshop being held at Mendel Goldberg Fabrics in NYC, May 20, 21. We’ll experiment with loads of trim ideas to compliment the new collection of designer boucles.
Hope to see you soon, either virtually or in-person.
Registration is open for my upcoming in-person classes. I’ll be hosting a sewing retreat in Bristol, RI October 2-8, 2023. Immerse yourself for 7 days of couture level sewing in the charming town of Bristol. Class fee includes 7 days of instruction plus accommodations at an Air B&B, snacks plus a group dinner at one of the lovely historical restaurants.


The November class in Palm Beach Gardens, FL is geared towards creating a custom French Jacket. You’ll construct a muslin test jacket prior to class (instructions provided). After perfecting the fit, you will be guided through the steps to create your own version of this iconic jacket. Read the class description for additional information.


The January 8-14, 2024 class is an opportunity to work on, or complete, your French jacket, construct a custom dressform or another project of your choosing. I will contact you prior to class to discuss your plans. Some students begin a new project while others bring partially completed ones for expert assistance in completing the garment.
This class is a great time to create a dressform which replicates your body. You will also draft a master sloper which serves as the basis for altering patterns or creating your own. Completed forms fly easily in a golf bag as checked luggage.


I am also offering a 1 or 2 day class this spring, May 20-21 at Mendel Goldberg Fabrics in NYC. The class will be geared towards creating custom trims to coordinate with Alice’s exquisite boucle fabrics. She will clear the shop for us to work Saturday and Sunday. This is a hands-on workshop where I’ll guide you through how I choose yarns and design a trim to match the fabrics. Techniques used are crochet, braiding, braiding on a Japanese Kumihimo stand and more. I will also explain my method for handworked buttonholes in boucle fabric and the specialized notions which give a professional result. Different topics are covered each day; Saturday and Sunday are NOT repeats, so attend both days for the best experience. You will enjoy this class more if you are comfortable with basic crochet stitches.


Class registration can be accessed through the “Classes” drop down menu or “Shop” and then look at the Catalog. Hope to see you. Any questions, email me at MF953@aol.com or leave a comment. Thanks for reading.

Interested in learning how to create custom trims to perfectly match your fabric? I’m offering several classes via Zoom in which we’ll explore various ways of creating trim. I developed these techniques after becoming frustrated with trims available in shops. Much of what I found was too thick, stiff and not the right colors to look like couture quality.


The classes offered on March 21 and April 11 will demo basic crochet stitches and we will create at least 6 different trims using a variety of techniques. Although I will go through all the stitches needed, you will enjoy the class more if you have a working knowledge and some practice with crochet.


Kits with crochet hooks are available if you wish to use the same materials I’ll be working with. Kits WITHOUT hooks are also available if you have hooks in sizes C, D, E and F. Purchase of a kit is not mandatory. You can source your own materials and use them along with the class. Classes are recorded and you will have one week to download the recording which you can then watch as often as you like.
I’m also offering a couture trim class on May 2. This class will focus on more complex trims using better quality fabrics and yarns. The trim kit for this class includes fabric from Mendel Goldberg and Linton Tweed plus many yarns sourced from Europe. Link for the trim kit WITHOUT hooks for those who have crochet hooks in sizes C, D E and F. You will enjoy this class if you are familiar with crochet and are comfortable working with trickier (slippery, multiple strands, metallic) yarns. You can also source your own fabrics/yarns and use this class as inspiration for creating your own versions.
Several of the trims utilize a set of brass tubes I’ve developed to facilitate trim making. I’ll demonstrate their use during class. Not all trims require their use. If you have a set, have them handy as they do make many aspects of trim easier.


I recently returned from a trip to London and was able to take photos of new Chanel trims in the Chanel shop (largest in the world) there. I’ll be showing images of trims I saw and we’ll explore how to recreate these designs for your fabrics.


Class dates are linked to registration. You may also browse the class offerings in the shop. Thanks for reading and hope to see you in class.
What better way to start 2023 than with a Chanel style jacket! This version used fabric from Linton Tweed and features trim created from coordinating yarn plus yarns pulled from the leftover fabric.


Vogue 7975 is a great starting point for the jacket. I shifted the princess seams closer to the neckline and shaped the fabric as described in several previous posts. The round neckline as shown in the pattern was changed to a V neck.
Creating custom trim to compliment the fabric is the part of jacket construction I enjoy most. Here’s my method for this trim: step by step.
Using a size E crochet hook, chain as many stitches as you need for the length of trim desired. I make samples using 20 stitches. Measure the length of your sample to calculate number of stitches needed. If 20 stitches makes 4 inches of trim, then I need 5 stitches for every inch of finished trim. I measure the length needed for the sleeves and make that length first just to double check that I’ve calculated right. These sleeves required 13 inches each. I add a couple of inches to allow for turning under the ends. 15 inches per sleeve times 2 sleeves equals 30 inches. If every inch requires 5 stitches then 30 inches needs 150 stitches.
I used Sesia elegant yarn and a size E hook to chain 150 stitches. Turn the chain and make a double crochet in every stitch. Here’s the (what felt like miles) length needed for the hem, front edges and neckline in one length.

To even out the stitches I use my set of Trim Tubes. Weave a larger size tube (I used sixth largest tube) through the stitches and steam. Allow to cool and block the next stitches. This is the same as blocking your knitted or crocheted work.
Once the stitches are blocked use a smaller tube to weave two strands of yarn pulled from the leftover fabric through the crochet stitches. The yarns from the fabric are 54 inches long but they can be joined on the wrong side of the trim so the joins don’t show.


Nudge the blue yarns to one side and weave another double strand of blue yarn through, alternating the up/down with the previous row in a basket weave pattern.

I used an eyelash yarn in light grey and made a chain stitch along the edges.

Finally, a chain stitch using a smaller hook (size C) with silver cord along the middle of the trim.

Handworked buttonholes and silver buttons to complete. More jackets with new trim ideas in the works.


Finding trim for your French jacket is easier when you are working with a multi color fabric, especially one with black, white or another neutral color. I think finding something pre-made for this color would be near impossible. You could introduce a contrasting color but often that’s not what you want.
Here’s a step by step tutorial on the process I used for this trim. If you’ve taken one of. my Zoom trim classes, much of this will be familiar. I used a silver metallic yarn for the base of the trim. Using a D hook, chain the desired length. Turn and make a double crochet in the fourth stitch from the hook. Chain 1 stitch. Repeat this pattern (double crochet, chain 1) in every other stitch.


If you make several lengths of trim, be sure to be consistent in which side you choose as the “right” side. Some trims look better when one side vs. the other is used as the “right” side. For this jacket, I used the side with the purl stitches for the right side.


I used the shiny yarn with variegated shades of teal. Some yarns can be pulled through the fabric. This one didn’t pull easily, so I cut closely along each shiny yarn and pulled it out. Tie the strands together and work a chain stitch along the long edges of the metallic base. To determine number of stitches needed, I make a sample using 25 stitches. Measure the sample and multiply number of stitches by the desired finished length. This jacket required 600 stitches for a length of trim which would go around the hem, along front edges and around neck. The trim for the sleeves and pockets was worked as another piece.


The trim is uneven and needs to be steam blocked into shape. I used the third from the largest tube from the Trim Tube set. Weave the tube in and out between stitches and steam. Hover the iron over the trim; you don’t want to compress it. The tube is 12 inches long so steam 10-11 inches at a time, let cool, and weave the tube through the next section. The ends where the teal yarn has been tied together will be tucked underneath when stitching to the jacket.


Stitch the trim in place. It works best to sew the outer edge around corners, then work the trim in place along the inner edge. The join between lengths of teal yarn can be tucked to the underside. The trim is very flexible and easily navigates curves and corners. I join the trim at the left hem.
When you’ve determined where to join the ends, press hard to flatten only the trim which will be turned under. Use a tailors clapper to flatten the trim as much as possible and let cool. Turn the ends under and stitch. The join will be almost invisible.


To create a finished end (nice on pockets and the sleeve vent), measure the finished length needed. Starting along one long side (it’s harder to stop and start at a corner) make the chain stitch with teal yarn. To turn the corner, make two chain stitches in each corner. One stitch for the long side and one stitch for the short end. Make 1-2 stitches across the short end of the trim. Then two stitches in the next corner. When you reach the starting point, pull yarn to the underside and fasten with a few small hand stitches. To secure the metallic yarn, machine stitch across a few times, compress the end with steam and cut off close to the stitching. The flattened end will turn under.


I will be offering additional trim classes via Zoom. Probably one in December and more starting in January. There are also a few openings left in the January class if you would like to work in person. We’ll be doing a variety of projects in the class: pattern drafting, French jackets: both starting one and completing ones already begun, dressforms and more.
My trim classes have sold out quickly in the past, so leave a comment if you would like advance notification of the schedule. Have fun creating your custom trims.
Winding down after a wonderful week of non-stop sewing with a lovely group of women. Here’s a glimpse of the varied projects.
First up is a Ziggi moto jacket from Style Arc patterns. The toile was tweaked until we were happy with the fit. Front neckline was raised and we opted for thin shoulder pads to eliminate drag lines in the back.


Style Arc patterns have minimal instructions. Marvine had chosen a luxurious piece of navy wool for this upscale jacket, and wanted to incorporate traditional tailoring techniques. She chose a lightweight Italian hymo canvas to support the front panels, collar and shoulders. Look at the beautiful pad stitching; too bad it gets covered up. Custom zippers from Botani Trim in NYC.


Robin chose this wonderful boucle for a French jacket. Like most boucle fabrics, this one frayed like crazy. Serging the cut edges kept things under control. I set up the serger for a four thread overlock using a very fine thread. Unlike regular sewing thread, the thin thread adds no bulk to the fabric. The studio was equipped with a professional boiler iron for superior pressing results. The combination of a supple fabric plus plenty of steam allowed us to reshape the side jacket panels, eliminating disruption of the fabric pattern along the princess lines.


Contrast the two front side panels. One is before shaping, the underneath panel shows what happens when you transfer the large dart to the armseye and side bust area.

I provided an assortment of professional style pressing tools. Everyone loved the large press buck. It’s a great tool for pressing long, gently curved seams such as hip curves, side seams and sleeve seams. Also works well for pinning the lining of French jacket seams as the gentle curve adds just enough ease to the lining. I have a post from December 17, 2020 with instructions for making your own. https://cloningcouture.com/category/tailoring/


Sandra Kay had several goals she wanted to accomplish. One was refining the fit of her moulage, making a custom dressform cover which she will use after padding her form at home plus developing a basic sloper to use for personal patterns.


We also tweaked the fit of her French jacket and set the sleeves in. She’ll be able to complete it at home. Rather than a goal of completing projects, I think class time is better spent on working out the complicated details which are hard to do by yourself.
Anne Kendall of Apple Annie Fabrics also joined us. Anne’s goal was to tweak the fit on several garments and perfect some toiles. Anne is a very accomplished sewist and wanted to utilize the time fitting rather than sewing. I didn’t get any photos of Anne’s fittings but she generously kept her shop open for us one evening.
How could we not shop!! One never has enough fabric and we left with large packages. I was particularly impressed with her selection of heavenly soft cottons.

This class was a small group which allowed me to give more individualized attention to each person. Shuffling between widely varied projects also takes a bit more time than when the entire class works on a single style. Additional workshop dates for 2023 will be published as soon as I work out my schedule. Hope you can join us.
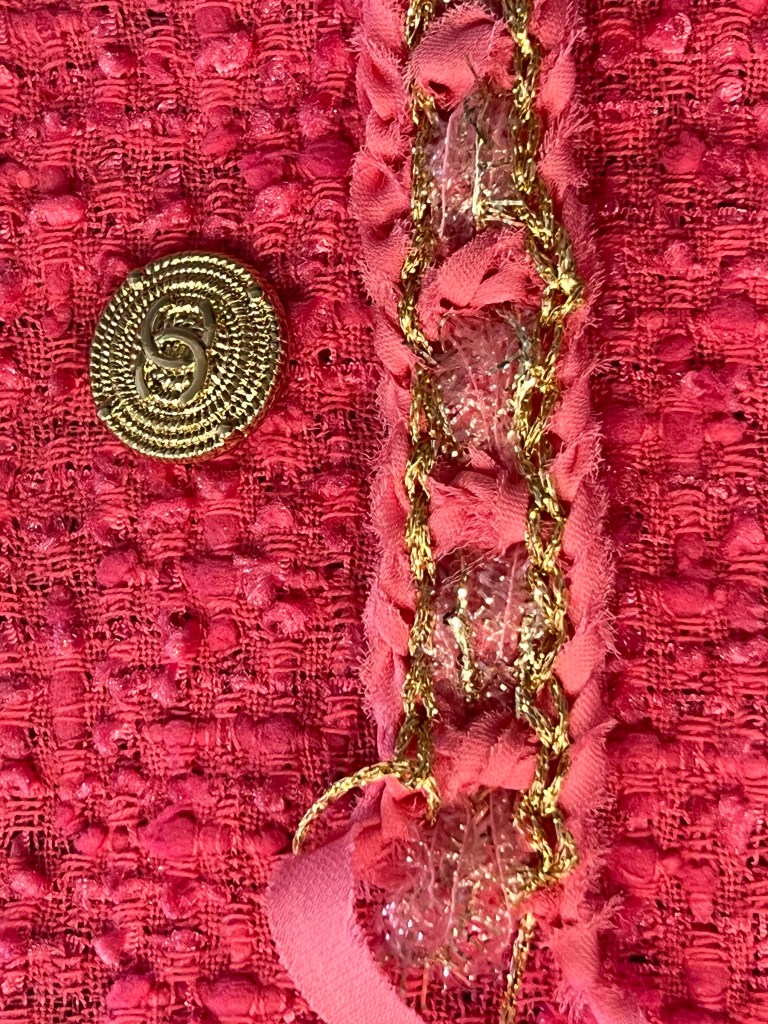
Finding trim is easier if you’re looking for black, white or common color. This fuschia jacket made from a wonderful soft Mendel Goldberg boucle wasn’t going to be easy, particularly if I wanted to avoid introducing another color. I did add silver or gold, depending on buttons.

When creating a trim, I make several variations to experiment with different yarns. If you’ve attended one of my trim classes, the techniques will be familiar.
All examples of trim use the same basic method. I make samples about 4 inches long. Once you decide which version to use, calculate the finished amount of trim you need. Measure the sample created with 20 stitches. If 20 stitches gives you 4 inches of trim and you need 40 inches, then start with a chain of 200 stitches.
First create a crochet base. Chain 20 plus 3. Turn and make a double crochet in every stitch. Weave a brass tube through the finished base to block it and even out the stitches.


Let cool and remove the tube. Weave a smaller tube through the stitches as shown. Pull the desired yarn or fabric through. Push the woven strand to one side and weave the tube through, alternating in and out with the first strand.


Chain stitch around the edge. Here I’m using a strand of flag yarn pulled from the boucle fabric. Using strands of yarns from the fabric guarantees a perfect match.


Finish with a chain stitch in the center. I did a version in gold and one in silver to audition with different buttons.
Trim 1: Using a size F hook, crochet the base with Sesia Elegant yarn with color: Rose. Chain 23, turn and make double crochet in every stitch.
Cut bias strips of fuschia silk double georgette 1.5 inches wide, fold in half lengthwise and stitch scant 1/4” from folded edge. Turn and stuff the silk tube with bulky yarn.
Weave the silk tubes though alternate double crochet stitches. Make a chain stitch through the middle with gold yarn. Finish the edges with a chain stitch using flag yarn pulled from leftover boucle.

Trim 2: Same as trim 1 except use size D hook for the base. Weave 3/8” wide bias strips of silk georgette through. Chain stitch through the middle with size C hook. Edge with the flag yarn from fabric.

Trim 3: Crochet base making double crochet every stitch. Weave one row of gold tape yarn, one row 3/8” wide silk georgette, one row gold tape yarn. Edge with flag yarn from the fabric.

Trim 4: Crochet base using gold metallic yarn and size E hook. Chain stitch along each edge with flag yarn from boucle fabric.

Trim 5: Use 3/8” wide bias strips of silk georgette as yarn. Crochet the base. Weave 4 strands pink tinsel yarn plus two strands metallic yarn through. Chain stitch inside the edge with gold metallic yarn.
Hard to make a decision. Possibilities are endless and by making your own trim you can guarantee a perfect match. Two opportunities to further explore French jacket construction and trims: New England Retreat, September 19-24 and Couture Sewing Class, Palm Beach Gardens, FL, January 16-21. 2023. These classes are not limited to making a French jacket but if you choose to work on a jacket, you will receive the identical information presented in the November French jacket class. The classes are small and allow for individualized instruction. You will receive my 100 plus page manual describing construction techniques unique to the French jacket plus an extended session on trims.
Enjoy creating your own unique trims.
What do you do when this extraordinary fabric finds its way to the sewing room?

Here’s the designer dress to clone.


The pattern is a slim fit basic bodice with princess seams ending in the armseye, both front and back. The skirt draft is a flared skirt, split along princess lines and pleats added. Precise pattern matching is critical. The easiest way is to cut every garment section from translucent pattern paper; full front bodice/skirt, right and left bodice/skirt pieces. Lay everything out and be sure the motifs line up before cutting anything.

Notice that the grain lines are centered on each skirt section. The fold and lap lines of pleats are also marked, making it easy to position pattern pieces accurately.
This fabric frayed like CRAZY so each edge was serged using super fine thread; my favorite is Gutermann Scala 360, TEX weight 8. The serged edge adds no bulk and can’t be felt. This fabric was also super resistant to pressing. It folded easily along the crossgrain but required loads of steam plus my large tailors clapper (made from lengths of unfinished hardwood) to convince the seams to lie flat.


I chose a crisp silk taffeta line the skirt but felt it was too stiff for the bodice lining. Silk charmeuse was perfect. Lining extends to the edges of armholes/ neckline and fell stitched in place. For the skirt hem, I cut a 4” wide facing from silk taffeta and applied it to the hem. Edge stitching along the inside of the pleats keeps them in place. French thread tacks keep the skirt lining in place.


Finished!!!
