I’m presenting a couture trim class with the ASG (American Sewing Guild) Atlanta chapter on Friday March 25 and Friday April 1. This is an 8 hour class (split into 2 four hour sessions) which will be presented via internet on Zoom. Both sessions will run 1:30 to 5:30 PM EST. One fee includes both sessions. The class fee also includes the trim kit so you will be able to create the trims along with me. This class was designed exclusively for the Atlanta ASG and open only to their members. The class has a few available openings and I have permission from the Atlanta group to open the remaining spots to my readers.
This trim from a Chanel jacket has always intrigued me and I FINALLY figured out a way to replicate it. It will be demonstrated in this class along with numerous other techniques including Kumihimo braiding.
If you’re interested, go to http://www.asgatlanta.org and register. The class will not be recorded so you will need to be available during class time. Registration will close on March 19 to allow time for your trim kit to be shipped to you.
There will also be a class on couture custom sleeves on Saturday, March 26 from 1:00 PM to 2:30 PM EST if you’re interested.
I will be offering additional trim classes later this spring and summer on my site. Thanks for reading.
A distinctive feature of many French (Chanel) style jackets is the iconic three piece sleeve. Vogue 7975 is a favorite starting pattern for many; however the sleeve is a standard two piece. I’ll go through my method for converting the pattern from a two to three piece sleeve.
First, trace the pattern onto translucent pattern paper. Eliminate the seam allowances. It’s much easier to alter patterns when you aren’t dealing with seam allowances. Make changes to the pattern, then add seam allowances back if you are more comfortable working with patterns which have seam allowances included. Include the marks indicating underarm and shoulder points as well as grain lines. Mark the front and back of the sleeve cap to eliminate confusion.
Working on a grain board/cutting mat makes it easy to keep the pattern properly aligned. Arrange the pattern pieces as shown with grain lines parallel to each other and seam lines just touching along the back armseye seam. Tape or weight the paper so it doesn’t shift.
Using a second sheet of pattern paper large enough for the entire sleeve, trace the shape of the sleeve cap from the underarm point to shoulder point, continuing through the front armseye seam. Mark the underarm and shoulder points. Also draw a line at a 90 degree angle to the grain lines intersecting the underarm point. This line represents the biceps width.
Move the undersleeve pattern to the front, arrange grain lines parallel to each other and trace the remainder of the arsmeye seam to the underarm point.
Also shift the grainline on the upper sleeve section so it is in line with the shoulder point. Connect underarm points with a horizontal line which should be perpendicular to the grainline.
Your draft should look like this:
Draw dashed lines from the underarm points to the hem. They will be parallel to the grainline and be the same distance apart as the biceps width. Measure the distance along the biceps line from back to the new grainline (intersects the shoulder). Measure distance from grainline to front underarm point. Compare the measurements. I’m working with a size 10 pattern. The back measures 7”; front measures 6.5”. Therefore the grainline is offset 1/2” from the midpoint of the front and back underarms. If your pattern size varies slightly, then use the measurements from your size. The additional curves which are mirror images of the armseye seam will be covered in upcoming steps.
Now calculate the sleeve taper from underarm to wrist. Measure the wrist on front and back sleeve sections and add them together for total sleeve wrist measurement. Size 10 is 9 inches. I want to offset the wrist by the same amount of the biceps. Divide 9 by 2 equals 4.5”. Add 1/4” to 4.5” for 4.75” back wrist. Subtract 1/4” from 4.5” for 4.25” front wrist. 4.75” plus 4.25” equals 9” so the total matches amount measured in the previous step.
Also draw in the elbow line. There are various methods for determining the elbow placement. You can measure from underarm to elbow. If you’re not sure, divide the underarm seam in half. Place the elbow about one inch higher than the midpoint.
Where the elbow and underarm seam intersect on the sleeve back, mark a point 1/4” wider than the elbow. Measure the distance from this point to the center grainline. Divide this distance in half (should be about 3 inches). Measure 3/4” down from the elbow line. Draw a line from this point to the halfway point just plotted, forming a dart at the elbow.
At the back wrist, mark a point 3/4” towards the center and 3/4” below the wrist hem. Connect the lower elbow dart leg to this point. The wrist will be shortened 3/4” so 3/4” needs to be added to the front underarm. Draw a line from the elbow to a point 3/4” to the right of the original seam.
Connect the front and back wrist hem with a smooth curve. Also shift the center grainline from elbow line to wrist 3/4” as shown.
Fold the pattern vertically, matching back underarm to grainline. Turn the pattern over with underside up. You will see the armseye curve. Using a red pencil, trace the curve as shown. Repeat for the front.
Now you will draft the narrow under-sleeve. Starting at the underarm, measure 1 and 1/4” to left of grainline; 1 and 1/8” to the right. Move to the elbow line. Measure 1 and 1/4” to the left, 1” to the right. Move to the wrist. Mark 1 and 1/8” left of the angled line, 7/8” to the right. Connect the points to form the under-sleeve. Shown in green.
The under-sleeve now needs to be removed from the outer edges of the back and front sleeve. Measure towards the center of the sleeve on both back and front, the same amounts that were used to draft the under-sleeve. Back underarm, measure in 1 and 1/4”, front underarm 1 and 1/8” towards center. Elbow line 1 and 1/4” along the back, 1” along the front. Wrist 1 and 1/8 at back, 7/8” at front.
This is the right sleeve. The under-sleeve as drafted is for the left sleeve. To create a right side pattern, flip the sleeve draft over and trace the under-sleeve onto pattern paper.
Flip the draft back to the right side and cut the back and front sleeve sections as shown. The elbow dart won’t be sewn as a dart. When constructing the sleeve, you will ease about two inches either side of the dart, drawing up the excess length to match the under-sleeve seam.
Shorten the front sleeve seam about 1/4” and redraw the wrist hem curve. The front seam will be stretched during construction to produce a better curve in the finished sleeve. Yes, the front sleeve seam that attaches to the under-sleeve will be slightly shorter than the corresponding seam on the under-sleeve pattern.
If you want to add sleeve vent for buttons/ trim, tape extensions onto the pattern. I used 1 and 1/2” wide and 4” long. If you want longer vents for more buttons, then just make the vent longer.
The grainline of the undersleeve can be changed to bias providing a little more flexibility in the sleeve.
Want to add a stand collar to your French jacket but don’t have a pattern? Here are easy directions for drafting your own. Two jackets to which I’ve added a stand collar.
Teal jacket has a separating zipper and trim created from fabric fibers and metallic silver yarn. The white jacket has a button closure. Trim made from coordinating and contrasting yarns.
I used Vogue 7975 which has a high round neck. To draft the collar measure the pattern from center back to the shoulder seam. Note that measurement. Then measure from shoulder seam to center front.
Draw lines at right angles to each other in the lower left corner of pattern paper.
Mark the intersection of the two lines CB (center back). Measure to the right of CB the length of CB to shoulder seam as measured on the jacket pattern. Mine was 3 5/8 inches. Be sure to measure the seam line, NOT cut edge. Mark shoulder point.
From the shoulder point measure towards the right the distance from shoulder to center front on the jacket pattern. Mine was 4 1/2 inches. Mark the point as CF (center front).
Draw a line 3/4 inch long up from CF.
Using a French curve draw a smooth curve from the shoulder point to the point 3/4 inch above the bottom line.
Decide how wide you want the collar. I used 1 1/4 inches. Draw a line parallel to the bottom line.
You can leave the top edge square or round off the corner. I use a circle template to determine how I want the curve shaped.
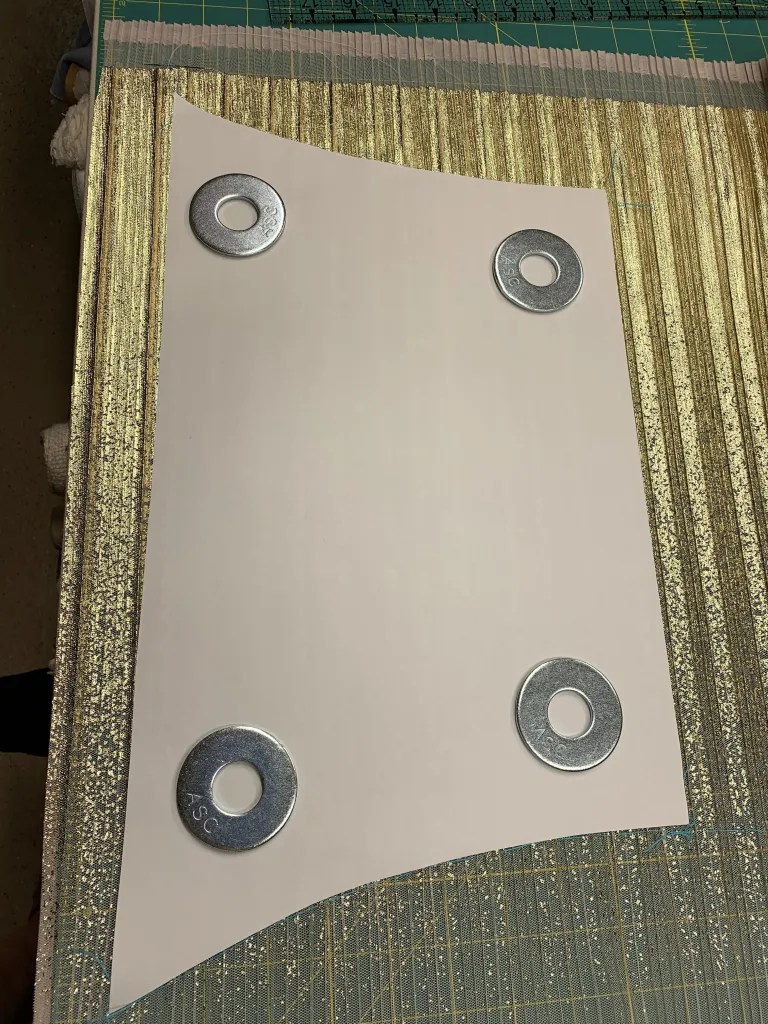
Finished collar pattern. This pattern has no seam allowances. I cut it from card stock so it’s sturdier and can be used as a template for pressing the seam allowances under.
The collar is slightly curved. Rather than cutting the collar so that the horizontal weave of the fabric is interrupted, the couture way of working is to cut a straight strip of fabric on the crossgrain. The fabric is shaped with steam into a curve to match the collar pattern. Position the fabric wrong side up with the neckline seam away from you. Using a steam iron, stretch the upper edge and ease the bottom edge to create a curved strip of fabric. The curve of fabric should match the curve of the collar pattern.
Thread trace the seam lines. To make the curved edges identical use the card stock template to press seam allowances under. A machine basting stitch along the curve can help ease in fullness. Add either fusible or sew-in interfacing. I used fusible for this demo.
Press the seam allowances along the outer edge of the collar under. Don’t press the seam which will join the collar to the jacket. The template will ensure the curved ends are identical. The inside of the collar can be either self fabric or lining. I’ve used self fabric for this inside collar. Attach the outer collar to the jacket along the neckline. Fell stitch the turned under edges of outer and inner collar together.
Next up will be transforming the two piece sleeve of Vogue 7975 into a three piece.
Thank you to all those who registered. The March 1 class sold out within the first day so I’m offering the same class one week later. You can sign up for the March 8 class here. Same time: 5-7:30 PM EST.
UPDATE: The link wasn’t working but it should be fixed. Class half-filled so it did work for some. You can also navigate to the class by going to “Shop” on main page, open Catalog and go to class. Thanks all who alerted me to the problem.
For my readers in Australia: Australia is only accepting Global Express Mail which is more expensive than the Global Priority offered in the shipping options. I’ve sent an email to those interested to see if we can find one person/shipping address. I will send a bulk order which that person can then distribute within Australia. Let me know if you are interested and I’ll put everyone in touch with each other.
I’m thrilled that so many of my readers are interested in exploring custom trims. See you soon.
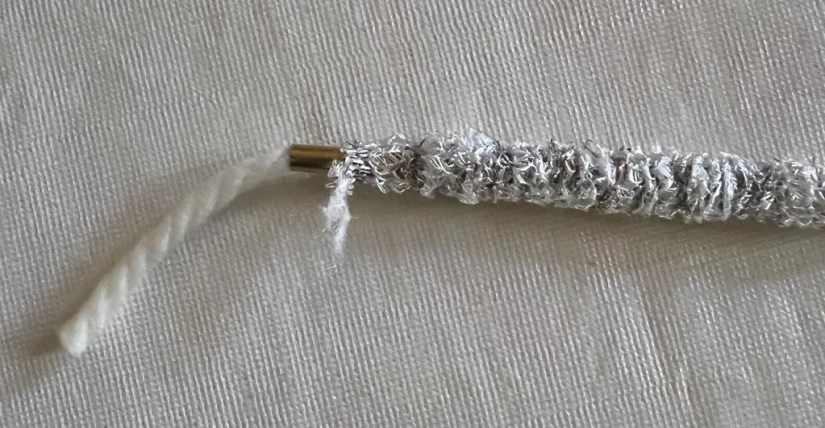
To expand my variations of custom trim, I’ve been experimenting with tubular yarns as well as crocheting with narrow strips of fabric. Many boucles are woven using tubular yarns, such as these two.
I pulled strands of the tubular knit from the fabrics and filled them with bulky wool yarn. Wool yarn works better than acrylic or cotton as it is lofty yet soft and flexible.
The tubes can be woven through a crochet base or braided. A technique for tubes of fabric used as braided trim here. This boucle contained gold tubular yarn as well as multiple other fibers and lent itself to several variations of trim.
You can also find tubular yarns put up in rolls or skeins. Any time I find metallic silver or gold I stock up, as gold/silver compliment many fabrics.
Another interesting technique uses narrow strips of silk georgette fabric to work a chain stitch along the edge of trim. This is a version created from a combination of ivory wool yarn combined with fibers pulled from fabric yardage and edged with a chain stitch of silk georgette. The bias edge of silk frays just enough to create a soft textured finish.
Join me on Tuesday, March 1, from 5-7:30 PM (Eastern standard time) for a hands-on virtual workshop in which we’ll create multiple variations of trim. Sign up (PLEASE NOTE: This link is for the March 8 class. The March 1 class is sold out) through the Cloning Couture Shop. The class is limited to 20 participants. A kit containing crochet hooks, sample boucle fabric plus assorted yarns is available here or you can source your own materials. The class is held via Zoom and will be recorded so if you can’t participate live, the recording will be available. You can also download and re-watch the class as often as you wish.
Here is the jacket I used for demonstration in a recent French Jacket Class. The trim utilizes fibers pulled from the yardage plus silk georgette used as yarn.
I recently had the pleasure of working with a delightful bride and her mother. She had chosen a simple, yet dramatic, gown of heavy white silk crepe. With the fall wedding planned to take place outside in a vineyard, she envisioned a coat to compliment the gown.
I felt attempting to match fabrics was risky. Fortunately, as with most made-to-order gowns, the bride’s mom was able to order matching fabric from the bridal manufacturer. Fashion illustration isn’t my strength but this sketch shows the gown and accompanying coat.
Ordinarily I would start with body measurements to create a custom drafted pattern. Anyone who has done bridal work, knows how much measurements and the bustline can change depending on undergarments. Therefore, the coat needed to be drafted according to measurements taken over the fitted gown. After gown alterations were completed, I put the gown on a mannequin and started drafting the coat.
Here’s the finished pattern with princess seams moved into the armseye and neckline extending from shoulder to waistline. Long slim sleeves will be added. The skirt is quite flared to match the fullness of the gown.
I absolutely LOVE my cutting table. Covered in canvas, 60 inches wide with vertical grain lines in black, horizontal lines in red and diagonals in green. It makes doing layouts for long gowns so easy. It also worked well for aligning the veil.
The bride planned to wear this lovely heirloom veil of intricate lace which was a perfect compliment to the solid crepe gown. We noticed a few small tears in the veil and I felt that attempting to repair them would have resulted in noticeable stitches. The decision was made to back the entire veil with soft tulle. The underlying layer of new tulle would stabilize the fragile netting.
Working on ivory tulle on an ivory canvas background makes seeing your work next to impossible. I often do these projects over a layer of black canvas which makes the work much, much easier on the eyes. The detail of this lace was just amazing. Machine stitching would have been a disaster, so the supporting tulle was hand stitched in place, then trimmed away from the edge.
This fall was a crazy bridal season and I forgot to take process photos during the construction. I did receive these. Perfect for a late fall outdoor wedding. Congratulations! I loved working with you.
Having a dressform that duplicates the figure you’re sewing for makes the process SO much easier! Your model stands perfectly still for hours and doesn’t mind being stuck over and over with pins. She also eliminates the need for multiple in-person fittings, which was a life-saver during the worst days of COVID.
Here’s my process to create this gown which made it’s debut at the recent opening of Carnegie Hall in NYC. The design was inspired by this exquisite pleated tulle from Mendel Goldberg Fabrics.
I start by draping the fabric on the mannequin and experimenting with how it will drape and best positioning of the design. This fabric was meant to have a full skirt with one seam at center back. Additional seaming would have interrupted the flow of fabric. I also secured a full tulle underskirt to the form to get a clear vision of how much fabric was needed for the skirt.
The bodice looked best using the denser side of the lame portion at the neck and semi sheer section along the waist. I tried two versions, one using the sheer tulle for the back, a second option with the gold. I decided on the first option as the sheer back seemed more interesting; the gold back was too much gold. With the skirt basted into a grosgrain ribbon waistband, the design was complete.
Pattern work for front bodice: left photo is 1/2 of front which will be cut with fold at center front. In order to cut it with the neck gathered fuller, I drew 6 evenly spaced lines from neck to waist, left the pattern attached at the waist and spread out along the neck edge until the side seam was parallel to center front. The altered pattern was traced onto a new sheet of paper.
Left photo shows altered pattern on the tulle. Neck is at the top, waist at bottom with center fold at the right edge. Placed on the form, checked for accuracy and waistline thread traced. The back was cut from sheer portion of the tulle with pleating running vertically.
Basted everything together for a final fit check. I opted to finish the neckline with a stand collar of gathered tulle cut from the gold portion. A zipper in both underskirt and tulle allows the outer layer of tulle to hang freely; attaching it to the inner layers resulted in unattractive pulling. An inner waistband of grosgrain ribbon holds everything in place and supports the weight of the skirt.
Final try-on in the studio; fit was perfect on the first go thanks to a custom form and worn for gala night out.
I’ve been working on additional trim ideas to customize and embellish your custom French jacket. Alice, of Mendel Goldberg Fabrics in NYC, sent me a generous sampling of her new fall boucles to play with.
Sampling of new boucles available at Mendel Goldberg
When creating custom trim, the possibilities are almost endless. Here’s a few variations I came up with for one fabric. I used varying textures of black yarn combined with fibers pulled from the fabric to create coordinated trims.
This trim also utilizes fibers from the boucle as well as a textured grey and white yarn.
To make this trim, I made a crochet chain, turned and worked a double crochet in each stitch. Inserted a large Trim Tube (available in my shop) and steamed to even out the stitches. Then, using a smaller size tube, wove through the chain and inserted a metallic fiber from the boucle. After nudging the metallic ribbon to one side, wove the tube through again, alternating the up and down weave, and threaded a second metallic ribbon through.
For the trim with fringing, I cut a narrow band of boucle fabric and pulled threads from each side. The crochet band was accented with a row of chain stitches on each side using grey yarn pulled from the fabric. Stitch on top of the fringed strip for the completed trim. A second variation uses chain stitching with black/white yarn around the outer edge. I prefer the softer look of the fringed version.
Here’s another idea to coordinate with this open weave ivory with gold and silver metallic threads. The version on the left is crocheted with narrow strips of silk georgette fabric bias cut 1cm wide and used as yarn. The version on the right uses wool/angora yarn. A chain of gold and silver metallic yarn is threaded through the crochet chain.
I’m also experimenting with adding pearls to the trim.
Pink metallic pearls combined with black textured yarn to compliment this black/pink boucle fabric
Finally, while sleuth shopping in Chanel boutiques, I found this jacket and was drawn to the unique use of ribbons and yarns in the weave. It’s listed for $$$ on EBay (untrimmed version) but stumbled across a VERY similar fabric on Etsy.
If you’re interested in a 6 day class focused on creating your own unique jacket and trim, join me in Palm Beach Gardens, FL from November 8-13, 2021. Details can be found in the shop under Classes.
I’ve created a new category on my main menu which will be links to free patterns, sewing/workroom tips, and other topics which readers may wish to refer back to. Not everything is linked yet but will be updated as soon as I organize. Having everything listed under one category will eliminate the need to search through past posts.
Here’s my pattern for a shoulder pad I designed several years ago. I love the shape of this shoulder pad as it has a built-in sleeve head and you can vary the thickness according to your needs. I’ve started making these using wool felt (which is available at JoAnns Fabrics) for a very couture shoulder pad. The wool felt is not inexpensive but one yard goes a long way and it’s a perfect use for the discount coupon. Cotton quilt batting also works well.
Several years ago I began experimenting with techniques for a better pattern match along the princess seams of the French jacket. Here’s a photo and link to the post explaining my approach.
Since then, I’ve continued to refine the method. It’s easy to achieve this match across the upper chest on model shapes but what about figures that have more curves? I started by giving one of my mannequins a much curvier (about a G cup) body and started playing with the fabric.