couture sewing

Luxury RTW and More

To celebrate a friend’s birthday we did a “girls day” in NYC. Although none of my friends are sewers we all enjoyed the current exhibit at the Anna Wintour Costume Exhibit. The theme was “Death Becomes Her”; a display of mourning wear through the last couple of centuries. We were lucky enough to plan our trip for opening day and were treated to a private showing of the exhibit. My photos were terrible and no flash allowed; much better shots here. The moire fabric in photo 7 was spectacular.

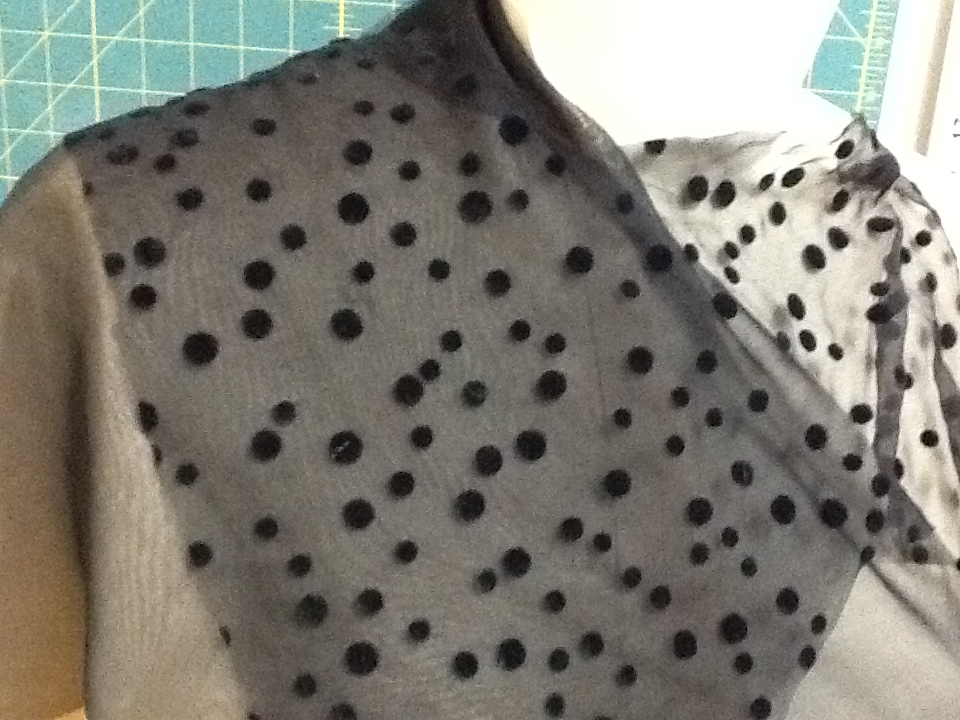
After the museum we wandered our way up Madison Ave. and stopped in a very upscale resale shop. Chanel dominated the racks! Even at resale prices, my shopping splurge in Paris for Chanel fabrics looked like a downright bargain. I was able to get some shots of garments and even got inside a few.

Black Chanel Jacket

White Chanel JacketHoundstoothBlouse and RoseRose
I’m working on a clone of this flower pin. Here’s a back view.
Rose Back
Inside Houndstooth
The houndstooth jacket was lined only in the sleeves. Seams were turned so they were hidden by the lining. The seams in the jacket body were serged and turned under, making a very clean finish inside.
Blouse Back
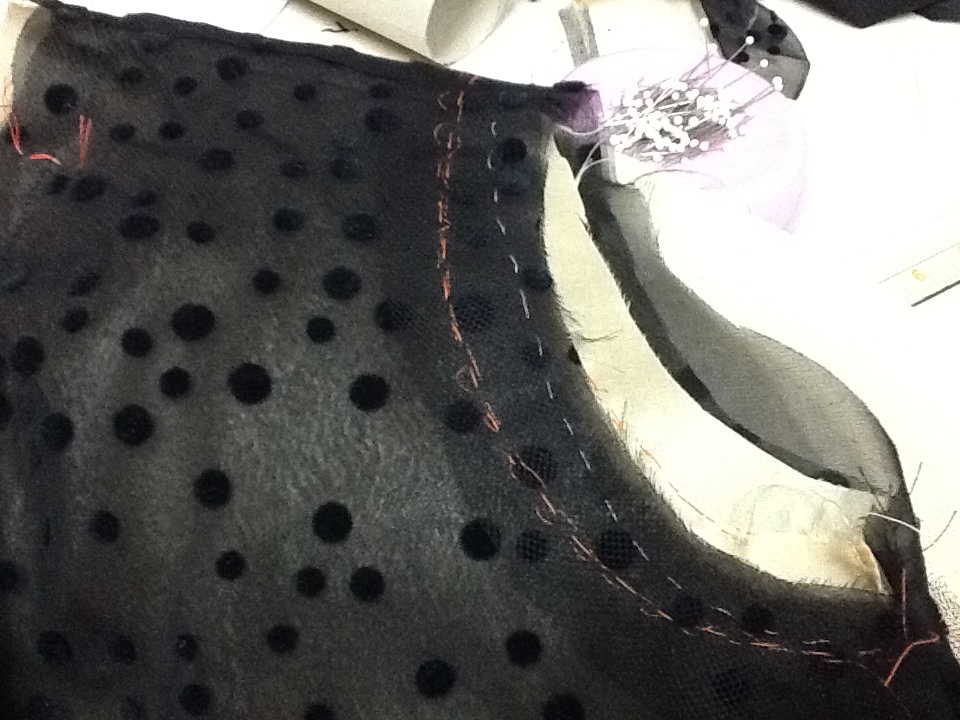
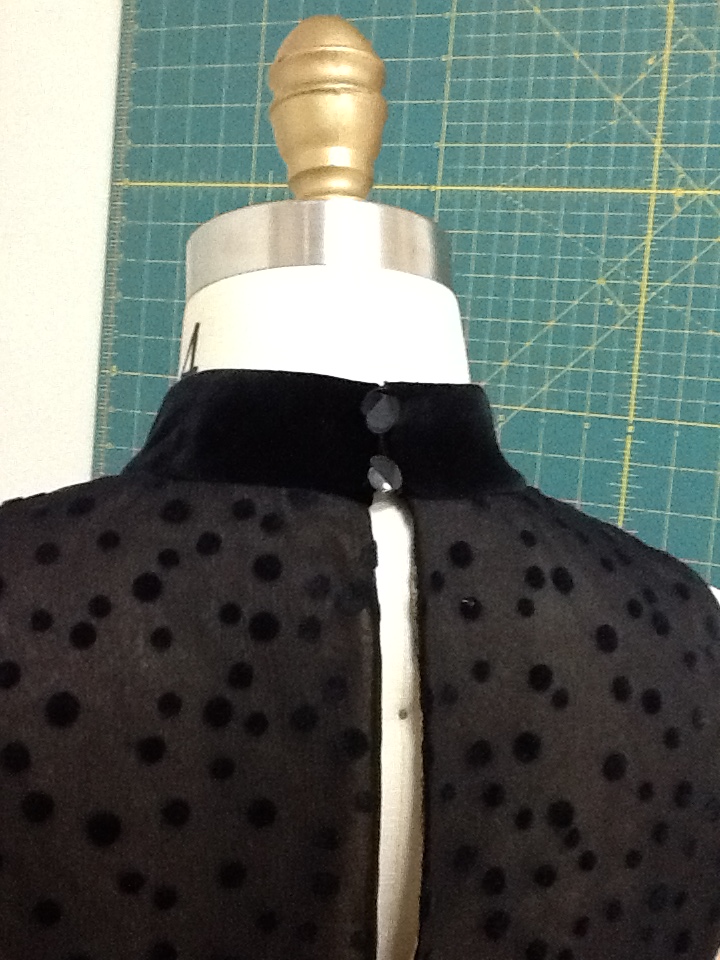
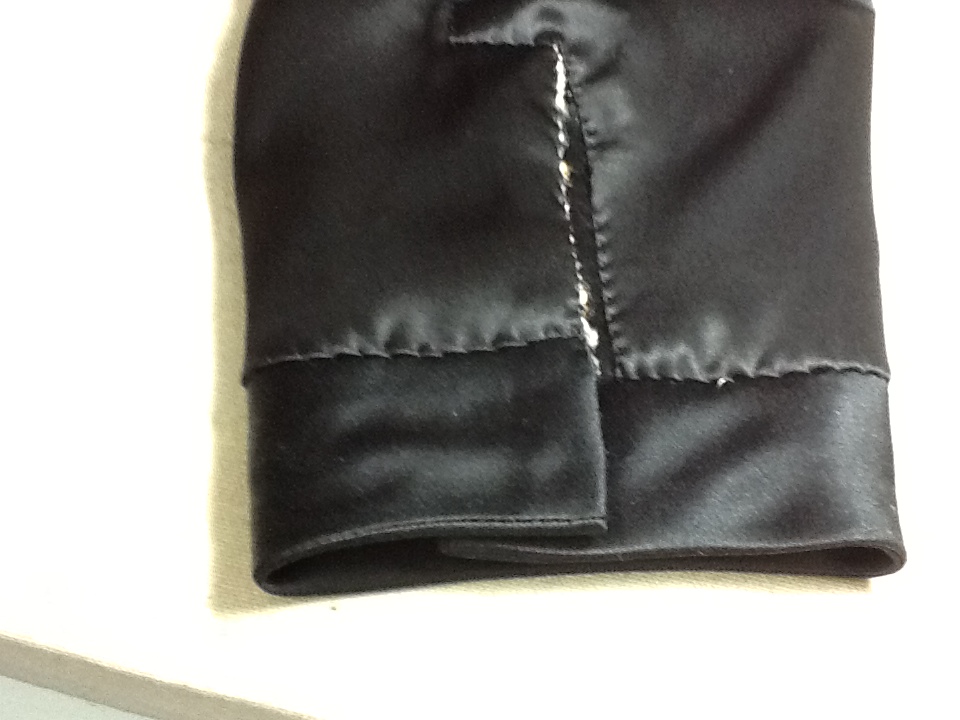
The black silk blouse had a back neck opening constructed like a shirt sleeve placket.
Lining Seams
Seams, even in the linings, were generous. The garment sections had all been serged before sewing together; makes for easier alterations and with the generous seam allowances, the salesladies assured us that the jackets could be altered three sizes up or down.
Chanel Braid
Chanel braid looks like a bias strip of fabric frayed and sewn on as trim.
Valentino Ribbon
A Valentino design with amazing pleated ribbon detail. Crystal drops were sewn in between each pleat.
Zipper Finish
Even zippers were carefully finished on the linings.
Jacket Shoulder
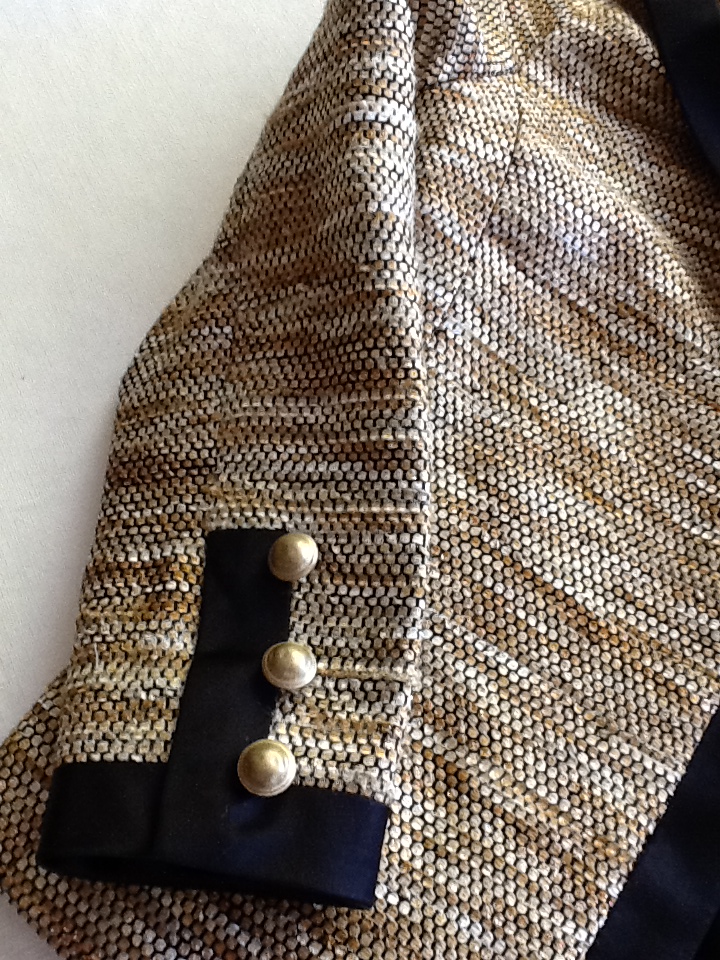
The jacket sleeve seam and shoulder pads were impeccable and created the shoulder line Chanel is known for. Note how the shoulder seam is pressed open at the top. The shoulder pads have a unique shape. I managed to dissect a couple of different ones.
Pattern 1
Here is the pattern for one. These are not bulky, oversized pads but provide just subtle lift and shaping for the shoulder, Notice how the pad is constructed to extend into the sleeve and provide support. I tried to convert the pattern to a pdf file but the sizing got wonky no matter how I did it. I think it will print at the correct size if you just print the photo on a 8.5 by 11 inch sheet and don’t allow scaling. Let me know if this doesn’t work and I will email you the file, hopefully in the correct size.

I used cotton quilt batting. Pieces cut and marked with placement  lines.P1000229
P1000230
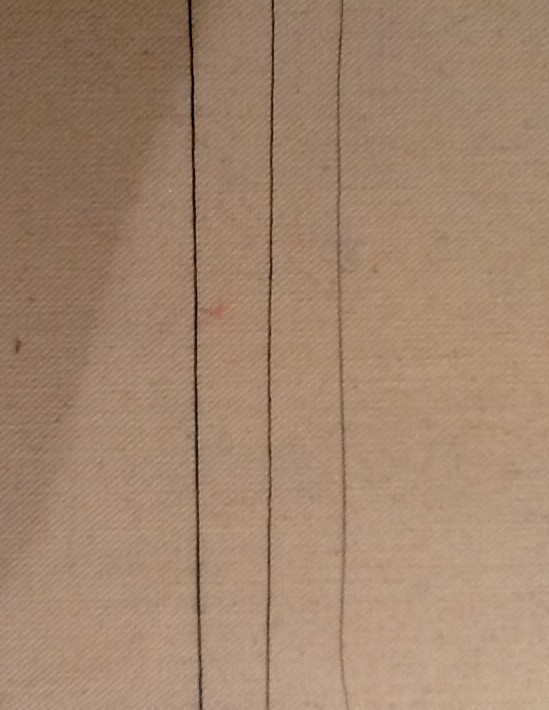
Mark the shoulder pad back and notches.
P1000231
Stitch piece 1 and 2 together. I used a 5.0 mm wide three step zig-zig stitch. Start and one end, butt the edges together and sew, butting the edges together as you sew. The pad will take on a curved shape.
P1000232
P1000233
P1000234
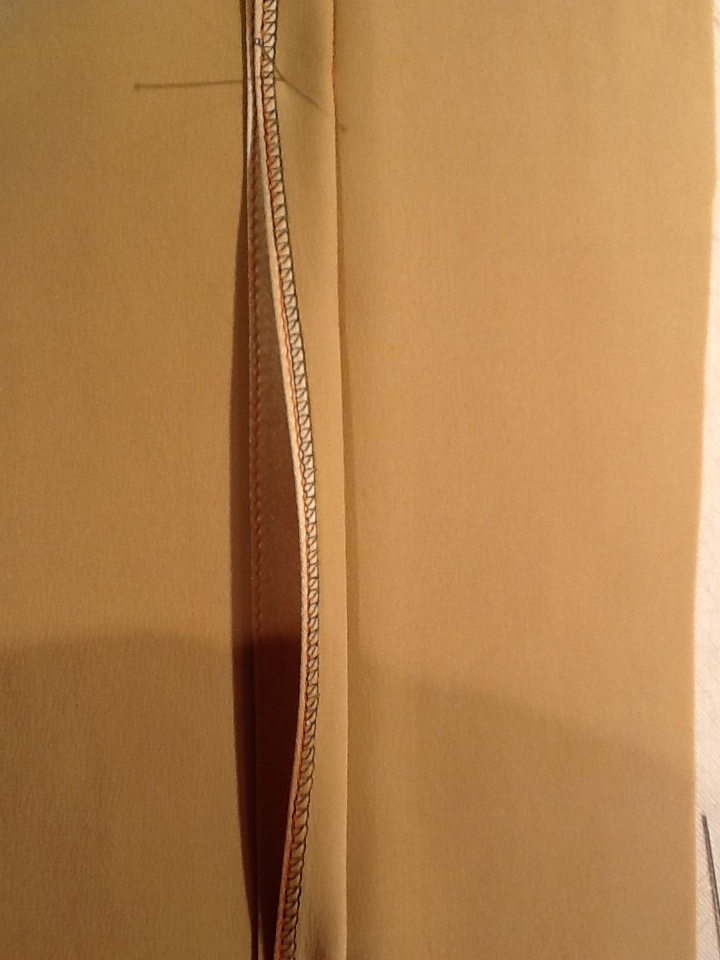
Section 4 will fold with the edges offset. Place the folded edge along the placement line on piece 3 with the narrower side up towards you. You want the layers to be graduated with the larger parts towards the outer side of the pad. Open the fold and stitch on the line. Fold back in place. Your piece should look like this:
P1000235
P1000236
Position sections 3 and 4 along the seam line of 1 and 2.
P1000237
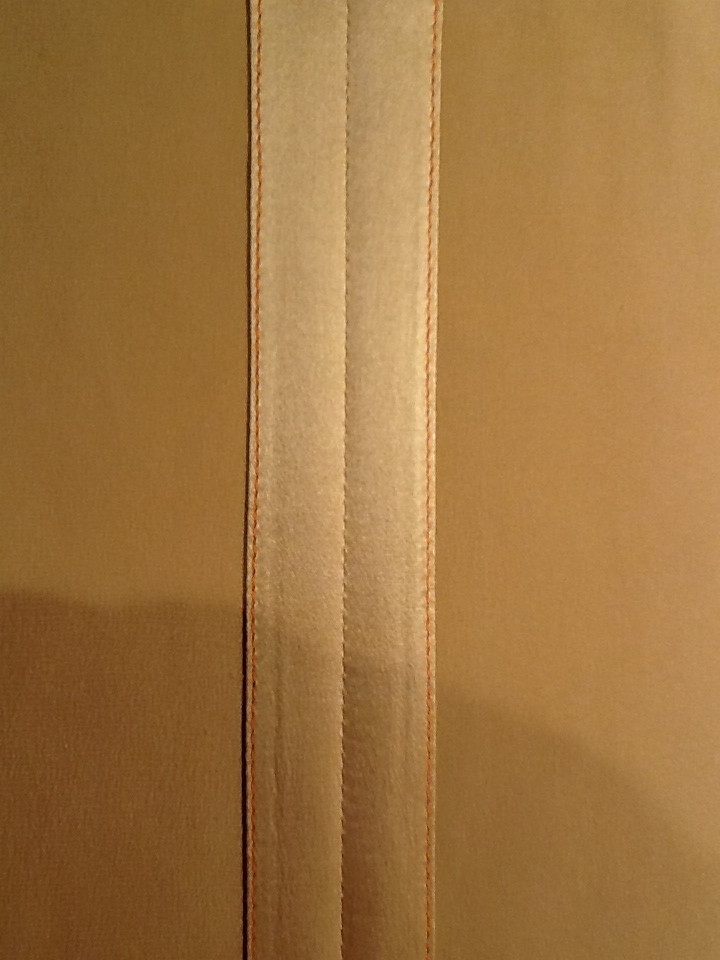
Turn and place a few pins on the outside of the pad to hold the layers together.
P1000238
Stitch the darts closed on piece 5 using the three step zig-zag stitch. Place it on the underside of the pad.
P1000242
Stitch the dart in piece 6 and add it to the underside of the pad. Be sure the edges are staggered.
P1000244
Place the pad on a ham and steam. The steam will compress the batting and start holding things together.
P1000245
Using a length of doubled thread, stab stitch the layers together. Don’t pull the thread tight as you don’t want dimples in your shoulder pad.
P1000247
Add a line of stitches along the seam line where you have multiple layers. You don’t want this coming apart inside the finished jacket.
P1000249
Put back on the ham and give it a good steam to meld the layers together. The finished pad. Notice how it isn’t huge and gives support to the top of the sleeve.
P1000251
Another style I discovered. This one is even easier to make.
Pattern 2
Pattern 3
Sew pieces 1 and 2 together with the zig-zag stitch, matching notches. Notice how the neck edge is longer in the back.
Piece 3 is placed inside and then piece 4.
P1000253
Sew the dart in section 5 closed and place.
P1000255
Steam over the ham, stab stitch the layers together, and steam again.
P1000256
P1000257
Notice how the shoulder pad extends to the neckline seam.
A few readers have asked about adding shoulder pads to a Chanel style jacket. The jacket construction does not allow for internal pads, but you could cover a set with the lining fabric and tack them into the finished jacket. Some figures just look better with a little more lift at the shoulder.
I did see one quilted jacket at the shop. I couldn’t snag photos as it was carefully guarded by the salesladies. From what I could tell it was well within the skill level of many home sewers. The silk charmeuse lining was a vibrant print and the colors in the lining echoed the boucle. The trim was constructed using fibers from the jacket fabric.
We ended our “girls evening” with dinner and a painting class. We were required to purchase two glasses of wine during class so the paintings are being saved for an appropriate event.

Notes on downloading the shoulder pad patterns:
Printing directly from the photo won’t give you the correct size. Right click the pattern photos, save as a jpeg file. Open with a program allowing you to resize. You will have the correct scale if Piece number 1 measures 4 and 13/16 wide for the first pattern and 5 inches for the second.
P1000258
P1000259
I tried several pdf converters but nothing gave the correct scale. I’m open to suggestions if you have experience.

couture sewing

Inside Chanel

Ever wanted to see inside luxury ready to wear and compare the construction techniques to yours?  Here is a glimpse inside a few pieces of Chanel and other luxury garments.  These aren’t technically couture as there are no fittings and they aren’t made for an individual client but some of the techniques are worth considering using in your sewing.

I found more hand sewing than in most ready to wear.  The hems are sewn by hand using a catch stitch. Jacket linings are completely sewn together before inserting but are hand tacked along the shoulders and underarm point.  The jump pleat at the hem is slip stitched by hand.

Chanel Hem

Closeup view of the jacket hem. Notice the hand stitching and how it is placed.

I noticed loads of serged edges. All garment and lining pieces are individually serged along all sides(except the armhole seam). In couture sewing, sergers are generally a big no-no. Raw edges are hand overcast but how time consuming is that! The difference is that an extremely fine thread is used; no wooly nylon or what is sold as serger thread.
Chanel Dress Pieces
The pockets and pocket flaps on this Chanel dress were slipstitched by hand. They are removed here for alterations.
White Jacket
Pink Chanel Overlock
Here is a Pucci dress using the same fine thread to finish the seams.
Pucci Dress
Also note the wide seam allowances. Most are at least 3/4 inch and some are 1″ to 1 1/4″. Linings have the same generous seams.
Chanel Lining Overlock
So what kind of thread and where to buy? Oshman Brothers in NYC is one source. You are looking for Gutermann Skala U81. I also have the U151 which is slightly thicker but the U81 is the thinnest thread I have ever seen.
Thread
The thread on the left is Gutermann 100 sewing thread, middle is Skala U151 and right is Skala U81.
Another source is Bergen Tailor Supply.
Also you need to set your serger for a narrow three thread stitch. On mine this is done by removing the left needle and using the three thread narrow hem but loosening the tensions. You’ll need to play with your serger settings and once you discover what works, write it down. I have it on a post-it note next to the machine.
For unlined garments I noticed the edges were serged, turned under and stitched. Here is a test on silk charmeuse using the Skala U81 thread.
Serger Sample 1
The serged edge is turned to the wrong side and edge stitched.
Serger Sample 3
Finished seam pressed open. Put strips of brown paper under the seams to prevent any press marks on the right side.
Serger Sample 2
This seam finish wasn’t limited to silk blouses. Here is an unlined Chanel jacket of silk and linen check. The jacket seams were serged, turned under and stitched. The sleeves were lined to make the garment easy to slip on and off.
Chanel Plaid Unlined Jacket
Sleeves are a whole topic of their own and I will delve more into that with the next post. Interesting the way the top sleeve seam is pressed open for about two inches each side of center at the sleeve cap. The armhole is stayed with narrow, lightweight bias tape and the shoulder pad incorporates a sleeve head.
Chanel Shoulder Pad
Exploring the Chanel shoulder and armhole led to a self-taught course on sleeve drafting, fitting and how to achieve that high, slim Chanel sleeve. More about that to follow.

Meanwhile I did manage to get Style Arc Franki dress finished and incorporated some of my new-found finishes.
Style Arc 4

I used a linen knit and lined with bias-cut silk charmeuse. The lining extended to the armhole edges where it is fell stitched, eliminating facings. I used the fine overlock thread for seam finishes and also used it for a slipstitched hem on the silk lining.
Style Arc 2
Style Arc 5
Hope you enjoy. Mary

couture sewing, Dress Forms

The Dress Form in Action

Here it is, the first dress created with the help of my new custom molded dress form. This would have been next to impossible to get right without the help of a perfect body double. Much of the work took place on the back. I needed a semi-formal dress for a destination wedding in the Bahamas. The bride requested all guests wear white. Although the ceremony was beachside, the reception called for semi-formal attire. Try buying something that fits that bill.

Ceremony on the Beach

I created a version of the Dior design worn by Nicole Kidman some years ago. I thread traced the seam lines into white 4 ply silk crepe and embroidered floral designs on the front using multiple hoopings. Since embroidery can cause the fabric to shrink and/or pucker, check the seam lines against the pattern after all embroidery is finished.Full Length View


Silver metallic mesh was positioned on the back and I printed templates of the embroidery designs on transparent film to finalize the design. The embroidery designs were placed to create a picture frame effect around the metallic mesh. The mesh was somewhat stretchy and having the dress on the form made getting the placement so much easier.

Back View

Another view of the back with skin toned fabric underneath. The zipper is hidden in the left side seam.

Back EmbroideryLiningAs this was to be worn in the tropics, I chose a fine Swiss cotton jersey for the lining. This was comfortable to wear and provided opacity so that the hot pink skirt lining did not show through. To attach the lining I put the dress on the form inside out and fitted the lining around the neck, armholes and back.

Back Lining

Finally a hot pink lining for the lower skirt which shows when walking.

Skirt Lining

dress 5

This is entered in the SewStylish Spring fashion Challenge at Threads Magazine.

couture sewing

Marfy Top Chiffon Version

chiffon topOne more version of the free Marfy top pattern before I retire it for awhile. I needed a simple black top for under suits and this seemed to fit the bill. The flocked silk chiffon is from B&J Fabrics in NYC ( bandj.com ). Using this fabric without lining was out of the question. I’m not into that see-through of a look.silk chiffon
I tried a layer of flesh tone china silk but wanted a softer effect.
chiffon and nude
Tried a black lining but that muted the dotted pattern too much. It looks much darker than the photo shows.
over black
Finally the right combination was to underline the dotted chiffon with a layer of plain black silk chiffon and use the nude chink silk as a lining.
three layers
I also chose to extend the shoulder about an inch for less of a cutaway armhole.
extended shoulder
I basted the two layers of chiffon together and seamed them using French seams. The lining was also stitched at the shoulders and sides with French seams. Baste all layers together before finishing the armhole, back opening and collar. I used silk tulle to create armhole facings. If you’ve never worked with silk tulle before it truly is a magic fabric. I use it to underline laces, stabilize seams and do loads of other finishes where you don’t want any added bulk. It is PRICEY and few shops carry it. It is available in black and off white but dyes easily if you need a special color. Expect to pay $125 to $160 per yard but I save every scrap as it can be used for so many things.
The tulle will stretch more in one direction than the other, (no need to cut it on the bias) so cut two pieces (one for each armhole) two inches wide and longer than the length of the armhole seam. Fold it in half and press. armhole shape tracing
I use a scrap of muslin and trace the armhole shape (no seams) onto the muslin with a waterproof fine point sharpie. You don’t want water soluble ink coming off when you steam. Then shape the tulle to match the traced edge. The folded side goes towards what will be the inside of the garment.
shaping silk tulle
Now you have a perfectly shaped strip to use as the armhole facing. Sew, understitch and press. Tack it to the lining being careful not to catch the face fabric.
facing basted
Inside of the finished top showing edge finishes.
tull binding
The back opening is a slit finished the same way with a narrow strip of silk tulle cut on the straight grain.
back opening
I completed the top with a velvet neckband, buttons and handworked thread loops. The fabric layers are joined together at the side seams with French tacks.
inside french tack
And the back view.
back view

couture sewing

Marfy 3182 Continued

I’ll give more info about changing the sleeve bands.  This is a long, detailed post so skip to the end if you would just like to see the finished photos.

I decided I would like the sleeve trim to extend to the vent rather than just a band encircling the hem. I chose black silk peau de soie for the trim on this jacket. Peau de soie has a satin weave and is moderately stiff so it will provide the support necessary for the collar and cuffs. The silk version behaves much differently than polyester so be sure you are buying the real thing.

sleeve trim layout - Copy

I made the trim slightly narrower than the Marfy pattern, decreasing the width from 1 and 3/8 to 1 and 1/8 inches. I also narrowed the trim bands around the neck and front to match.  Not a big change but I felt it looked better. Here is the new pattern with circles for the buttons so I can visualize the finished look. I use paper towels or shop rags for this. They are flexible,cheap, can be written on, pressed and don’t tear easily.

Completed pattern and marking the peau de soie trim. Cut it on the true bias so it curves smoothly.

satin trim layout - CopyI allowed 1/2 inch seams.  Cut 2 for the right side and 2 for the facing side. I allowed wider seams at the upper edge of the facing pieces so the sleeve lining can be sewn to them. Press on a quality fusible interfacing, also cut on the bias. Peau de soie curls like crazy but the fusible will tame it. I used satin weave fusible here.

peau de soie curling

Next take your pattern back to the sleeves. You will sew the underarm seam first. It’s much easier to work on this before the sleeves are set into the jacket. Now mark exactly where the trim will be and staystitch on that line.

staystitching first
Just a quick note about my serged edges. Sergers are generally a BIG no-no in couture sewing. I do use one for certain things. This fabric was so loosely woven it ravelled like crazy and I’m not sure hand overcasting would have kept it together.  I serge only the face fabric after basting to the underlining. This ensures the serging won’t distort the fabric. I use fine cotton embroidery thread, a three thread stitch and set to the longest length possible. This gives a very flexible fine edge and doesn’t destroy the drape of the fabric. Note how the underlining is turned back and I am only catching the outer layer.
serging
Next staystitch the trim exactly on the stitching line. Stitch only the inner edge; I will double check the trim width after sewing it to the sleeve and readjust my seam lines if necessary to have an even width band.first stay of facing
Now carefully line up your seams and stitch the long edge of the trim to the sleeve. Don’t cross seams; leave long thread tails and tie them off. You might not think this would make a big difference but it really does. Seams will press much easier and the garment won’t be stiff, especially where multiple seams cross. Takes more time but it really is worth it.
trim stitch 4
Work your way around the trim, stitching each segment after lining up the seams. Make sure you cross the corners at a sharp angle to give a clean line to the finished trim.
trim stitch 2 - Copy
finished first step
Double check that your bottom edge seam is an even width all the way around and remark if necessary. Now you need to apply stay tape to that bottom edge (remember this is cut on the bias) so your hem doesn’t grow. There are commercial tapes and some books suggest using the selvages of silk organza but I have found this too stiff. Make your own by cutting bias strips of china silk. Pin one end down to your pressing surface and pull hard on the other end while hitting it with a good blast of steam. You will feel the fibers release and stretch. Pin the other end down and let it cool. Steam and stretch again to make sure you have stretched it as much as possible. Don’t unpin until it’s totally dry and cold! You will have the best stay tape that’s fine, flexible and won’t show through to the right side. I cut 1/2 inch strips and wind up with stay tape about 1/4 inch wide.
trim stitch 6
One more quick pressing note. I dislike using a spray bottle as it’s tough to control where all that water goes; not good if you’re working on silks. I use a cheap chip brush and brush water on top of my press cloth exactly where I want steam, then press dry without using steam. Much more control as to where you are putting steam. Then weight the seam (I’m using an old, heavy iron, not plugged in of course) and let it sit until cold. Amazing how much flatter you can get bulky fabric using this technique.pressing 1
pressing 2
pressing 3
Now attach the facing to the lower edge. Notice how this is wider than the 1 and 1/8 on the right side. This gives me room to sew the sleeve lining high enough that it doesn’t peek out. Sew only the lower edge as I’ll show you how to turn the corner and get it perfectly sharp and straight.
sleeve facing 1 - Copy
Press the seam open and then turn all layers away from the right side.
turning corner 1
Now fold the right sides together keeping all the seam allowances to the wrong side.
turning corner 3
Stitch and press open using a point presser.point presser
Some books tell you to trim the fabric at an angle but I’ve found I get much sharper corners if I don’t trim anything. Insert a point turner or I use a pair of blunt end scissors or not too pointy knitting needle and turn the corner. Carefully work the fabric over your instrument until the fabric forms a sharp corner. Work carefully as you don’t want to poke through.turning corner 5
If the fabric bunches up and won’t cooperate turn everything wrong side out and try again. Try placing your turning instrument next to the inside of the right side and turning the seam over.

The completed sleeve:trim finishedAnd a closeup of the finished sleeve:

Cuff detail
Cuff detail

This side was just off. Notice the stitching line at the top of the trim is slanted.
mistake
I do try and fix these little details. Maybe someone else woundn’t notice but I know it’s there and it would bug me.  The top edge unpicked and restitched.
mistake fixedInside the finished sleeve with lining hand stitched around the vent.
inside ventI’m still not sure about the buttons. I need to wear this tonight and this was all Joann’s had. I tried black but everything had a rough surface which I was afraid would snag the peau de soie trim. Also undecided about whether or not to have the buttons contrast.  I’ll wear it for awhile and reevaluate when I can get to M&J or other source. Also, the front buttonholes are just openings in the seam which joins the trim band to the jacket. That makes them invisible; it was just a bit tricky getting all the layers to line up so the openings were in the same place on both sides. I then slipstitched all layers together around the buttonhole edges.

Photos of the finished work

finished 2
Collar worn folded down or flipped up.
finished 3
This pattern could also be made as a quilted unstructured jacket and I would make the following changes:
Eliminate the collar and trim
Raise the underarm an inch or so
Eliminate all facings and canvas interfacings
The front neckline might need to be raised/reshaped
Take at least an inch off the sleeve width.
Here is my test version in polar fleece and I think it will work out nicely as a quilted jacket.
test version
I liked the raglan sleeve lines on this and will try and get a quilted version started before too long.

couture sewing

Pleating Detail for Marfy Top

I’ve received a few requests to elaborate on how I pleated the front neckline of the Marfy top pattern. Here is the step-by-step process.

Full size muslin front

The top front cut in muslin. I’ve marked the seam lines. Starting at the center front, mark 1 and 1/4 inches away from the center front on both sides. Label both these marks and the center front “A.” Make another mark 1/2 inch away from “A” on both sides. Label this mark “B.” Another mark 7/8 inch away from “B” and this is also labeled “B.” Another mark 1/2 inch away from the second “B” and this is “C.” Finally measure out 7/8 inch from “C” and mark another “C.” Your top should look like this.
pleat 2
pleat 3

Now bring both “A”s together meeting at the center front.
pleat 4
Fold another pleat so the “B”s meet.
pleat 5
Then the “C”s. Do this on both sides of center front.
pleat 8
Finished pleating. Baste on the seamline. Don’t press flat. The inverted pleat at the center front prevents the fabric from poufing out too much. I liked this look better than gathers. I hope this make sense. If not let me know what is unclear. Thanks for all your comments.

couture sewing

Marfy Top

Here is my version of Marfy 1913, a free Marfy pattern offered on their website. Leisa from A Challenging Sew.com started a sewalong using the free Marfy patterns. Sarah on Goodbye Valentino.com is also following the sewalong and has posted her interpretations of the top. Sarah has also started the Ready-to-wear Fast and participants pledge to refrain from buying ready to wear clothing during the year. I figured it was a perfect opportunity for me to make a dent in my fabric stash.

I am a fan of Marfy patterns as they are expertly drafted and don’t have the immense amounts of ease that most patterns have. The styling is up to date and they don’t include seam allowances, which drive me batty. Once you get used to using patterns with no seam allowances, you’ll never go back.

I found a length of about 3/4 yard of an exqusite Leonard silk print in my stash which was perfect for the high collared, cutaway armhole top.

Leonard print
Leonard print

Leonard prints have a distinctive narrow border running along one edge. My goal was to incorporate the border as trim.

Trim edge of a Leonard print

The decorative border is broken by a white line every 0.5 meters and I had only about 0.75 meters so the trim would be limited. I decided to use it as a top border around the high collar and miter the edge. Since the border was along the lengthwise grain I wasn’t sure if I could curve it to match the pattern.

I disliked the fullness created by gathering the neck edge and decided that inverted pleats would give fullness yet lie smother. I experimented with the muslin and came up with the following measurments for pleating. There was 3 inches excess fabric each side of the front neck; total of 6 inches. The pleats took out 1 and 1/4 inches at the center front, space of 1/2 inch; then 7/8 inch taken out, another 1/2 inch space; another 7/8 inch out. Here is the redrafted front neck with pleating marked in red.neck pleats

I also decided to eliminate the back opening and close the neck with tiny self-covered buttons. I shifted the left shoulder seam 1 inch towards the front. This was accomplished by trimming 1 inch off the left front shoulder and adding it to the left back shoulder. This shifted the buttons slightly forward making it easier to button once on the body and also looks better than having the buttons at the exact top of the shoulder.

altered pattern all pieces

The collar pattern was also redrafted to shift the opening 1 inch forward of the left shoulder seam. I cut a full collar pattern from paper, taped it together at the center fronts and center backs and cut 1 inch forward of the left shoulder mark.

The collar was the most time-consuming part of this project. The border was cut, pressed under and steam shaped to match the curvature of the upper collar line. It was basted and then machine stitched into place. The top corner was mitered.

Shaping the trim with steam
Completed collar
Completed collar

I used the paper collar pattern to accurately stay-stitch the lower edge of the collar where it attaches to the blouse.

Staystitching along the paper pattern

To form button loops, bias strips of of fabric are folded right sides together and stitched about 1/8 inch from the folded edge. Stretch while stitching.  Trim the seam to 1/8 inch and turn. Pin one end of the narrow strip to your presing surface and stretch while steaming. You will have a narrow tube of fabric which is used for the button loops.

Button Loops hand tacked into place

Tack the loops into place allowing just enough room for the button to pass through. I used two on the collar and three on the shoulder. My buttons are 9/16 in diameter.

Armhole binding
Armhole binding

I used a fine cord to form piping around the armholes and finished the edges with a strip of black silk tulle which was doubled before attaching. After pressing the tulle was tacked at the shoulder and side seams. It stays in place with no further stitching. French seams close the shoulder and side seams. Rather than use elastic at the bottom edge, I opted to attach a band about 2 inches wide and pleat the excess fabric into the band.

Here is the finished product. This Marfy pattern can be as simple or complicated as you want. Made with plain seams, narrowly hemmed armseyes and a back slit opening, this can be completed in a couple of hours. The elastic at the bottom can be eliminated if you want to tuck it into a waistband or simply leave it loose. The pattern can also be a canvas for intricate details.

Finished Top
Finished Top


full length


couture sewing

First Project of the New Year

I joined the Ready-to-Wear Fast on GoodbyeValentino.com. It is a pledge to refrain from ready-to wear clothing for this year. What a great idea and it will also motivate me to use up some of my ever growing fabric stash!
While in Paris and London over the holidays I couldn’t help but notice that everything was devoid of color. All black and white-everywhere!
20131225_222932
20131225_223011
20131225_223016
20131225_223121
20131225_223201 20131226_113513

I found a lovely piece of wool, angora and rabbit hair double cloth in my fabric stash and decided it would make a fabulous cape. Amazingly it was black and white. Double cloth is two layers of fabric, usually contrasting colors or textures, woven together. Seaming this fabric is time consuming but the result is a truly reversible garment. After cutting the pattern pieces, the edges of the fabric need to be separated. This can be maddingly laborious so I usually do it while watching TV. The fabric edges need to be peeled apart for a little more than double the seam allowance.
double cloth seam 4
Seam the face side of the fabric together in the usual manner. Press open. Then turn under both edges of the reverse fabric side and slip stitch.

double cloth seam 1double cloth seam 3

I wanted bound buttonholes for the front closure. The two fabric layers were peeled apart for about 3 inches along the center front. This gave me room to construct buttonholes. I like my bound buttonholes to be between 1/4 and 3/8 inch wide. Too wide and they don’t look professional. The lips of the buttonholes were formed from a single layer of the black fabric. On the facing side, I stitched a rectangle of white silk organza to the white facing side of the buttonholes. Turn and press and hand stitch to the reverse side of the buttonhole.

buttonhole closeup 2buttonhole closeup

Next was drafting a collar. I used scrap fleece which was the same weight and body as the double cloth. I draped a collar and will show the construction and finishing in the next post.
cape collar draft
This is how the cape is progressing.
cape with collar draft
A shot of the reverse side of the buttonholes.
cape buttonholes

couture sewing

New Year; New Projects

Finally back after a busy holiday season. I got a special holiday treat of fabric shopping in Paris and London. Janssen & Janssen in Paris was the absolute highlight of the trip for me. While drooling over the exquisite fabrics there, I met fellow blogger Julie from jetsetsewing.com. Check our her site as she posted some great pics of the inside of Janssen.
Janssen does have the most georgeous fabrics in the world with prices to match. Fortunately I had the good sense to take my husband shopping at Chanel first, so the cost of fabric to make my own Chanel jackets seemed like a virtual steal! The trims were equally pricy but unlike anything else. Some of my selections:2014-01-03 09.04.27
Also some of my fabrics:2014-01-03 09.02.22

2014-01-03 09.01.11

I also managed to complete a fancy lace top to wear New Year’s Eve with black skinny pants. It is entered in the Fancy Fabrics Challange on the Threads Magazine website. Link to the site: http://www.threadsmagazine.com/item/34231/mcqueen-modified

Here are some photos:2013-12-21 22.00.38 - Copy

2013-12-21 22.03.02 - Copy
And some closeups of the details.2013-12-21 22.01.59 - Copy

2013-12-21 22.01.45 - Copy

2013-12-21 22.01.22 - Copy
This is a pic from the Alexander McQueen show at the NYC Met several years ago. I fell in love with this design but felt it needed modifying to be wearable, at least where I would go.
2013-12-11 08.27.40-1 - Copy. Please leave a comment if you like it.
Now that the holidays are over I hope to post every week, usually Mondays. I always love comments.

couture sewing

Jacket Finished

After enjoying a wonderful Thanksgiving with family, I’m back with the finished jacket.

Front View
Front View
Back View
Back View

I had some dotted silk crepe in my stash and decided to use it for the lining. I attached chain at the hemline, adding weight so the jacket hangs properly.

Side View
Side View
Lining
Lining

Next post will be first steps in the boucle jacket. I’m still exploring options for trim. This is where many non-authentic jackets fall short. The wrong trim can turn your designer jacket into an upholstery project. I’m looking closely at the designer photos for trim ideas and will report. Thanks for following me.